CHALLENGE INFORMATION
 | Platform: TryHackMe Event: Advent of Cyber 2025 Day: 17 Title: CyberChef - Hoperation Save McSkidy Bonus: Side Quest 3 Key Challenge |
Description
The story continues, and the elves mount a rescue and will try to breach the Quantum Fortress’s defenses and free McSkidy.
Summary
We tackle a multi-level CTF challenge called King Malhare’s Fortress, where we systematically break through five locked gates to free McSkidy from prison. The challenge revolves around encoding and decoding techniques, with each level introducing increasingly complex cryptographic operations. We leverage CyberChef as our primary tool to transform and decode data at each stage.
We systematically break through five fortress gates using a consistent process: Base64-encode the guard name for the username, extract the magic question from HTTP headers, send it to the guard for an encoded password, examine the Debugger to understand the encryption logic, reverse the transformations in CyberChef, and log in.

Storyline
McSkidy is imprisoned in King Malhare’s Quantum Warren, secured by five locks. He has secretly sent clues to his team revealing that the locks can be broken by analyzing their logic and exploiting a guards’ chat system to extract passwords and vital details.
Important Concepts
Encoding is a method that transforms data to ensure compatibility between different systems.
It differs from encryption in that encoding prioritizes usability and compatibility using standardized processes, whereas encryption prioritizes security using algorithms and keys. Encoding is fast but provides no security; encryption is slower but secure.
Decoding is the reverse process – converting encoded data back to its original, readable form.
CyberChef is a web-based tool that allows users to encode, decode, and transform data by chaining together various operations in a user-friendly interface.
Preparation
Things to keep in mind:
- Chat is Base64-encoded
- The guard name differs on each level
- Network headers contain the question (e.g., X-Magic-Question: What is the password for this level?)
- Hints and login logic are inside the Debugger tab
Steps for opening the gates on the different levels:
- Step-1: Identify the guard name and Base64-encode it; then use it as the username input.
- Step-2: Base64-encode the magic question from the page headers.
- Step-3: Send the encoded magic question to the chat and wait for the guard to answer with the encoded level password.
- Step-4: Identify the level login logic with Debugger.
- Step-5: Decode the answer from the guard by applying the necessary modifications with CyberChef.
- Step-6: Log in with credentials – username (encoded username from step-1) and password (the plaintext password from step-5).
Launch the target VM and the attacker box, open the website for King Malhare’s Fortress, and begin the mission to free McSkidy from prison.
There are five levels: Outer Gate, Outer Wall, Guard House, Inner Castle, and Prison Tower.
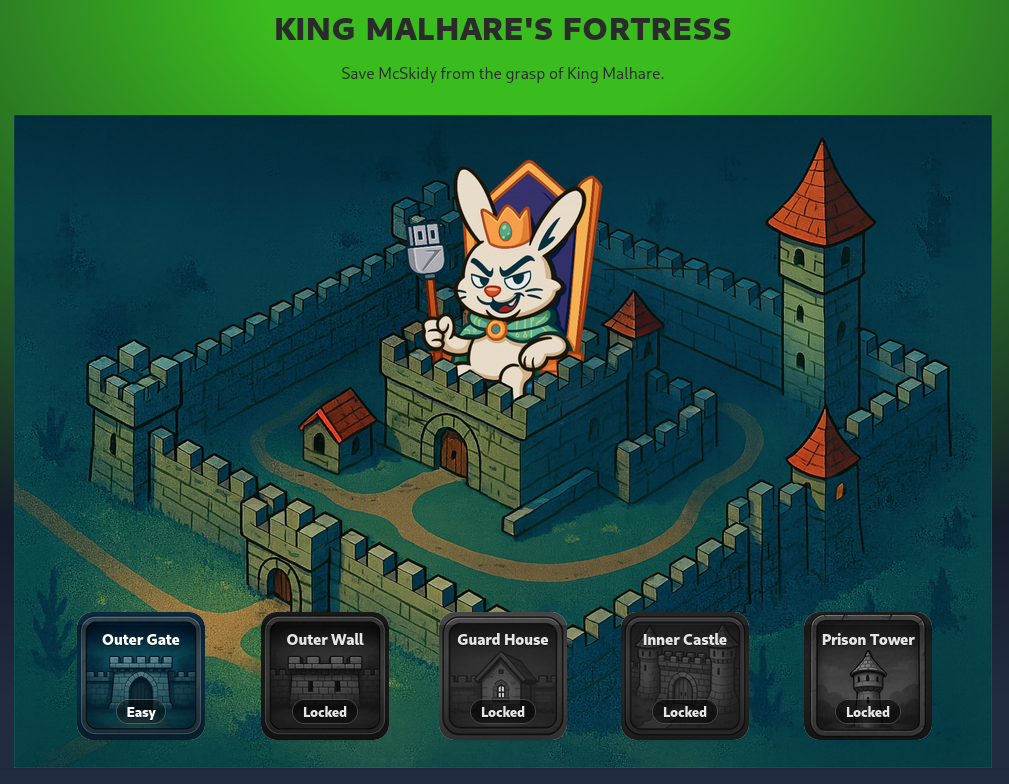
Figure 1: King Malhare’s Fortress: Five Levels
Here is the full login logic for all the different levels:
// ~app.js
...
    // User login logic
    userOk = atob(usr) === guardName;

    // Password login logic
    try {
      if (level === 1) {
        // CyberChef: From Base64
        passOk = btoa(pwd) === expectedConst;
      } else if (level === 2) {
        // CyberChef: Double From Base64
        passOk = btoa(btoa(pwd)) === expectedConst;
      } else if (level === 3) {
        // CyberChef: From Base64 => XOR(key=recipeKey)
        const bytes = xorWithKey(toBytes(pwd), toBytes(recipeKey));
        const b64 = bytesToBase64(bytes);
        passOk = b64 === expectedConst;
      } else if (level === 4) {
        // CrackStation: Hash lookup
        passOk = (md5(pwd) === expectedConst);
      } else if (level === 5) {
        const recipe =  recipeId || "R1";
        let tp = pwd;

        switch (recipe){
          case "R1":
            // CyberChef: From Base64 => Reverse => ROT13
            tp = btoa(reverse(rot13(tp)));
            break;
          case "R2":
            // CyberChef: From Base64 => FromHex => Reverse
            tp = btoa(strToHex(reverse(tp)));
            break;
          case "R3":
            // CyberChef: ROT13 => From Base64 => XOR(key=recipeKey)
            const exed = bytesToBase64(xorWithKey(toBytes(tp), toBytes(recipeKey || "hare")));
            tp = rot13(exed);
            break;
          case "R4":
            // CyberChef: ROT13 => From Base64 => ROT47
            tp = rot13(btoa(rot47(tp)));
            break;
          default:
            tp = btoa(reverse(rot13(tp)));
        }
        passOk = (tp === expectedConst);
      }
    } catch (_) {
      userOk = passOk = false;
    }
...
Laying siege to the Quantum Fortress
First Lock - Outer Gate
Question-1: What is the password for the first lock?
Iamsofluffy
Step-1: Identify the guard name and Base64-encode it.
We select the Outer Gate option – the only unlocked one – and note the guard name below the chat: CottonTail.
Since all guard names must be Base64-encoded, we navigate to CyberChef and use the To Base64 recipe, which can be found under Favourites.
For the input, we specify the guard name – CottonTail – and receive the encoded guard name under Output: Q290dG9uVGFpbA==.
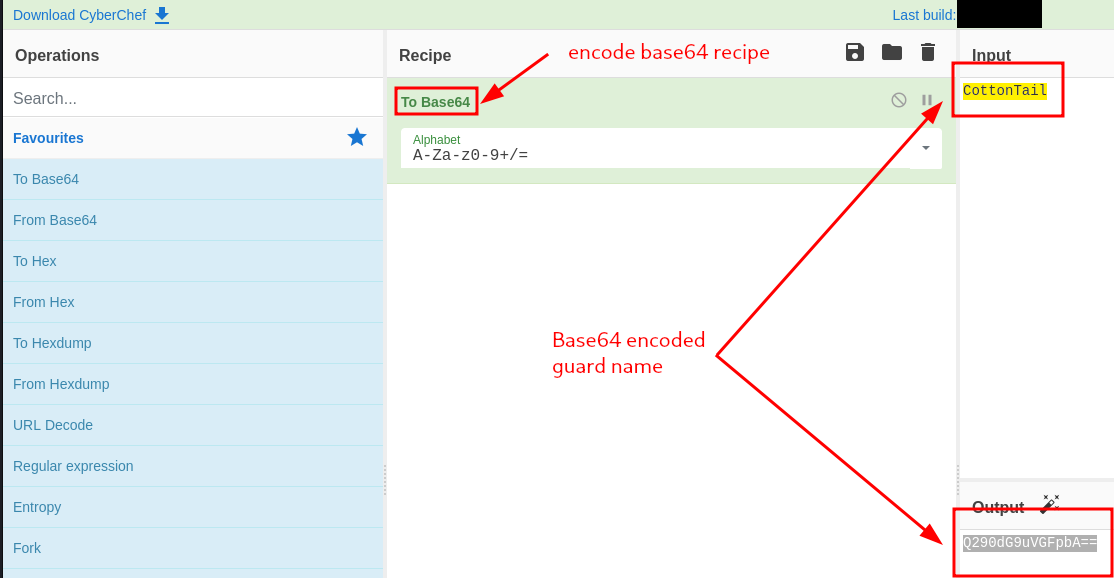
Figure 2: CyberChef Interface Showing Base64-Encoded Guard Name
To summarize:
↓ (transformation)
Q290dG9uVGFpbA== – Base64-encoded guard usernameStep-2: Base64-encode the magic question from the page headers.
In Firefox, we open the browser menu (hamburger icon) in the upper-right corner, select More Tools, and under Browser Tools select Web Developer Tools. We click on the Network tab and refresh the page.
A web request is sent to http://targetbox-ip:8080/level1, and its respective Response Headers contain a custom header named X-Magic-Question with the value “What is the password for this level?”.
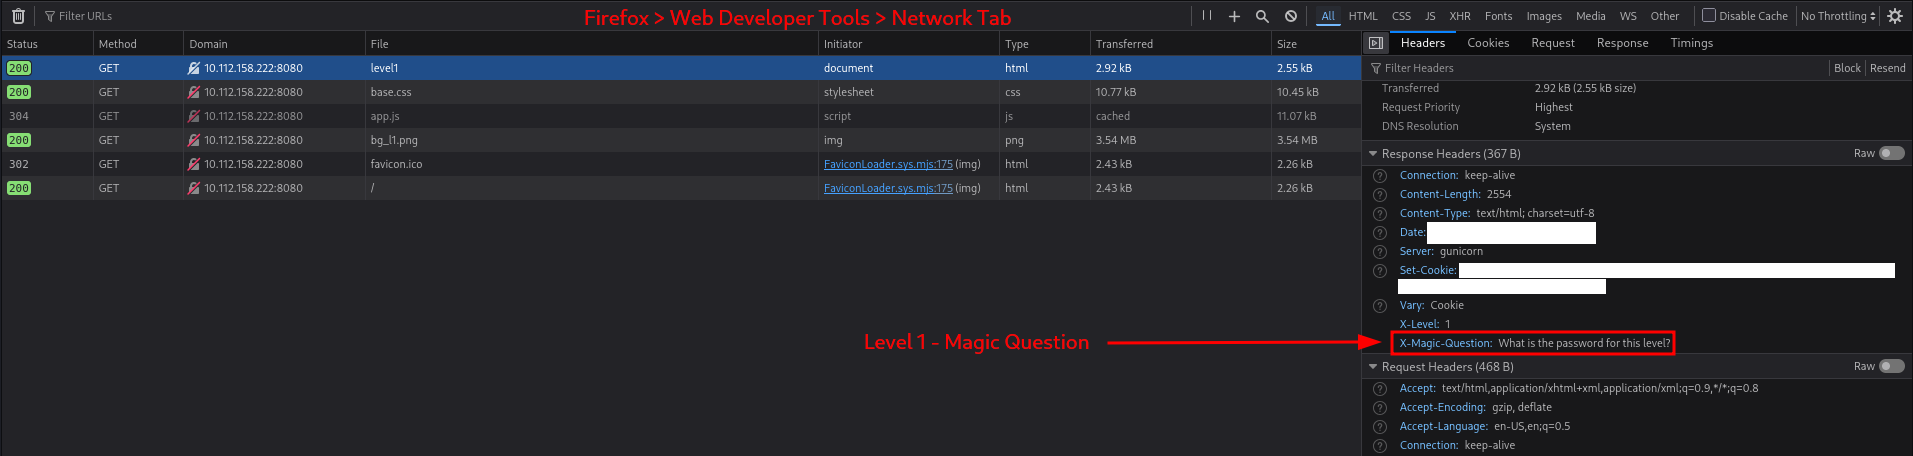
Figure 3: HTTP response headers containing X-Magic-Question
We copy this value and Base64-encode it with CyberChef:
↓ (transformation)
V2hhdCBpcyB0aGUgcGFzc3dvcmQgZm9yIHRoaXMgbGV2ZWw/ – Base64-encoded magic questionStep-3: Send the encoded magic question to the chat and wait for the guard to answer with the encoded level password.
Before proceeding, we note that the chat already contains one Base64-encoded message: QWxsIGhhaWwgS2luZyBNYWxoYXJlIQ==.
To avoid any mishaps, we decode it first with the From Base64 recipe:
QWxsIGhhaWwgS2luZyBNYWxoYXJlIQ== – Base64-encoded message↓ (transformation)
All hail King Malhare! – plaintext message
Now that we understand the context, we enter our Base64-encoded magic question (from step-2) into the chat and send it.
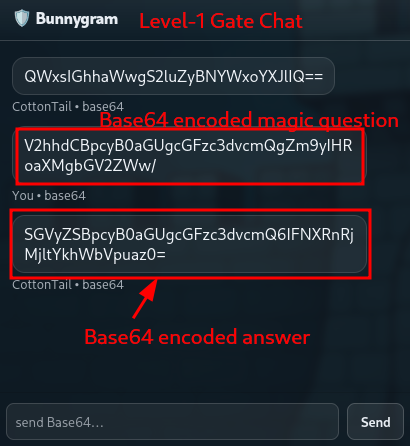
Figure 4: Chat interface with encoded message sent to guard
We immediately receive a Base64-encoded answer: SGVyZSBpcyB0aGUgcGFzc3dvcmQ6IFNXRnRjMjltYkhWbVpuaz0=.
We decode it with CyberChef using the From Base64 recipe:
SGVyZSBpcyB0aGUgcGFzc3dvcmQ6IFNXRnRjMjltYkhWbVpuaz0= – Base64-encoded message↓ (transformation)
Here is the password: SWFtc29mbHVmZnk= – plaintext message
Step-4: Identify the level login logic with Debugger.
We examine the login logic by navigating to the Debugger tab within Web Developer Tools and viewing the source code of app.js.
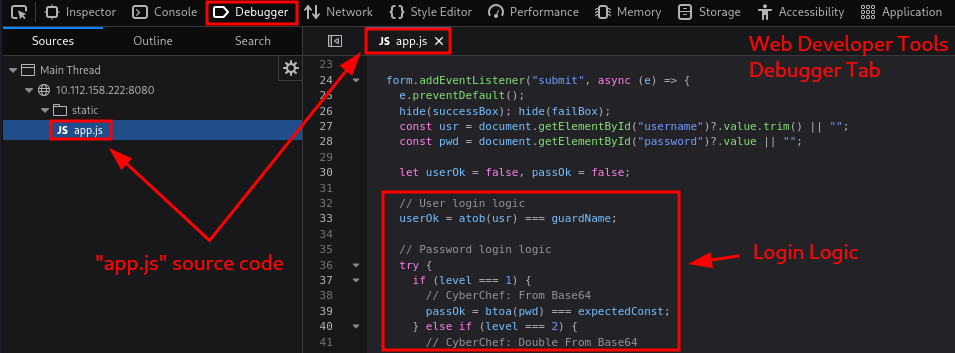
Figure 5: Firefox debugger tab showing login logic in app.js
For level 1, the following code snippets are relevant:
Username-relevant code:
- The
atob()JavaScript function decodes a string that has been Base64-encoded. - This means the guard name (username) must be Base64-encoded when entering credentials.
// User login logic
userOk = atob(usr) === guardName;
Password-relevant code:
- The
btoa()JavaScript function encodes a string in Base64 format. - This means we must input the password in plaintext format, which will then be Base64-encoded and compared to the hardcoded password.
if (level === 1) {
    // CyberChef: From Base64
    passOk = btoa(pwd) === expectedConst;
Step-5: Decode the answer from the guard by applying the necessary modifications with CyberChef.
We already decoded the answer in Step-3: Here is the password: SWFtc29mbHVmZnk=.
However, SWFtc29mbHVmZnk= – the password – is still in Base64-encoded format, so we again use the From Base64 recipe to decode it:
SWFtc29mbHVmZnk= – Base64-encoded password↓ (transformation)
Iamsofluffy – plaintext password
Step-6: Log in with credentials – username (encoded username from step-1) and password (the plaintext password from step-5).
Everything is now ready. We have:
- Username: Q290dG9uVGFpbA==
- Password: Iamsofluffy
We attempt to log in with these credentials. The attempt succeeds, and the Outer Gate door is breached.
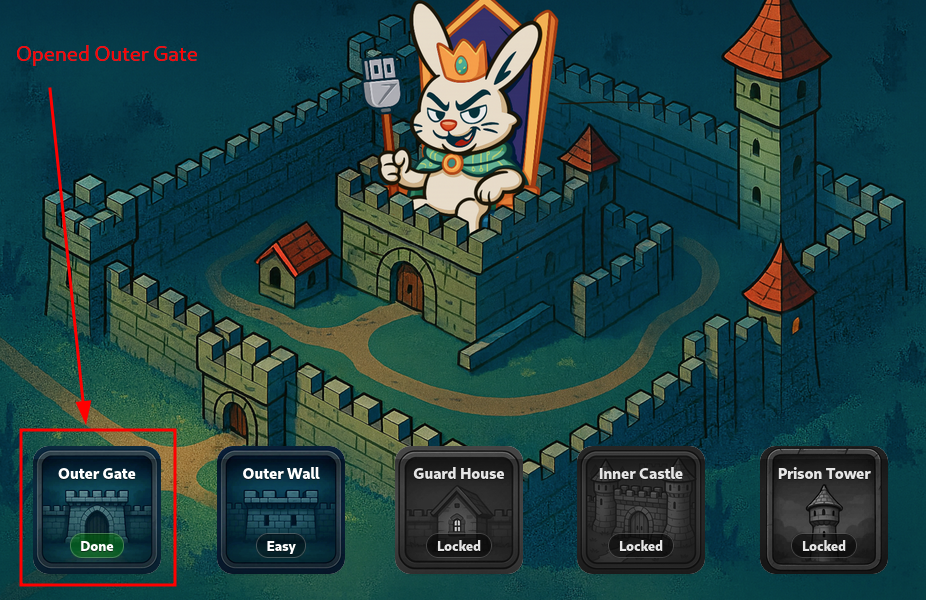
Figure 6: Outer Gate successfully breached
Second Lock - Outer Wall
Question-2: What is the password for the second lock?
Itoldyoutochangeit!
Step-1: Identify the guard name and Base64-encode it.
- Plaintext guard name: CarrotHelm
- Base64-encoded guard name:
Q2Fycm90SGVsbQ==
Step-2: Base64-encode the magic question from the page headers.
- Plaintext magic question: “Did you change the password?”
- Base64-encoded magic question:
RGlkIHlvdSBjaGFuZ2UgdGhlIHBhc3N3b3JkPw==
Step-3: Send the encoded magic question to the chat and wait for the guard to answer with the encoded level password.
- Base64-encoded answer:
SGVyZSBpcyB0aGUgcGFzc3dvcmQ6IFUxaFNkbUpIVWpWaU0xWXdZakpPYjFsWE5XNWFWMnd3U1ZFOVBRPT0= - Plaintext answer: “Here is the password: U1hSdmJHUjViM1YwYjJOb1lXNW5aV2wwSVE9PQ==”
Step-4: Identify the level login logic with Debugger.
- The
btoa()JavaScript function encodes a string in Base64 format. - This means double Base64 encoding is applied.
} else if (level === 2) {
    // CyberChef: Double From Base64
    passOk = btoa(btoa(pwd)) === expectedConst;
Step-5: Decode the answer from the guard by applying the necessary modifications with CyberChef.
- Double Base64-encoded password:
U1hSdmJHUjViM1YwYjJOb1lXNW5aV2wwSVE9PQ== - Base64-encoded password (one-time Base64-decoded):
SXRvbGR5b3V0b2NoYW5nZWl0IQ== - Plaintext password (twice Base64-decoded): Itoldyoutochangeit!
Step-6: Log in with credentials – username (encoded username from step-1) and password (the plaintext password from step-5).
- Username: Q2Fycm90SGVsbQ==
- Password: Itoldyoutochangeit!
Third Lock - Guard House
Question-3: What is the password for the third lock?
BugsBunny
Step-1: Identify the guard name and Base64-encode it.
- Plaintext guard name: LongEars
- Base64-encoded guard name:
TG9uZ0VhcnM=
Step-2: Base64-encode the magic question from the page headers.
Instead of a magic question header, we have a new one: X-Recipe-Key with ‘cyberchef’ as the value.
Step-3: Send the encoded magic question to the chat and wait for the guard to answer with the encoded level password.
- There is no magic question, so we politely ask the guard for it with “Password please.”
- Plaintext question: “Password please.”
- Base64-encoded question:
UGFzc3dvcmQgcGxlYXNlLg== - Base64-encoded answer:
SGVyZSBpcyB0aGUgcGFzc3dvcmQ6IElRd0ZGakFXQmdzZg== - Plaintext answer: “Here is the password: IQwFFjAWBgsf”
Step-4: Identify the level login logic with Debugger.
Password-relevant code:
} else if (level === 3) {
    // CyberChef: From Base64 => XOR(key=recipeKey)
    const bytes = xorWithKey(toBytes(pwd), toBytes(recipeKey));
    const b64 = bytesToBase64(bytes);
    passOk = b64 === expectedConst;
The custom JavaScript function toBytes() converts a string into a byte array (Unicode/ASCII code points).
function toBytes(str) {
    const out = new Uint8Array(str.length);
    for (let i = 0; i < str.length; i++) out[i] = str.charCodeAt(i) & 0xff;
    return out;
}
The custom JavaScript function xorWithKey() XORs a byte buffer with a repeating key.
function xorWithKey(buf, key) {
    if (!key || key.length === 0) return buf;
    const out = new Uint8Array(buf.length);
    for (let i = 0; i < buf.length; i++) out[i] = buf[i] ^ key[i % key.length];
    return out;
}
The custom JavaScript function bytesToBase64(bytes) converts a byte array into a Base64-encoded string.
function bytesToBase64(bytes) {
    let bin = "";
    for (let i = 0; i < bytes.length; i++) bin += String.fromCharCode(bytes[i]);
    return btoa(bin);
}
Put simply, the key and the password are first converted into byte arrays; then XOR (with repeating key) is applied to them. Finally, this resulting byte array is converted into a Base64-encoded string.
Step-5: Decode the answer from the guard by applying the necessary modifications with CyberChef.
- Base64-encoded password:
IQwFFjAWBgsf - Applying recipe From Base64 on input
IQwFFjAWBgsf - Applying recipe XOR with key ‘cyberchef’ with UTF-8 encoding
- Output: BugsBunny
Step-6: Log in with credentials – username (encoded username from step-1) and password (the plaintext password from step-5).
- Username: TG9uZ0VhcnM=
- Password: BugsBunny
Fourth Lock - Inner Castle
Question-4: What is the password for the fourth lock?
passw0rd1
Step-1: Identify the guard name and Base64-encode it.
- Plaintext guard name: Lenny
- Base64-encoded guard name:
TGVubnk=
Step-2: Base64-encode the magic question from the page headers.
No magic question this time, so we move on.
Step-3: Send the encoded magic question to the chat and wait for the guard to answer with the encoded level password.
- There is no magic question, so we politely ask the guard for it with “Password please.”
- Plaintext question: “Password please.”
- Base64-encoded question:
UGFzc3dvcmQgcGxlYXNlLg== - Base64-encoded answer:
SGVyZSBpcyB0aGUgcGFzc3dvcmQ6IGI0YzBiZTdkN2U5N2FiNzRjMTMwOTFiNzY4MjVjZjM5 - Plaintext answer: “Here is the password: b4c0be7d7e97ab74c13091b76825cf39”
Step-4: Identify the level login logic with Debugger.
Password-relevant login for level four:
} else if (level === 4) {
    // CrackStation: Hash lookup
    passOk = (md5(pwd) === expectedConst);
Put simply, MD5 is applied to the password, so we must crack the hash we received to find the matching plaintext password.
Step-5: Decode the answer from the guard by applying the necessary modifications with CyberChef.
- MD5 password hash:
b4c0be7d7e97ab74c13091b76825cf39 - We crack it with CrackStation
- Cracked plaintext password: passw0rd1
Step-6: Log in with credentials – username (encoded username from step-1) and password (the plaintext password from step-5).
- Username: TGVubnk=
- Password: passw0rd1
Fifth Lock - Prison Tower
Question-5: What is the password for the fifth lock?
51rBr34chBl0ck3r
Step-1: Identify the guard name and Base64-encode it.
- Plaintext guard name: Carl
- Base64-encoded guard name:
Q2FybA==
Step-2: Base64-encode the magic question from the page headers.
- Custom header X-Recipe-ID: ‘R3’
- Custom header X-Recipe-Key: ‘cyberchef’
Step-3: Send the encoded magic question to the chat and wait for the guard to answer with the encoded level password.
- There is no magic question, so we politely ask the guard with “Password please.”
- Plaintext question: “Password please.”
- Base64-encoded question:
UGFzc3dvcmQgcGxlYXNlLg== - Base64-encoded answer:
SGVyZSBpcyB0aGUgcGFzc3dvcmQ6Ikl4dERXak9ES05MQlZFSUZPdXlEVHQ9PQ== - Plaintext answer: “Here is the password: IxtDWjODKNLBVEIFOuyDTt==”
Step-4: Identify the level login logic with Debugger.
Relevant login logic code:
} else if (level === 5) {
    const recipe =  recipeId || "R1";
    let tp = pwd;

    switch (recipe){
        case "R1":
            // CyberChef: From Base64 => Reverse => ROT13
            tp = btoa(reverse(rot13(tp)));
            break;
        case "R2":
            // CyberChef: From Base64 => FromHex => Reverse
            tp = btoa(strToHex(reverse(tp)));
            break;
        case "R3":
            // CyberChef: ROT13 => From Base64 => XOR(key=recipeKey)
            const exed = bytesToBase64(xorWithKey(toBytes(tp), toBytes(recipeKey || "hare")));
            tp = rot13(exed);
            break;
        case "R4":
            // CyberChef: ROT13 => From Base64 => ROT47
            tp = rot13(btoa(rot47(tp)));
            break;
        default:
            tp = btoa(reverse(rot13(tp)));
    }
    passOk = (tp === expectedConst);
}
Given that Recipe-ID=R3 was allocated to us – see the response header from step-2 – the following logic is relevant:
Step-5: Decode the answer from the guard by applying the necessary modifications with CyberChef.
We apply the recipes accordingly:
- First recipe: ROT13 with
IxtDWjODKNLBVEIFOuyDTt==as the Input - Second recipe: From Base64
- Third recipe: XOR with key ‘cyberchef’ in UTF-8 encoding
- Output: 51rBr34chBl0ck3r
Step-6: Log in with credentials – username (encoded username from step-1) and password (the plaintext password from step-5).
- Username: Q2FybA==
- Password: 51rBr34chBl0ck3r
Once the last gate is breached and the fortress taken, we are provided with the flag.
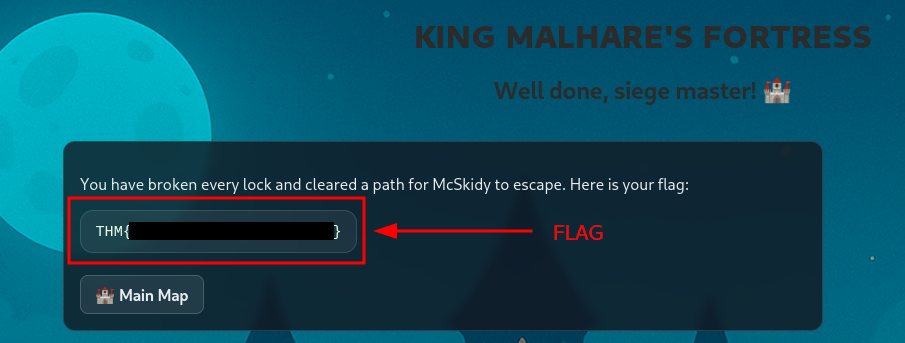
Figure 7: Retrieved flag after breaching the Prison Tower
Question-6: What is the retrieved flag?
<redacted-flag>
Epilogue
Question-7: If you found decoding secrets interesting, you can also check out the Introduction to Cryptography, which dives into the world of cryptography.
No answer needed
Side Quest 3 Key Challenge
Question: Looking for the key to Side Quest 3? Hopper has left us this cyberchef link (opens in new tab) as a lead. See if you can recover the key and access the corresponding challenge in our Side Quest Hub!
The challenge link leads to an assembled CyberChef recipe with the following input:
Hopper managed to use CyberChef to scramble the easter egg key image. He used this very recipe to do it. The scrambled version of the egg can be downloaded from:

Reverse the algorithm to get it back!
We download the scrambled easter egg key image and save it as scrambled-easter-egg.png.

Figure 8: Scrambled easter egg key displayed as grayscale noise
The image appears as gray noise – visual static with no discernible pattern.
Analyzing the Algorithm
We examine the assembled recipe by navigating to Save recipe > CLEAN JSON > Specify a recipe name > SAVE.
This is the original encoding recipe in JSON format:
[
  { "op": "To Base64",
    "args": ["A-Za-z0-9+/="] },
  { "op": "Label",
    "args": ["encoder1"] },
  { "op": "ROT13",
    "args": [true, true, false, 7] },
  { "op": "Split",
    "args": ["H0", "H0\\n"] },
  { "op": "Jump",
    "args": ["encoder1", 8] },
  { "op": "Fork",
    "args": ["\\n", "\\n", false] },
  { "op": "Zlib Deflate",
    "args": ["Dynamic Huffman Coding"] },
  { "op": "XOR",
    "args": [{ "option": "UTF8", "string": "h0pp3r" }, "Standard", false] },
  { "op": "To Base32",
    "args": ["A-Z2-7="] },
  { "op": "Merge",
    "args": [true] },
  { "op": "Generate Image",
    "args": ["Greyscale", 1, 512] }
]
The recipe is difficult to understand at first glance, so we break it down step by step:
To Base64: Encodes the input as Base64 (standard alphabet: A-Za-z0-9+/=).
Label ’encoder1’: Sets a checkpoint for looping back to later.
ROT13: Applies ROT13 cipher with specific parameters (rotates letters by 13 positions, applies to both uppercase and lowercase).
Split on ‘H0’: Breaks the string wherever ‘H0’ appears, creating an array of chunks separated by newlines.
Jump to ’encoder1’ by 8: Loops back to the Label operation, executing steps 2–4 again eight times (iterative encoding).
Fork on newlines: Splits the data by newline characters and processes each chunk independently through the remaining steps in parallel.
Zlib Deflate: Compresses each chunk using Zlib compression with Dynamic Huffman Coding.
XOR with ‘h0pp3r’: Encrypts each chunk by XORing it with the UTF-8 string ‘h0pp3r’.
To Base32: Encodes the result as Base32 (alphabet: A-Z2-7=).
Merge: Recombines all the forked chunks back together.
Generate Image: Converts the final Base32 data into a grayscale image with 1-bit color depth and 512-pixel row width.
Put simply:
Input: Easter Egg Image
- Base64
- Encoder Loop – x8 times:
- ROT13 by 7 shifts
- Split on ‘H0’ – split up data into array
- Fork on newlines
- Parallel Processing – process each chunk independently
- Zlib Deflate
- XOR with ‘h0pp3r’
- Base32
- Merge – recombine all forked chunks back together
- Generate Image
Output: Scrambled easter egg image
To reverse this process, we construct the following recipe:
Input: Scrambled easter egg image
- Extract Image – read pixel data as binary
- Fork on newlines
- Parallel Processing – process each chunk independently
- From Base32 – decode Base32
- XOR with ‘h0pp3r’
- Zlib Inflate — reverse operation to deflate
- Merge – recombine all forked chunks back together
- Decoder Loop – x8 times:
- Join on ‘H0’ – join up arrays
- ROT13
- From Base64 – decode Base64
Output: Easter Egg Image
Two issues complicate this approach: CyberChef provides no Extract Image or Join recipes. Additionally, ROT13 with 7 shifts requires different handling when reversed. We address these challenges with alternative solutions.
Extracting the Raw Bytes from the Image
Given that CyberChef lacks an Extract Image recipe, we extract the raw bytes manually.
The Generate Image Recipe
The Generate Image recipe converts raw byte data into a visual image. It interprets the input bytes as pixel color values and creates an image based on those values.
With our settings – Greyscale, Pixel Scale Factor: 1, and Pixels per row: 512:
- Each byte becomes one pixel. Every single byte in our input data is interpreted as a grayscale value (0–255).
- Image width is 512 pixels. The recipe arranges our bytes in rows of exactly 512 pixels.
- Height is calculated automatically. If we have 1,024 bytes, we get a 512×2 pixel image. If we have 2,560 bytes, we get a 512×5 pixel image (rounded up).
- No scaling is applied. With a scale factor of 1, the final image stays at its native pixel dimensions (no enlargement).
Moreover, Greyscale means that we use only the alpha/transparency channel, not the RGB (red, green, blue) channels from RGBA. Consequently, we cannot use the Extract RGBA recipe, given that we only want to extract one channel – the alpha channel.
Therefore, we extract the raw byte data ourselves.
Extracting the Raw Bytes with Python
We create a Python script named extract-image-pixels.py to perform this extraction:
# ~ extract-image-pixels.py
from PIL import Image

def extract_bytes_from_greyscale_image(image_file, output_file=None):

    # Open the image
    img = Image.open(image_file)

    # Ensure it's in greyscale mode
    if img.mode != 'L':
        img = img.convert('L')

    # Convert image to bytes
    byte_data = bytes(img.tobytes())

    # Save to file if specified
    if output_file:
        with open(output_file, 'wb') as f:
            f.write(byte_data)
        print(f"Extracted {len(byte_data)} bytes to {output_file}")
    else:
        print(f"Extracted {len(byte_data)} bytes")

    return byte_data

# Usage
extracted_bytes = extract_bytes_from_greyscale_image("scrambled-easter-egg.png", output_file="extracted_bytes.txt")
The script extracts pixels from the single channel, converts them to bytes, and writes them to extracted_bytes.txt
The script uses the Python Imaging Library (PIL), which we install (if not already present) with pip install pillow.
We make the script executable with chmod +x extract-image-pixels.py and run it with python extract-image-pixels.py.
Here is a sample of extracted byte data from the scrambled image:
CCWJ3NT24TBAAZHXYJ3VTICQOI6XHAPLGZM2C232FJQ7YEXXLSNQ7XWQ57JNPDE6ZSE52MWUA5H6YJULR5GUWQZRLQ7K6GOJQ5ZQXGEIVVSSJIBP3WW7BTAI7EDDS75V2ZHSAC4SVSYMUYURWQRD7EPNWEOS3HFR45W33QQBIXX6SMJKER23LZ2HGT57EIXLDA5C3ELCXQR6D6LESQ7QOK6J2AMWH5QWV36Z34LSND6Z62R767UC3YVYXVML6NL6MLIVYIMH2RZXKD43D3OSBVO3NM7UTCRIX6O6BXFXJIEOQVGQOBOBFTGW33GZLJ6P72Q6UF65X75R57I3ILOTRZO3A67IS7JF2SHN3KXJDWCH4RMMKRB4CGAQ63UOPVS5ESQCBDHP4SMDCN3Y45RS3QLBD7PJVPMFWSTOOZ2LTWMO5EVJOYEH3HRZ5MGOHQXKYAJUFJZBWUTQKTWUH7JPDJVVLZCKQKYXRRWDA2G4WSX5XHVKRCTQMMTK4TL6RYFXDQDGAUPI5XC6UVSWVAY346OTKDXKWU6WVQDAI6VTEQWYPLTH2YYFRHWIW7NT6GEA45QYCA4JZ2ARGSRYBQ6RUDRUUJU5VLLBNVCUCJO3FRJHN6KIUMHVBPNEYSV27DNKSBVUYDPUGHEXAILYRXG76ZJJRTZ3FK7PFDAKPL6BN7KISCFNTEZ547AZAA5FBCXCUSGMFTBCFVYNPQ3EIT4ODI6CXQT6QS76BIBWASKPJXSAHOS4QMXHMFIMZ2YKM5ZTNZGLUDDR5BHINQY5SX6GIS7VKXHU3JK4WLSA====
CCWHLMH34QVYA7YCQPDOEEZCBO2SFYVLAX4T34A4YCCYGH4FLDXL5IBZWOAOGVKDWALZUIRTRMMN7JZZBLBMKNFPQRWHTHOXOLRTPEJ4KIZTYQGPC5ZWKZ36AUZ3KVCHO4PZYZKSK46SK4X4VVHXLVOF6WPIFA3OFIM6P2G37VSAHAVZTZTHSULC4Q5XGIXV42HGCPAGA7KHSGY5QAAKS745TVD5AMSUSTSUMG4U5ASZVDACD6CXGF4QEC4U5H2YER3JCYYMXMKYHCOBUL62OJPHBDU4H7RWOZ2HQTQGIEXGDHYPP2XWYCRLFEZVCU3YHJ5566UWUDDSF5AOCZGYO2JFX4M6ZIGBHLDGEQJDR5USUPR62ZF552FQFBNQJH3S5ML3TLPRNWH54PYZ5QP5FA3ABRTCMEVUMEI3NQIZBLSQ6QMNUT4B4DI=
CCWH3IDUYTVAA4BQ4J3VCOBYN5YVUYVYHBOQAGEAWL2MVSMNL7AL4SYEHLZUW5LJAFUGOJKKNPZGS5G7FEU7BHEHLXP2KZBDSABUTY7YR3R25XPVCRQV4CE3BONQMB5LTVSOFAESQD2BPDTIRCRKF627MF5BL5SSLFZ4UL5V4QT4XJFJDXXOEAIVL53Y3FIJU4ZK3EUPN7SORVPCCVXHYB476UZBBL3CZED5PJ5AQOYZ3FZTULZ4FIVAONSXPOGAKXATMMSC2KRSFEQ3GQMTLIPLZGCETBZWCJ66UJ66RFHX536WZ5RVTSFKE4JGFEQWUQ6MS65EU6HTFNPDBR5YNJIOA3G5SLE4TZLDKY32WOUKXOXWQWZSKPHLXBHM7RKRZW26OA35F2HCIB55LXUZH6XZPPE6E3JI66GA2HMZUPXZ42VZDYJ4OX5526556QO263XUO5H2UHWGNSEN33FUBTJTFPW3SC2YCIVX2PW3VE6MHDNISDLZFXQXU2PY253PVKS7YUCBBYCFNT42J6LFKHSS2SRHDVCAH4ARD5HX3Y33FQKX6BCWKHABWISNXNBAMBFYM3OY2LJJA2Y4FLXSSCQMSJRGDDHIHMGPX3DYLL3U43RKDTKQSXVKLHZVOQ4WEMEI5LFBES65LE32MGSZQQPNBJQIREMROK2XFETVOO5K5ASIRLNK4ZNLFCFE2CGXUC76ELFXB4MUZ3E3QWEOEJ2FO7X2LKF37BON4EAGHN7UUJYJO4JYZQQOWAX43FU4UWWFIUKY7WSFJHOU6FUHFC7HCK4BF2TKKBBDS6ASKXF3RIFOAVBMED3ST4JCJQ52X3EDHXB2K2IXPIICTYHTMQW7UY2V4IRDS7GKTAMSWYXXW4SXT3GLWYAN3GEQSLOTLMBUPVZ6MZ2AELC2XKOZGTE76DM6XZQ6YK6I5JGVHJQ2MJ2B23QRK4ZUCCEU4HRA4KSZ3RHHPHKBDHJWUX2MIGNLTMQBG7MLHD5V24PG2XDTZDOGXMA4BPKLZYZNL3MBLQWX7EET6HUBQB47JTMDJR55ZOBKXRZHCJNRCANYDZ3IEA56UEZZC34LLXQAAT572VWJHC2NS3YSPOHYPYFEIM5GBHVEUPAIJUVGN52SJIANBMMN2YUBGLXYRNOT3GSR7FWJF4ZJTGDXUG6VVSJIH4VDZ5M6PPMDB6P7KMXNJMUABBK6QPXP7HUMCC2NVZVSZS2E7CLMZXBF24BBB4LTOOAG
CCWHK4HSPDVRBBHTRFLJBXC4CUG6V7GSAAOAJP5LPYFMCAONG2LMYCZMUY4NBNIWIOKKGXNJLACQSR76JREUFJR7UCLNHWEDZPNYTB3JCMQLFYDCO347U4INOO6W6RYJM2MA====
CCWHLMFSPZUDA4DSAPLXJOSWB6ZZ2AZQONPDEUA=
CCWHL4DSPNUDA6DTDAVYTQCVTBYLMYW3N4I4OP2VXPSBCJFINOWQ====
CCWHK4HM5UVABDD73GZQMXR577ORTMTFTZ4LMRNOMLLPRRQRC5GW6GFW2PLATCQ5RCMLZVVKZOCSCIC24XP52VRWP45C5BA6RAPK3GJYVEGRDSM4AQBGOGUUFTWL4HTW7NCFXYZTMZBVBZGI5344SCCUDFM65E5JM3Q6EXQPKUFNWCX6JVCPY4JIA66YCRDBKKC6YDVR7RX4SHT5LZOZKFVVV2IXNZG3W5RCJRYOPH5YOMUYL4SBAG5MUPF3ZMMXOVKQBQS67CWL56JM44CVOEIDUK7TLXHX7VONFWRFOVRLUQIBZDSSDJHDGPUQ6PM3JOR7FPV5PC7ZBHRJUWB5YPH6ITHMN2D6EJ7K473NQEEDP2PCNQGTH52KNHKQ====
CCWHK4HYPDWBBAHTYVBIVME6NS3FMNHRWKYFP7PJE34GDXXRSJFQD5HKB67QJYRGUTWX2EO3NHL2EGLBV5R7TLBQ2YXYMQGU2DGXEXOPZVZUHU2KONZEUDAFBH3WAMBTPLUSMEQ=
...
Reversing the Other Recipes
Split
Having successfully reversed the Generate Image recipe, we now address the Split recipe. Its reverse – the Join recipe – is unavailable in CyberChef.
Essentially, the Split recipe divides input data into separate parts based on a delimiter. The recipe takes our input data and splits it wherever it finds the delimiter ‘H0’ (a hex value). It then joins the resulting pieces back together with ‘H0\n’ (the hex value H0 followed by a newline) as the separator.
This operation is essentially a find-and-replace disguised as a split: it replaces occurrences of ‘H0’ with ‘H0\n’, effectively adding newlines after every ‘H0’ occurrence in the data.
Therefore, instead of Join, we use the Find / Replace recipe.
Base32 and Base64
The reverse operations for To Base64 and To Base32 are From Base64 and From Base32, respectively.
Fork and Merge
The reverse operation for Fork is Merge, and vice versa.
XOR
There is no reverse operation for XOR; we simply apply it again.
Jump and Label
To reverse the loop, we apply the same loop structure but process it in the opposite direction.
ROT13 by 7
During encryption, ROT13 was applied with an amount of 7, which is essentially ROT7 (shifting letters 7 positions forward in the alphabet).
To reverse ROT7 encryption, we do not apply ROT7 again – we apply the inverse. The inverse of ROT7 in a 26-letter alphabet is ROT19 (because 7 + 19 = 26, wrapping around the alphabet back to the start).
To decrypt ROT7, we shift 7 positions backward, which is equivalent to shifting forward by the complement: 26 − 7 = 19.
Therefore, instead of applying ROT7 (or ROT13 with 7 shifts), we apply ROT19 – or ROT13 with 19 shifts.
Assembling the Pieces
With all components prepared, we apply the reverse recipes to the extracted byte data from the scrambled image.
Input: Extracted pixel data as binary
- Fork on newlines
- From Base32
- XOR with ‘h0pp3r’
- Zlib Inflate
- Merge
- Decoder Loop – x8 times:
- Find / Replace: ‘H0\n’ –> ‘H0’
- ROT13 by 19
- From Base64
Output: Restored easter egg image
Here is the complete reversed recipe in JSON format:
[
  { "op": "Fork",
    "args": ["\\n", "\\n", false] },
  { "op": "From Base32",
    "args": ["A-Z2-7=", true] },
  { "op": "XOR",
    "args": [{ "option": "UTF8", "string": "h0pp3r" }, "Standard", false] },
  { "op": "Zlib Inflate",
    "args": [0, 0, "Adaptive", false, false] },
  { "op": "Merge",
    "args": [true] },
  { "op": "Label",
    "args": ["decoder1"] },
  { "op": "Find / Replace",
    "args": [{ "option": "Regex", "string": "H0\\n" }, "H0", true, false, true, false] },
  { "op": "ROT13",
    "args": [true, true, false, 19] },
  { "op": "Jump",
    "args": ["decoder1", 8] },
  { "op": "From Base64",
    "args": ["A-Za-z0-9+/=", true, false] }
]
Once applied, we save the output as an image: Output > Save output to file > easter-egg.png.
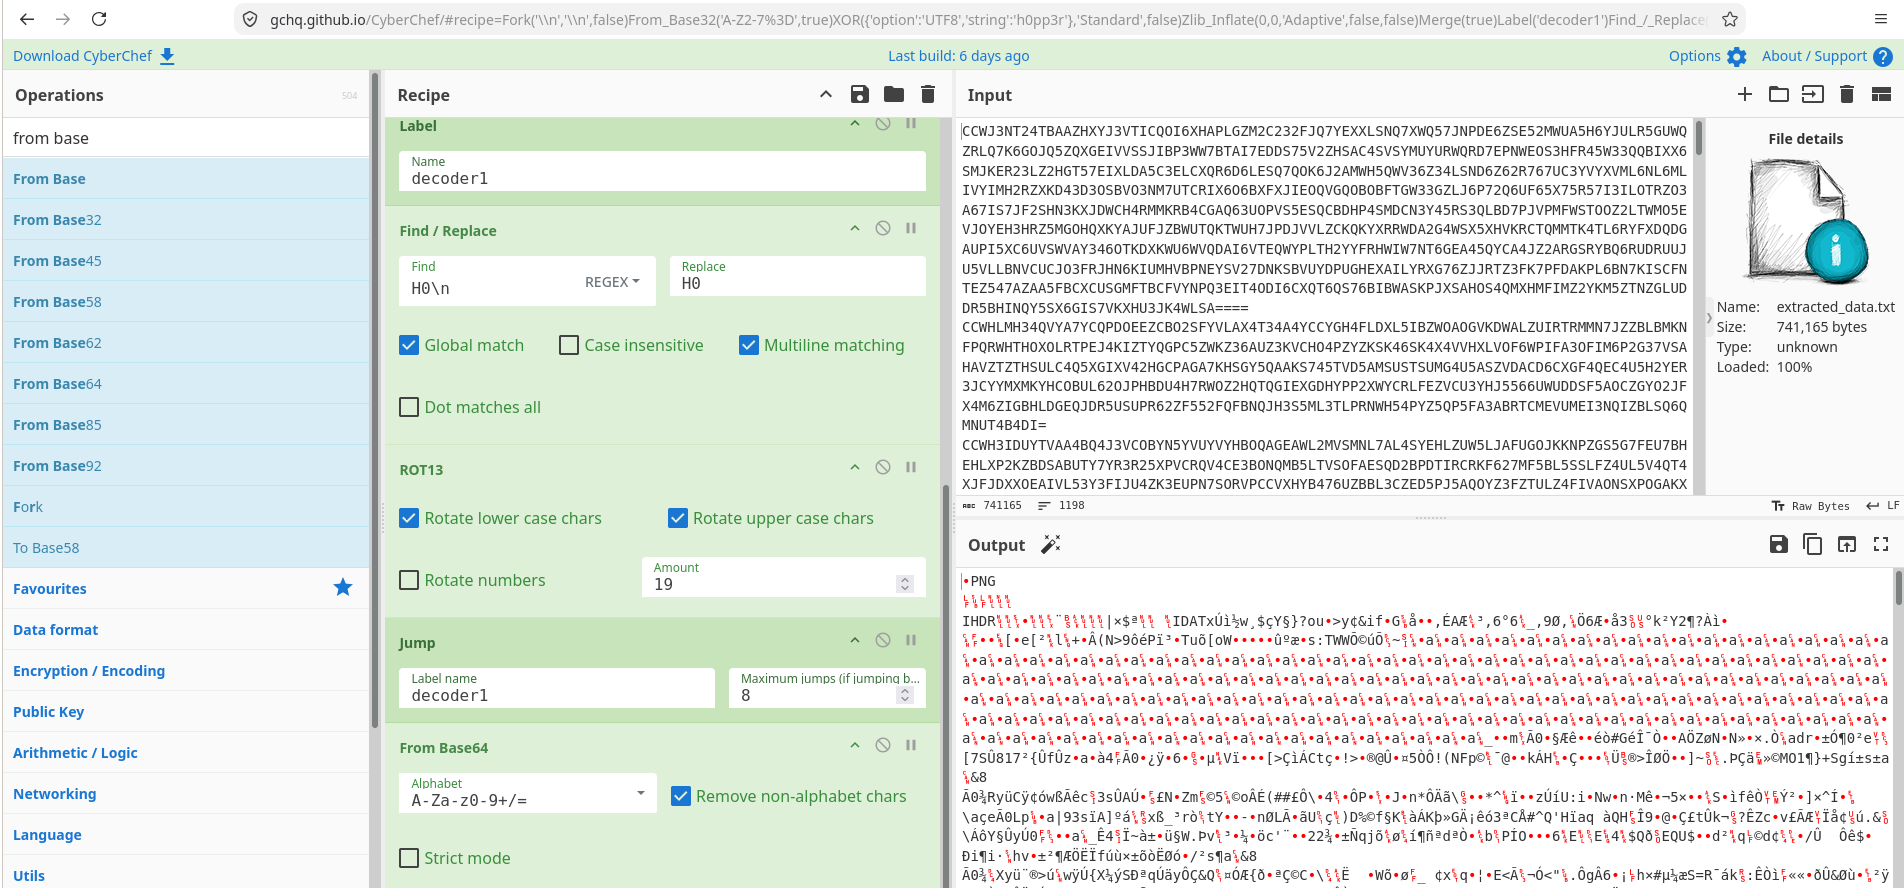
Figure 9: Reversed decoding recipe configured in CyberChef
The reversed easter egg reveals the Side Quest 3 Challenge Key: