Challenge Information
Platform: TryHackMe
Path: Web Fundamentals
Room: Walking an Application
Description: Manually review a web application for security issues using only your browser’s developer tools. Hacking with just your browser, no tools or scripts.
Walking an Application
Read the introduction and the brief breakdown of the room. Ensure the virtual machine is started.
Question 1: I confirm that I have deployed the virtual machine and opened the website.
No answer needed
Exploring the Website
Explore the website and its various directories. To gain a more comprehensive understanding, run Gobuster to discover common directories.
gobuster dir -u https://10-10-205-27.p.thmlabs.com/ -w /usr/share/dirb/wordlists/common.txt
COMMAND     DESCRIPTION
gobuster    Gobuster is a tool used to brute-force URIs, including
            directories and files, as well as DNS subdomains.

OPTIONS                 DESCRIPTION
<command> (dir)         Uses directory/file enumeration mode
-u / --url string       The target URL
-w / --wordlist string  Path to the wordlist
Below is the complete terminal interaction in Kali Linux:
user@kali:~$ gobuster dir -u https://10-10-205-27.p.thmlabs.com/ -w /usr/share/dirb/wordlists/common.txt
...
/assets               (Status: 301) [Size: 178] [--> http://10-10-205-27.p.thmlabs.com/assets/]
/contact              (Status: 200) [Size: 3108]
/customers            (Status: 302) [Size: 0] [--> /customers/login]
/development.log      (Status: 200) [Size: 27]
/monthly              (Status: 200) [Size: 28]
/news                 (Status: 200) [Size: 2538]
/private              (Status: 301) [Size: 178] [--> http://10-10-205-27.p.thmlabs.com/private/]
/robots.txt           (Status: 200) [Size: 46]
/sitemap.xml          (Status: 200) [Size: 1495]
...
user@kali:~$Note that by running a simple directory enumeration, we discovered three folders not listed in the task: /assets, /monthly, and /private.
In addition to the directories, several interesting file paths were discovered: /development.log, /sitemap.xml, and /robots.txt.
In a penetration-testing scenario, these files could contain valuable information; however, as that is not the objective of this room, we will skip them and proceed to examine the main page in the browser.
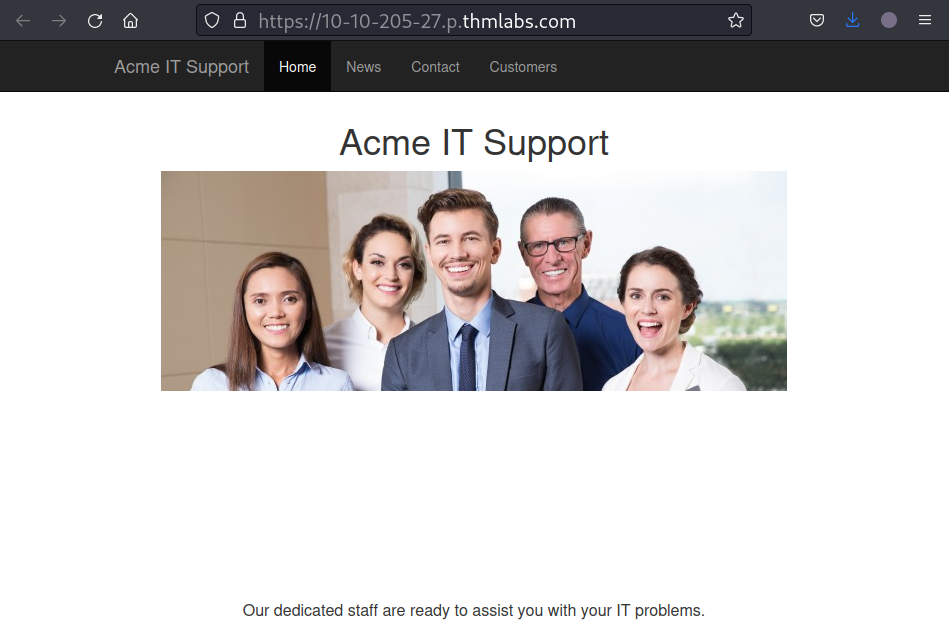
Figure 1: Landing page on target website
Question 1: Read the above.
No answer needed
Viewing the Page Source
Examine the page source (HTML source code), and follow the instructions in the task to obtain the flags.
Question 1: What is the flag from the HTML comment?
<redacted-flag>
To obtain the first flag, locate the webpage hidden in the developer’s comment. In Firefox, press CTRL+U to view the page source code.
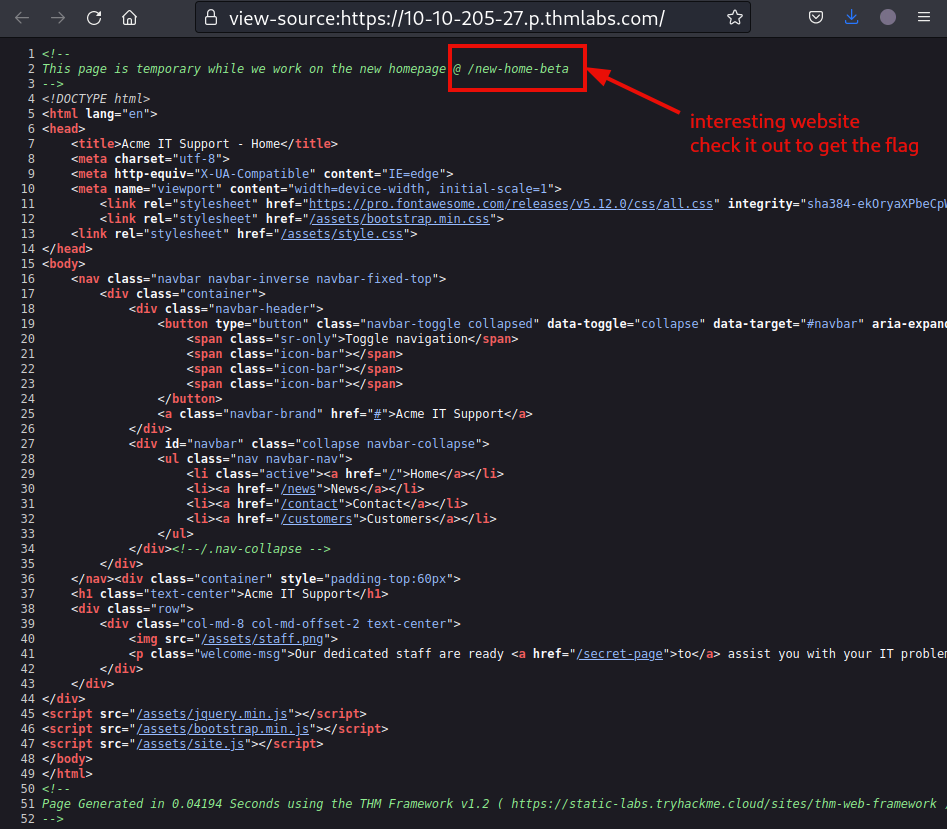
Figure 2: Hidden page within comments in the landing page’s source code
Navigate to the hidden website mentioned by the developer, and retrieve the flag.

Figure 3: Redacted flag on /new-home-beta
Question 2: What is the flag from the secret link?
<redacted-flag>
Another hidden page is mentioned further down in the page source.
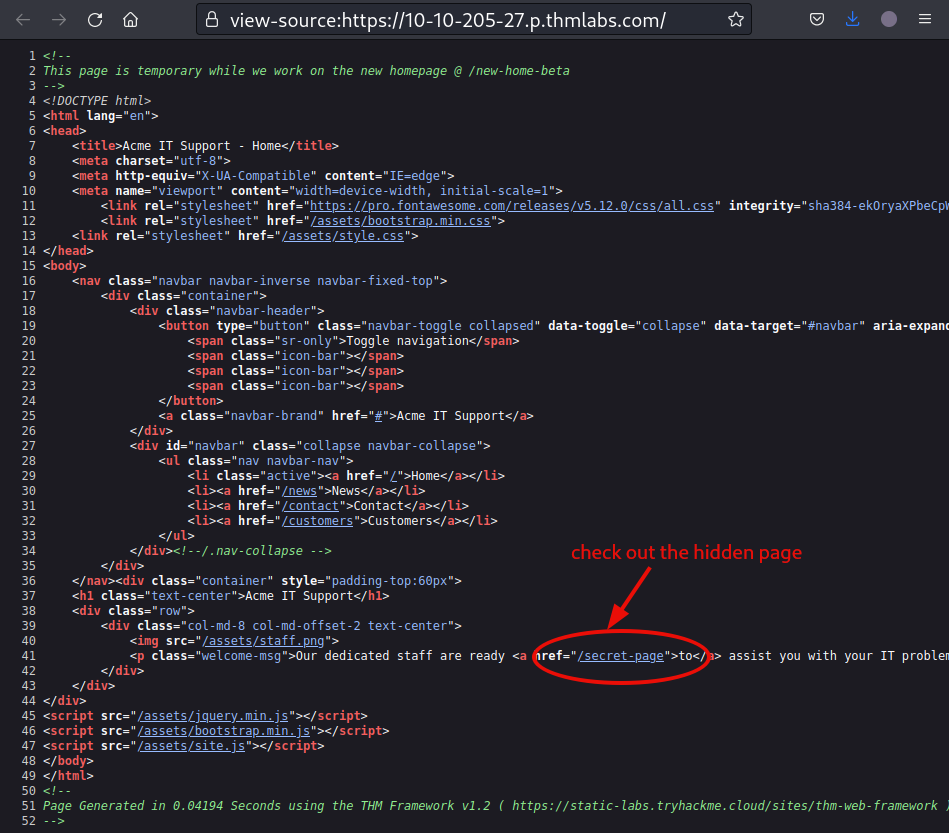
Figure 4: Hidden reference in the landing page’s source code
As before, navigate to the page to retrieve the flag.

Figure 5: Redacted flag on /secret-page
Question 3: What is the directory listing flag?
<redacted-flag>
As mentioned, a configuration error exists in the web application: the directory listing feature remains enabled. Consequently, we can traverse the /assets directory and retrieve the flag stored in the flag.txt file.
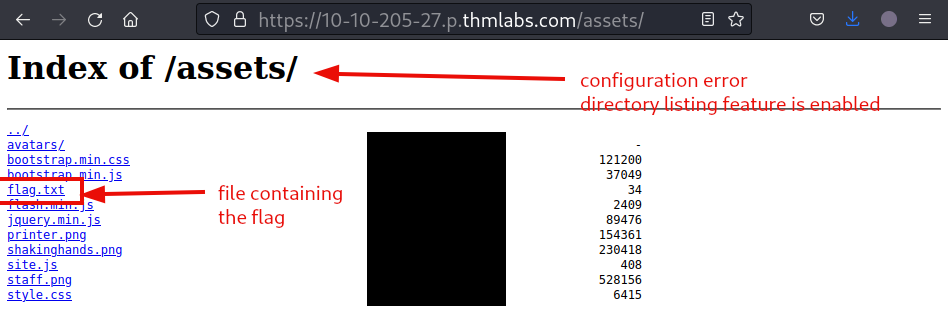
Figure 6: Enabled directory traversal for /assets

Figure 7: Redacted flag from /assets/flag.txt
Question 4: What is the framework flag?
<redacted-flag>
For the final flag in this task, follow the link to the framework’s website, listed at the bottom of the page source.
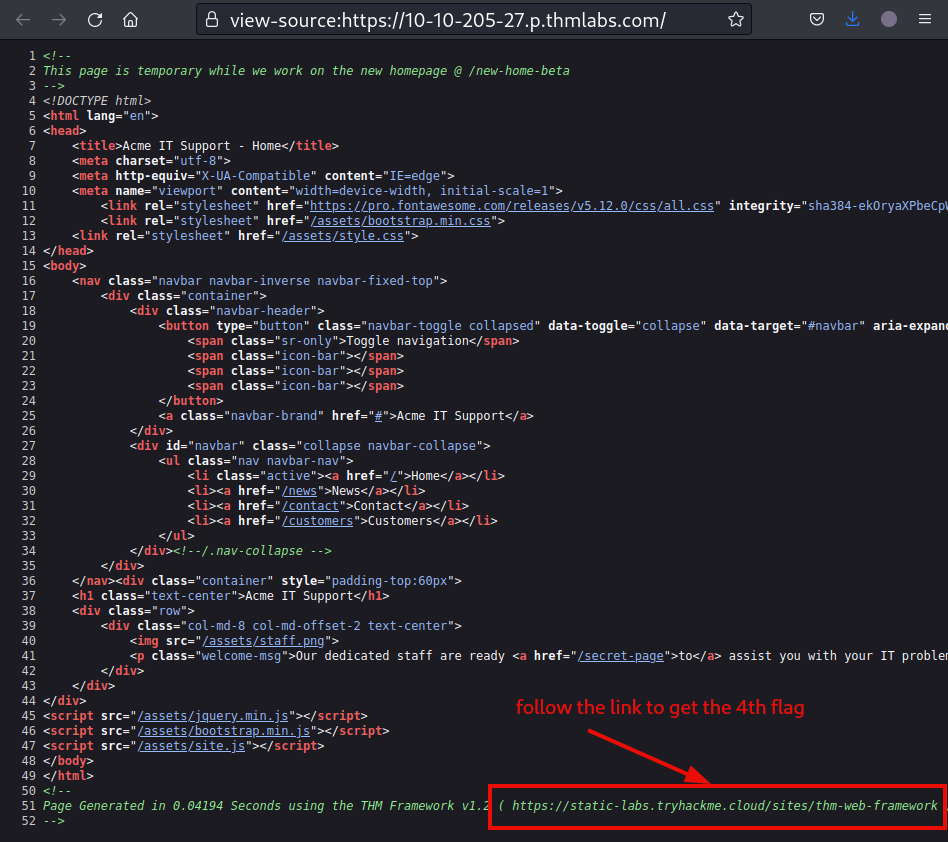
Figure 8: Framework reference within the landing page’s source code
We will notice that our version is one patch behind.
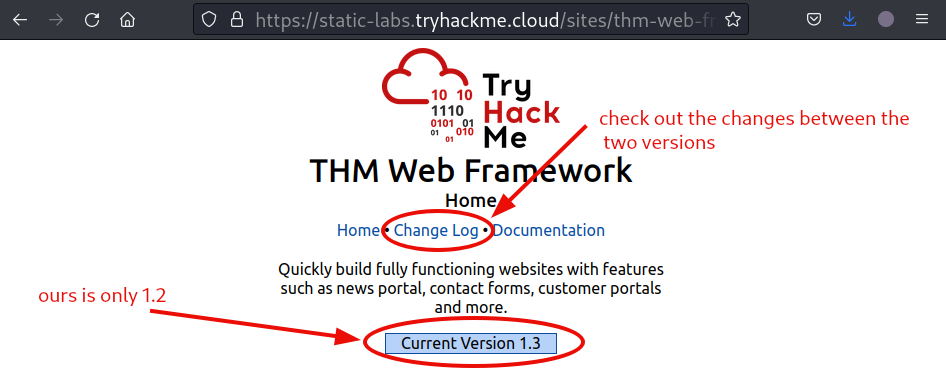
Figure 9: Target potentially running outdated version
Let us examine the changes since the last version. The changelog mentions a file named tmp.zip. Investigate it.
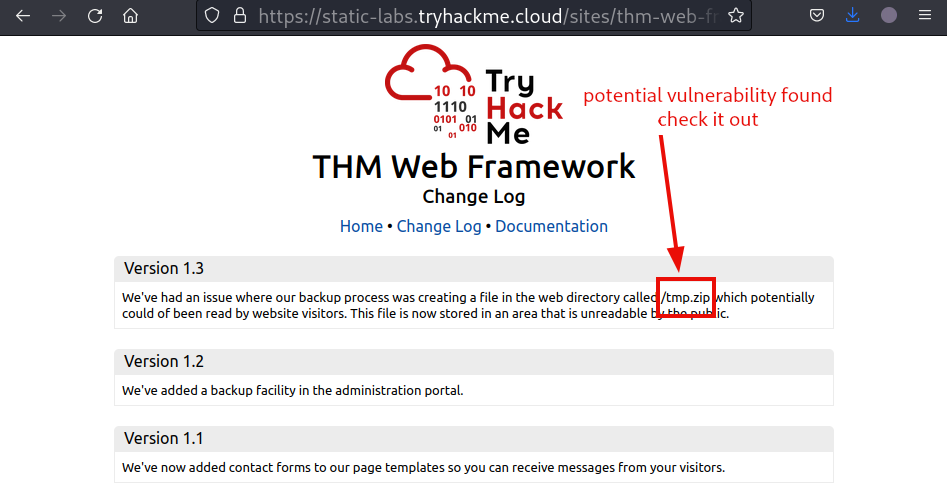
Figure 10: Changelog between the relevant versions
By entering the file path, the browser will automatically attempt to download the file. Allow the download.
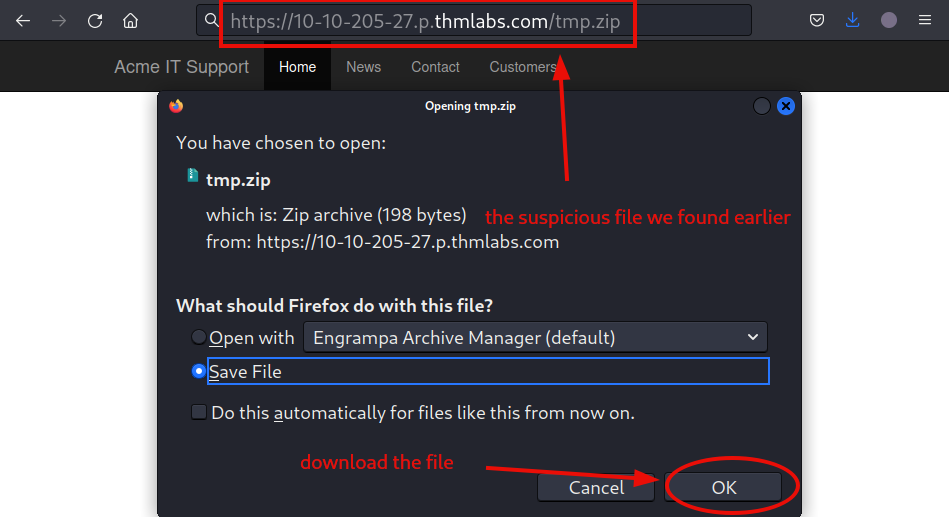
Figure 11: Zip file containing the changelog between the relevant versions
On our system, navigate to the directory where the file was saved and examine its contents. Then extract the compressed file, retrieve the flag, and clean up afterward.
# Change directory and list directory contents
cd Downloads/ ; ls -hlag

# List, test, and extract compressed files in a ZIP archive
unzip tmp.zip

# Concatenate files and print to standard output
cat flag.txt

# Remove files or directories
rm tmp.zip flag.txt
Below is the complete terminal interaction in Kali Linux:
user@kali:~$ cd Downloads/ ; ls -hlag
...
-rw-r--r--  1 user  198 ... tmp.zip
...
user@kali:~$ unzip tmp.zip
Archive:  tmp.zip
 extracting: flag.txt
...
user@kali:~$ cat flag.txt
THM{<redacted-flag>}
user@kali:~$ rm tmp.zip flag.txtDeveloper Tools - Inspector
Read about Developer Tools, and navigate to the /news directory to follow along.
Question 1: What is the flag behind the paywall?
<redacted-flag>
Open the third article, and inspect the blocked-out part as described. Alternatively, open the Inspector from Developer Tools in Firefox by pressing CTRL+SHIFT+I.
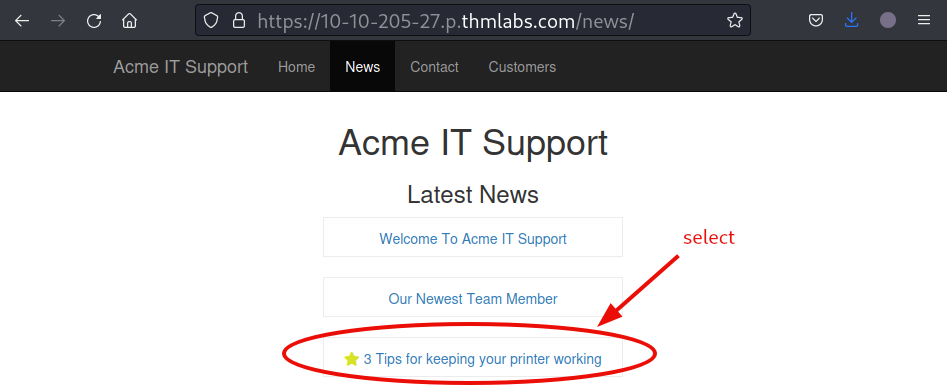
Figure 12: News page on the target website
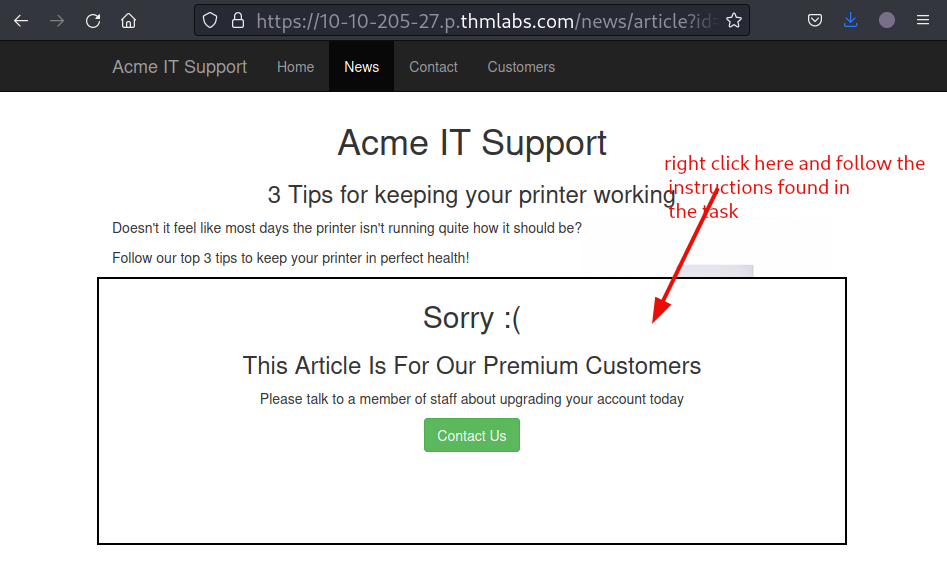
Figure 13: Blocker present for the article
Click on the premium-customer-blocker class in the Inspector module, and change the style from display: block to display: none. This will remove the blocker displayed on the article.
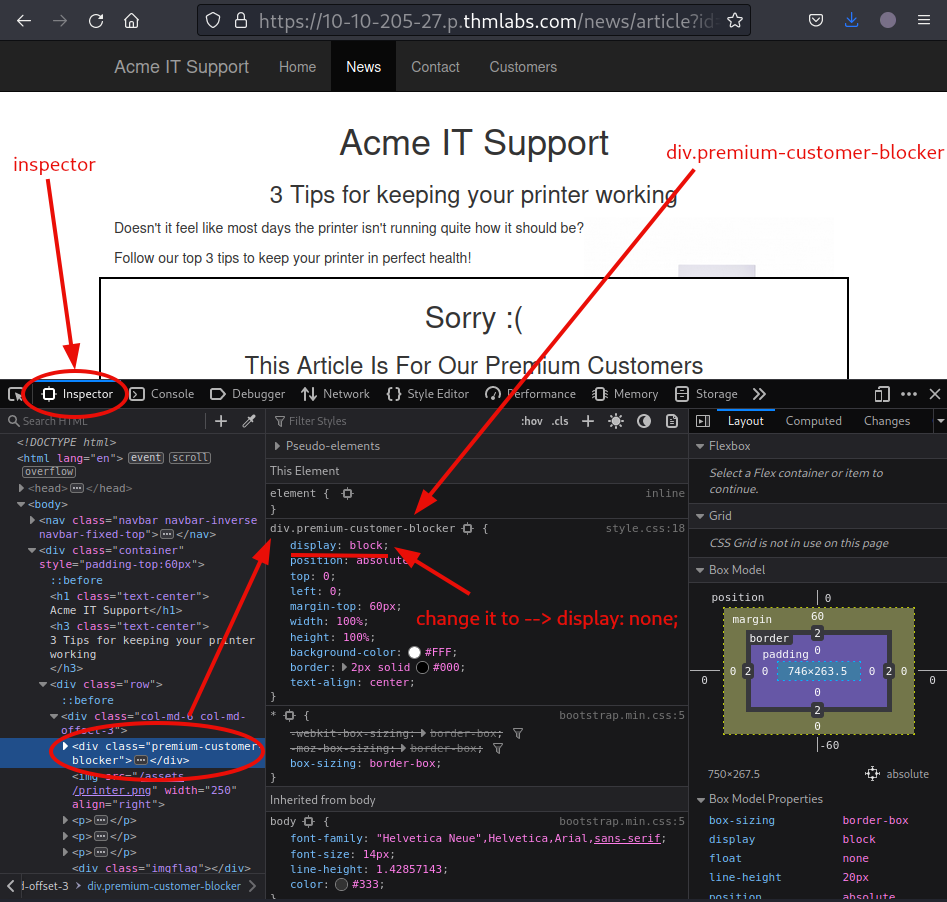
Figure 14: Disabling blocker in Developer Tools
Do not forget to retrieve the flag.
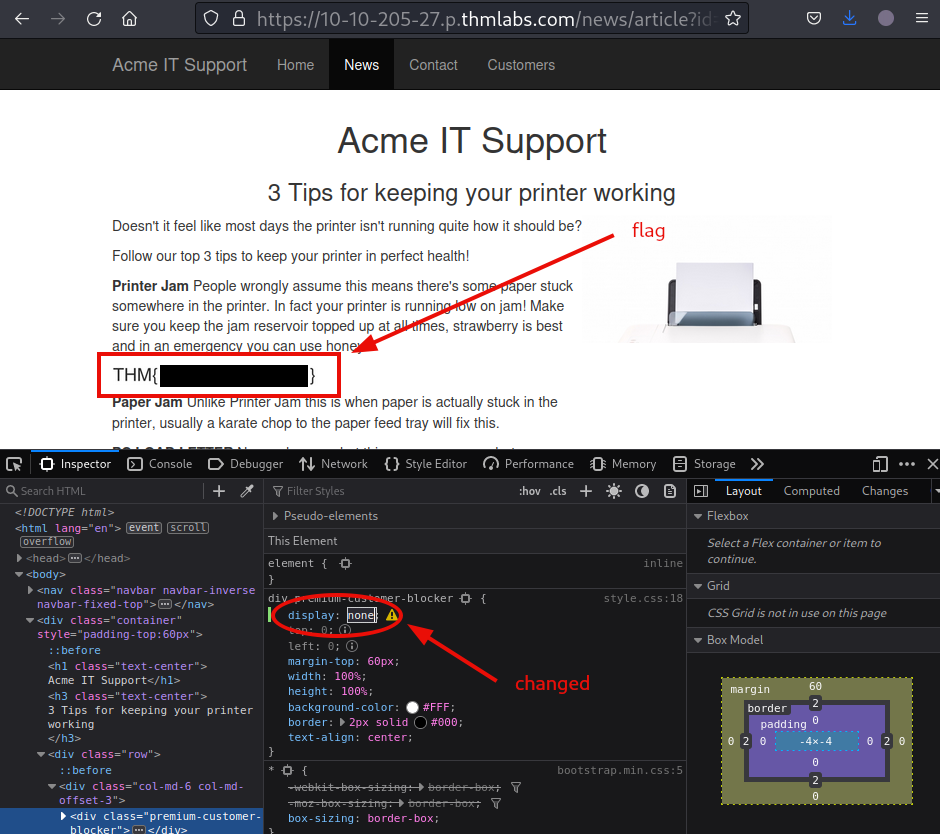
Figure 15: Redacted flag behind the removed blocker
Developer Tools - Debugger
Question 1: What is the flag in the red box?
<redacted-flag>
For the next flag, navigate to the /contract directory and open the Debugger module in Developer Tools. Then examine the flash.min.js JavaScript file stored in the /assets directory. Beautify it with the built-in Pretty Print function for improved readability.
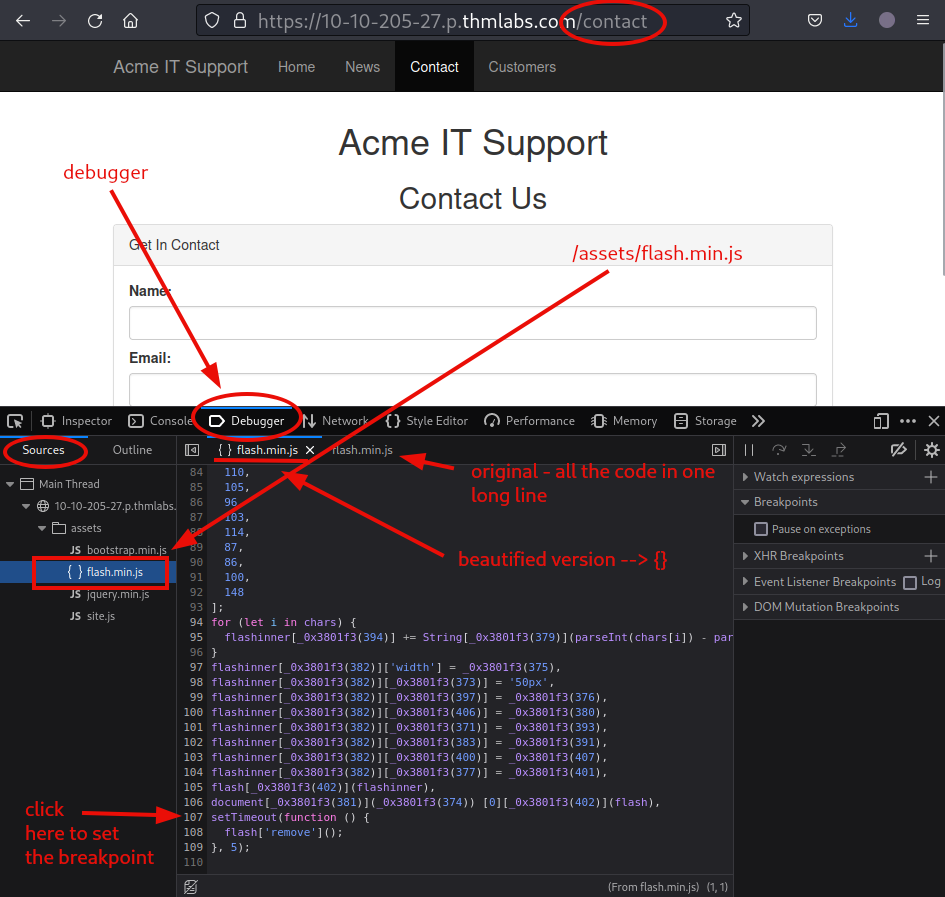
Figure 16: flash.min.js file on the contact page
Set the breakpoint as instructed, and refresh the page.
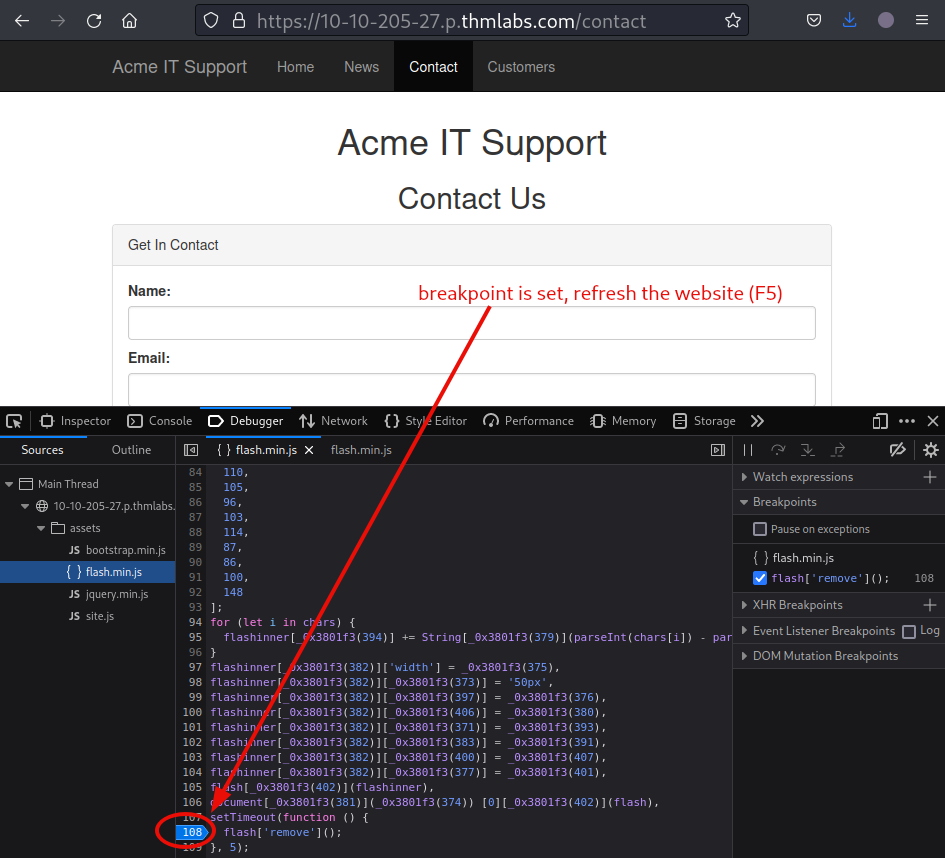
Figure 17: Setting a breakpoint before timeout
Retrieve the flag.
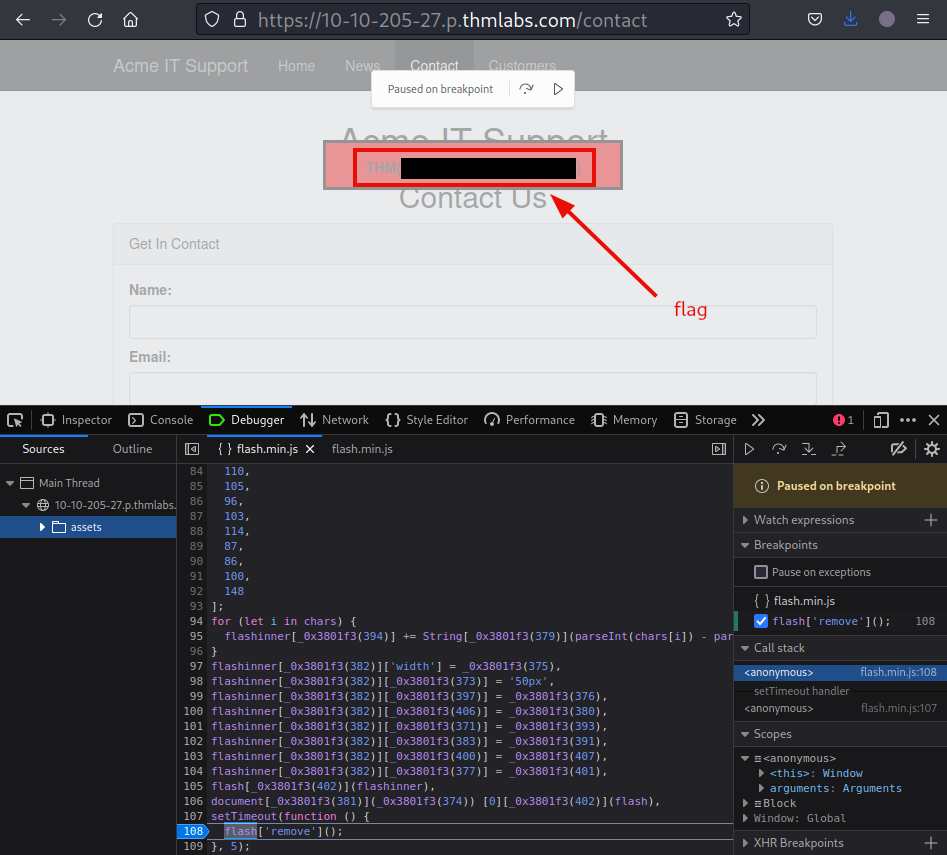
Figure 18: Redacted flag for working around the timeout
Developer Tools - Network
Question 1: What is the flag shown on the contact-msg network request?
<redacted-flag>
For the final flag, first open the Network module in Developer Tools. Then fill out the contact form with sample data, and send the request.
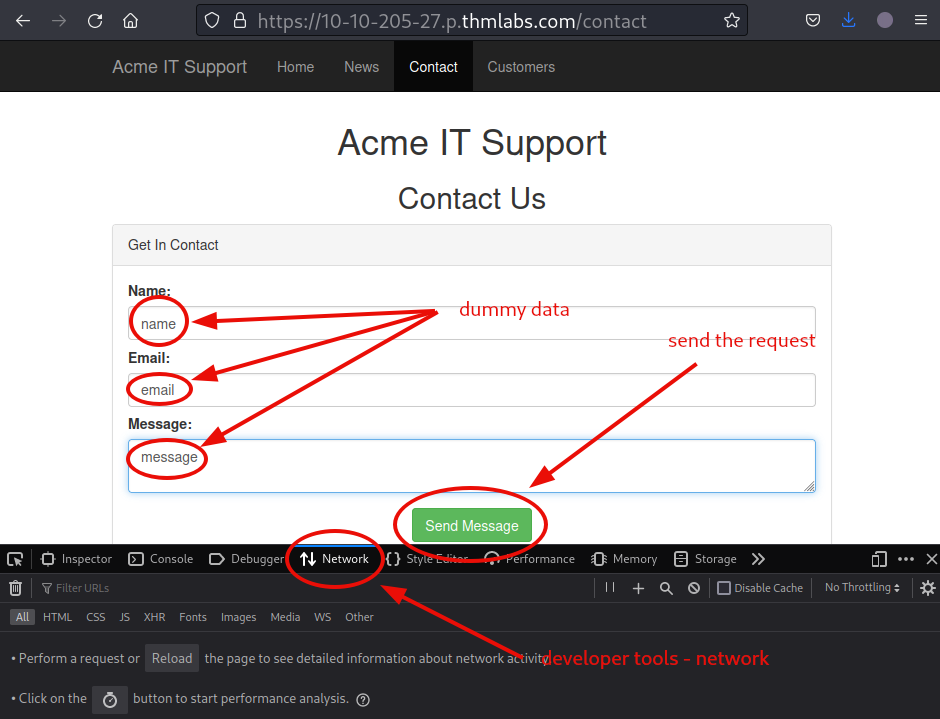
Figure 19: Sample request data for the contact page
A pop-up window notifies us that the request was successfully sent and received. Examine the request for additional details.
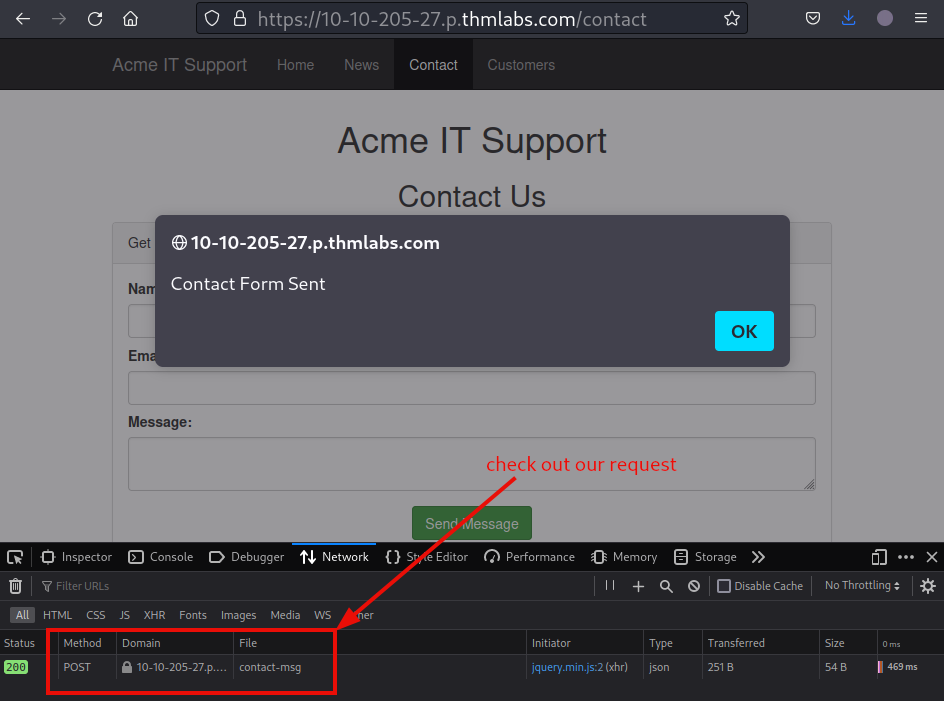
Figure 20: Submitted contact form for the contact page
The final flag is located in the response headers, under a header named X-FLAG. Alternatively, we could navigate directly to /contact-msg to retrieve the same flag.
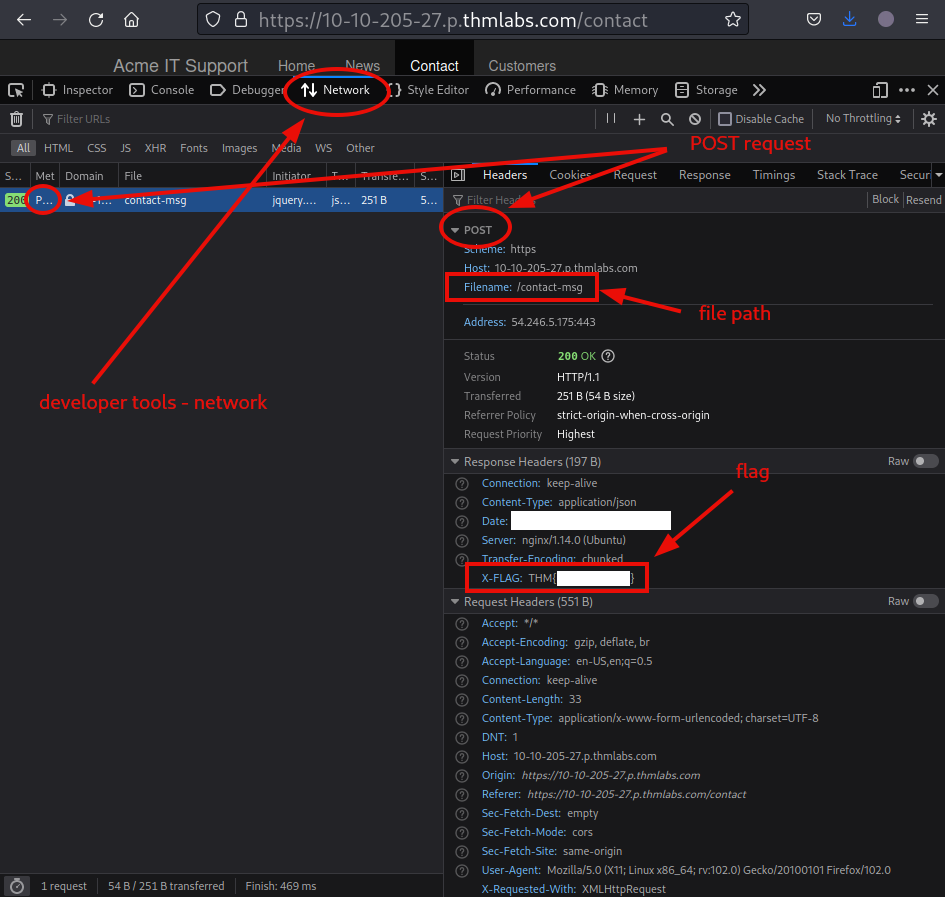
Figure 21: Redacted flag in X-Flag response header
Ensure the machine that was started is terminated before proceeding to the next room.