THM | AoC 2025 | Day 06-07
![]()
Day-06: Malware analysis | Day-07: Network discovery
SUMMARY
On Day 06 (Malware analysis) – we show how to examine a suspicious Windows executable using static tools (PeStudio) and dynamic sandbox techniques (RegShot, ProcMon) to extract hashes, strings, registry changes, and C2 information.
Then on Day 07 (Network discovery), we demonstrate progressive port scanning (Nmap), service enumeration (FTP, custom TCP service, DNS), file retrieval, and post‑exploitation steps (accessing an admin console, enumerating listening ports, and extracting flags from a local MySQL database).

D-06 | Malware Analysis - Egg-xecutable
- TL;DR: Discover some common tooling for malware analysis within a sandbox environment.
- Original Room: TryHackMe | Advent of Cyber 2025 | DAY 06 - Malware Analysis - Egg-xecutable
Storyline
"At night, TBFC’s SOC receives a 3 AM email from Elf McClause with
HopHelper.exe, claiming a new rota program. Elf McBlue flags it as suspicious and initiates a malware investigation. The session covers malware analysis basics, sandboxes, static vs. dynamic analysis, and tools like PeStudio, ProcMon, and Regshot."
Theory
Malware analysis examines malicious files to reveal their behavior and devise defenses—e.g., blocking attacker‑C2 servers or detecting artifacts left on hosts. It splits into static analysis (inspect without execution) and dynamic analysis (run the sample).
Sandboxes provide isolated, disposable environments—typically virtual machines with snapshot capability—where samples can be executed safely, adhering to the core rule: never run dangerous code on production systems.
Static Analysis | PeStudio
Static analysis extracts metadata from a malware sample without running it. Key data points include:
- Checksums – unique hashes for cataloguing and searching (e.g., a93f7e8c4d21b19f2e12f09a5c33e48a).
- Strings – readable text such as IPs, URLs, commands, or passwords (e.g., 138.62.51.186).
- Imports – DLL functions the binary relies on, revealing OS interactions (e.g., CreateFileW).
- Resources – embedded assets like icons that can be used for deception or hide malicious code.
While static clues help form hypotheses, obfuscation can mask true behavior, so execution (dynamic analysis) is ultimately required for confirmation.
Dynamic Analysis | RegShot & ProcMon
Dynamic analysis runs a malware sample in a controlled environment to observe its runtime behavior and interactions with the operating system.
- RegShot: creates two snapshots of the registry—one before the malware is run and another afterwards and then compares them to identify any changes
- ProcMon: monitor and investigate how processes are interacting with the Windows operating system
Q & A
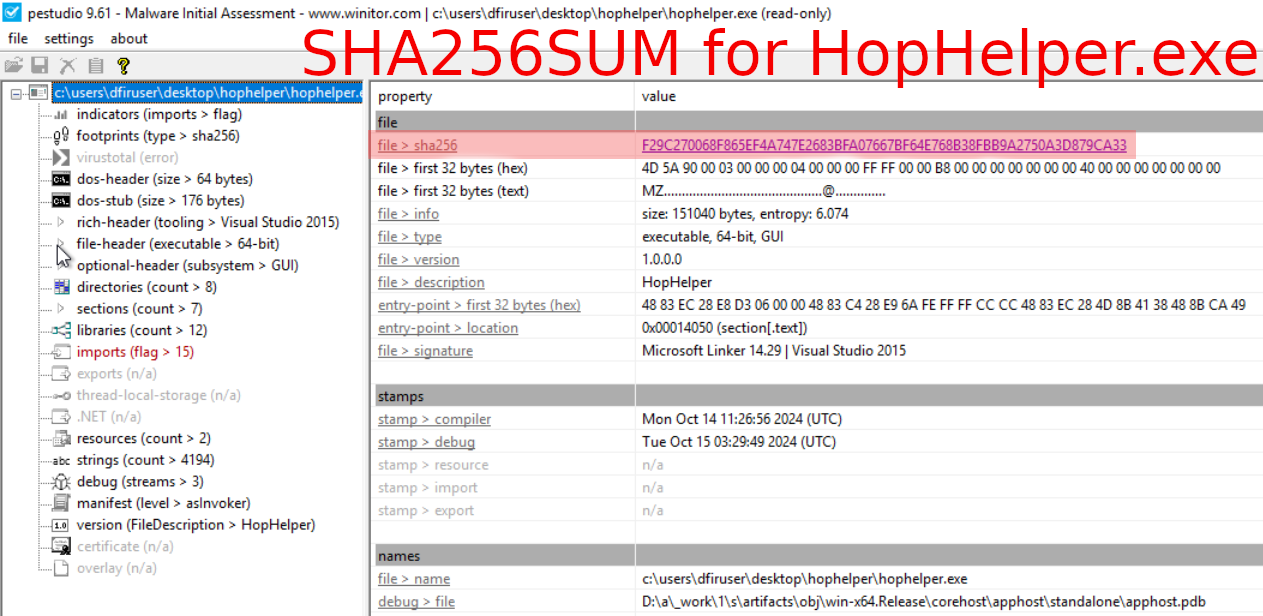
Question-1: Static analysis: What is the SHA256Sum of the HopHelper.exe?
F29C270068F865EF4A747E2683BFA07667BF64E768B38FBB9A2750A3D879CA33
Launch PeStudio > Load the executable (Desktop\hophelper\HopHelper.exe) into PeStudio > Click on the "indicators" tab in the dropdown > Look for the SHA256SUM.
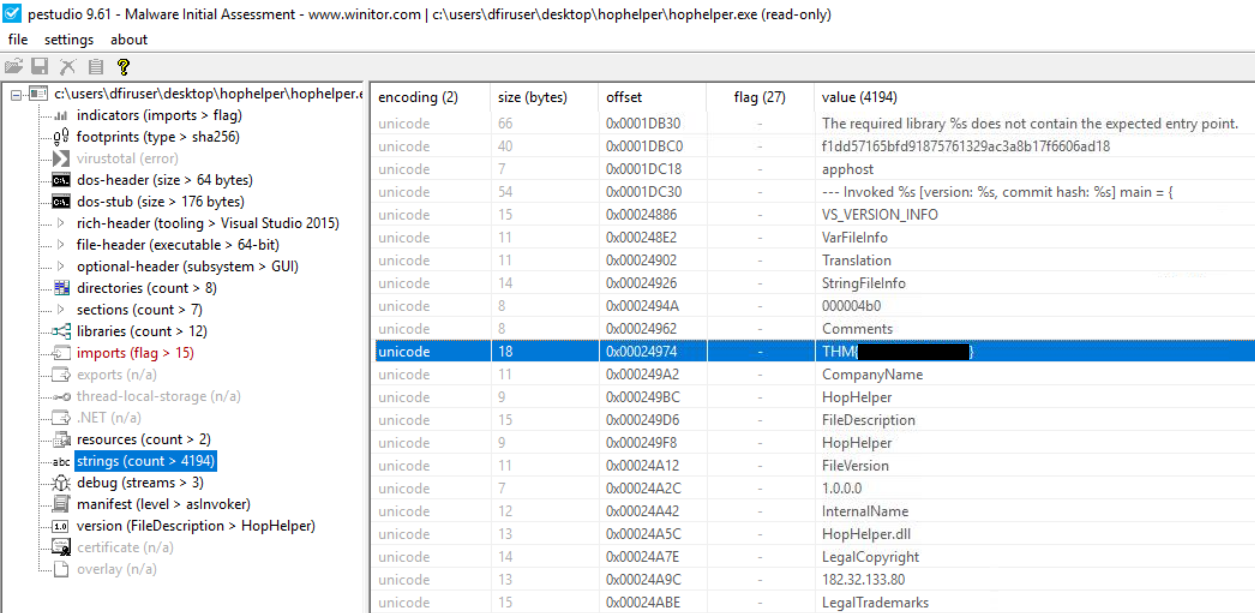
Question-2: Static analysis: Within the strings of HopHelper.exe, a flag with the format THM{XXXXX} exists. What is that flag value? Note, this can be found towards the bottom of the strings output.
THM{<flag>}
Within PeStudio, loaded with the HopHelper binary, check on the "strings" tab in the dropdown and search for the THM{...REDACTED...} string value.
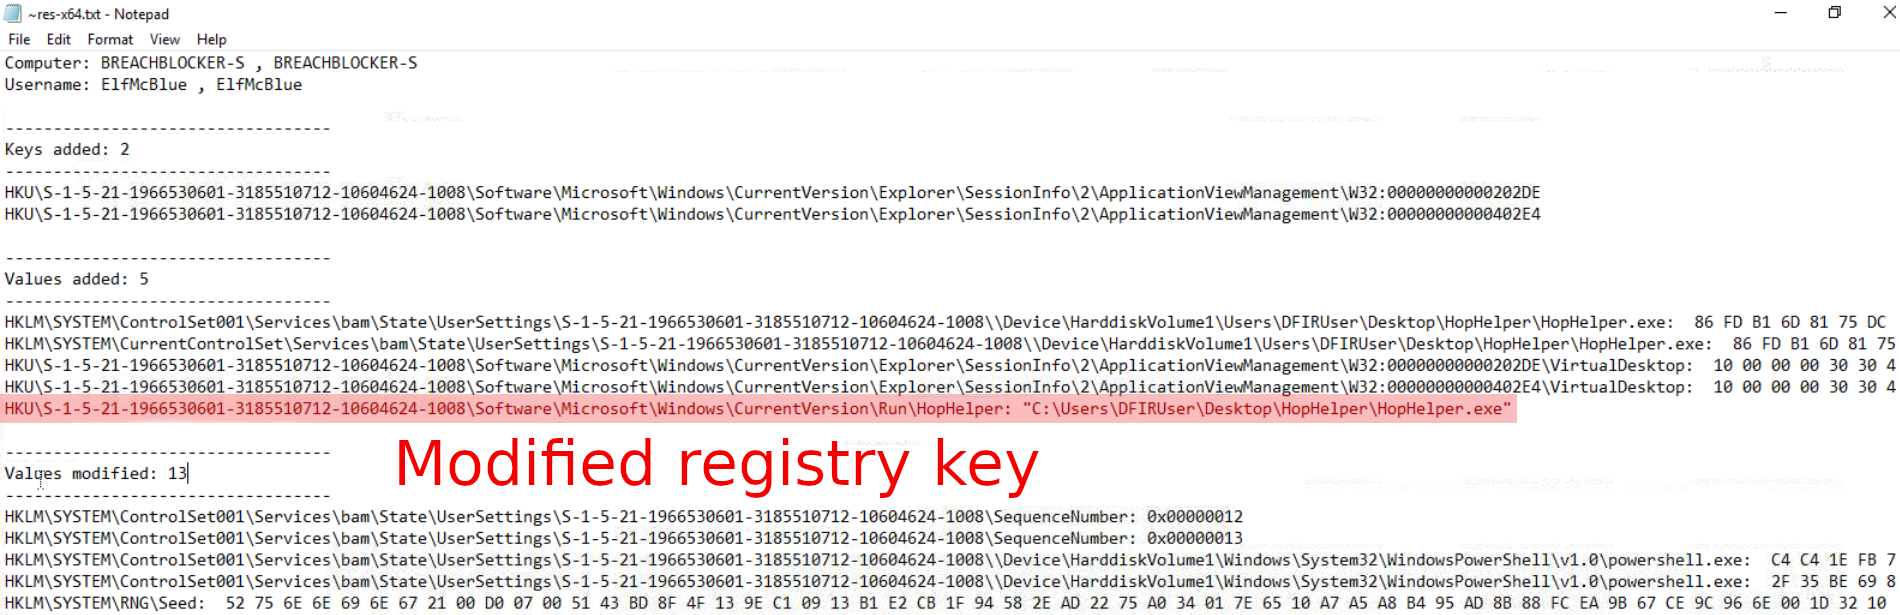
Question-3: Dynamic analysis: What registry value has the HopHelper.exe modified for persistence? Note: Provide the full path of the key that has been modified
HKU\S-1-5-21-1966530601-3185510712-10604624-1008\Software\Microsoft\Windows\CurrentVersion\Run\HopHelper
Create a registry capture with Regshot, launch the malicious binary (HopHelper.exe), then create a 2nd registry capture. Check the differences between the two captures with Regshot's "Compare" function to identify the modified registry values.
Question-4: If you enjoyed today's room, feel free to explore both the Basic Static Analysis and Basic Dynamic Analysis rooms, where you can delve deeper into the techniques and tools discussed today.
No answer needed
BONUS
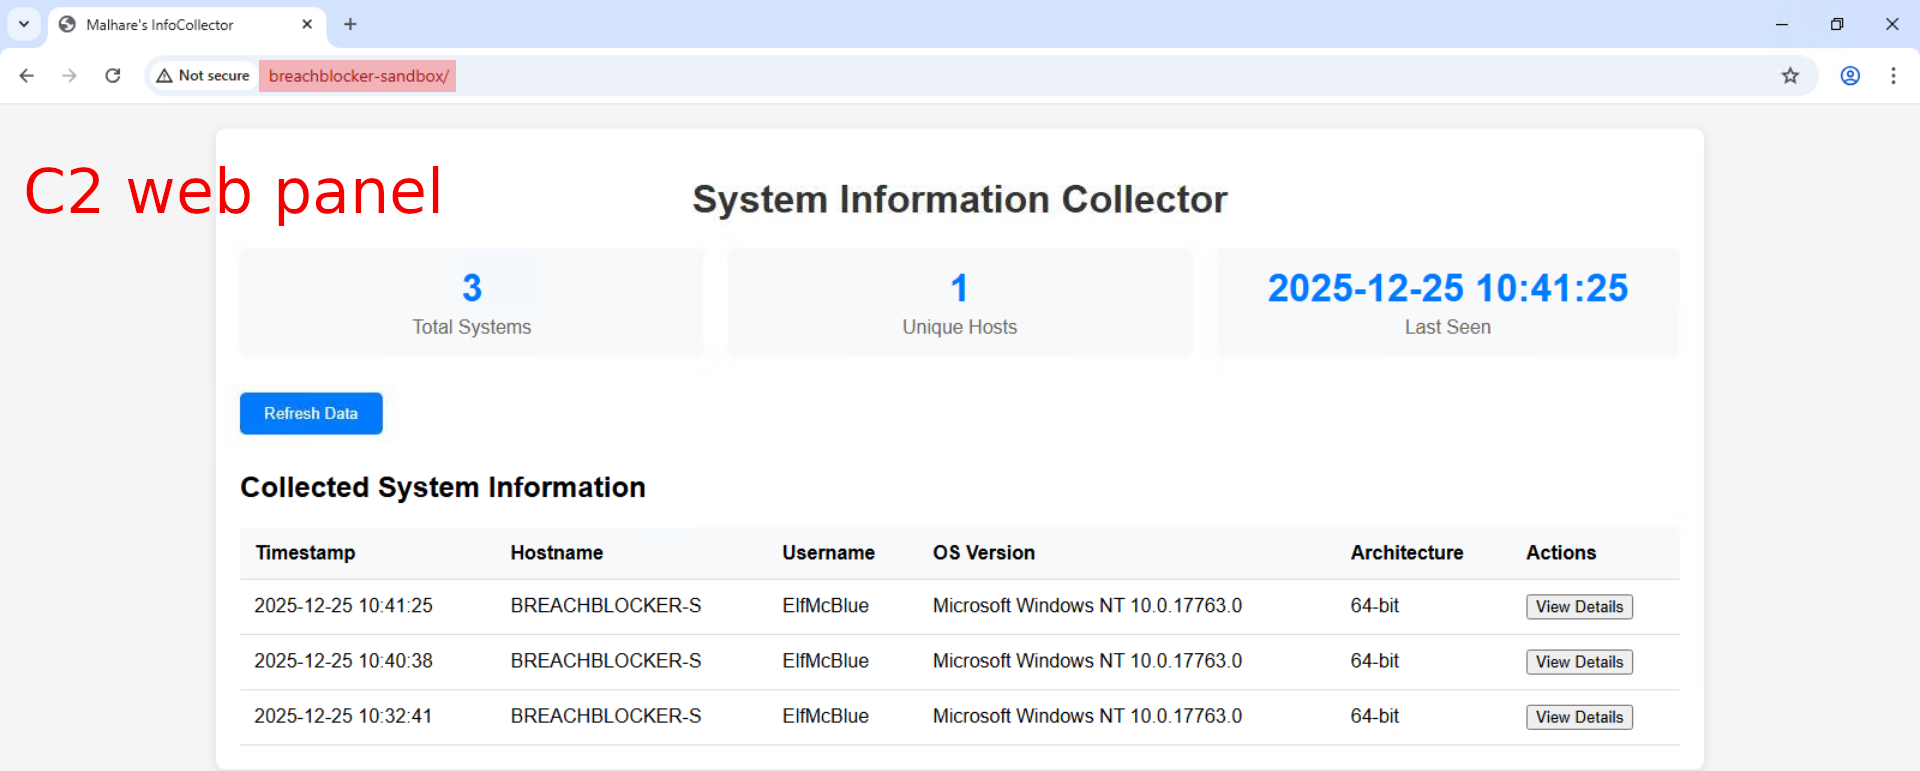
Bonus-Question: Can you find the web panel that HopHelper.exe is communicating with?
Open ProcMon, start capturing events (default setting), execute the malicious binary, stop capturing events. Use the "Filter" to narrow down the search by first filtering for the HopHelper.exe "Process Name", then by filtering for "Operations" that contain the word "TCP". There are only 4 such events listed. Look for the "Path" field for the C2 panel.

Once the C2-panel is identified, we can check it out with a web-browser.

D-07 | Network Discovery - Scan-ta Clause
- TL;DR: Discover how to scan network ports and uncover what is hidden behind them.
- Original Room: TryHackMe | Advent of Cyber 2025 | DAY 07 - Network Discovery - Scan-ta Clause
Storyline
"HopSec breached the QA server (tbfc‑devqa01), locking out access and halting the TBFC projects and SOC‑mas pipeline. The compromised server is gradually turning into a “twisted EAST‑mas” node. The task is to trace HopSec’s activity, regain entry to the server, and restore it before the “bunny” takeover completes."
Discover Network Services
Let's start with the simplest (default) port scan, which scans the most common top 1000 TCP ports.
┌──(user㉿kali)-[~]
└─$ nmap 10.82.130.66
[...SNIP...]
PORT   STATE SERVICE
22/tcp open  ssh
80/tcp open  http
[...SNIP...]
┌──(user㉿kali)-[~]
└─$
Only 2 ports are reported open, p22/tcp and p80/tcp. Checking on the web portal (p80/tcp) provides us with the answer for the 1st question.

We continue by scanning the whole range, aka all the TCP ports and use --script=banner to run an additional script scan where we connect to the open service and return whatever identification text (service banner) they return.
┌──(user㉿kali)-[~]
└─$ nmap -p- --script=banner 10.82.130.66
[...SNIP...]
PORT      STATE SERVICE
22/tcp    open  ssh
|_banner: SSH-2.0-OpenSSH_9.6p1 Ubuntu-3ubuntu13.14
80/tcp    open  http
21212/tcp open  trinket-agent
|_banner: 220 (vsFTPd 3.0.5)
25251/tcp open  unknown
|_banner: TBFC maintd v0.2\x0AType HELP for commands.
[...SNIP...]
┌──(user㉿kali)-[~]
└─$
Some additional interesting open ports are discovered here. Let's try accessing the FTP service we just found on port 21212 in anonymous mode.
┌──(user㉿kali)-[~]
└─$ ftp 10.82.130.66 21212
Connected to 10.82.130.66.
220 (vsFTPd 3.0.5)
Name (10.82.130.66:user): anonymous
230 Login successful.
Remote system type is UNIX.
Using binary mode to transfer files.
ftp> ls
229 Entering Extended Passive Mode (|||15846|)
^C
receive aborted. Waiting for remote to finish abort.
The connection appears to be successful, but somehow we entered "Extended Passive" Mode. Let's switch it off and enter into active mode by typing passive. Once in active mode, let us take a quick look around the directory we are currently in.
ftp> passive
Passive mode: off; fallback to active mode: off.
ftp> ls
200 EPRT command successful. Consider using EPSV.
150 Here comes the directory listing.
-rw-r--r--    1 ftp      ftp            13 Oct 22 16:27 tbfc_qa_key1
226 Directory send OK.
There is a tbfc_qa_key1 file in the directory, let's grab it with get and then close our connection by exiting it.
ftp> get tbfc_qa_key1
local: tbfc_qa_key1 remote: tbfc_qa_key1
200 EPRT command successful. Consider using EPSV.
150 Opening BINARY mode data connection for tbfc_qa_key1 (13 bytes).
100% |***********************************************************************************************|    13        5.64 KiB/s    00:00 ETA
226 Transfer complete.
13 bytes received in 00:00 (0.21 KiB/s)
ftp> exit
221 Goodbye.
Once we check on the file, we find the first key for the challenge.
┌──(user㉿kali)-[~]
└─$ ll
[...SNIP...]
-rw-rw-r-- 1 user user   13 Oct 22 17:27 tbfc_qa_key1
[...SNIP...]
┌──(user㉿kali)-[~]
└─$ cat tbfc_qa_key1
KEY1:3aster_

┌──(user㉿kali)-[~]
└─$
Moving on, let's try identifying the service running on port 25251 with netcat. Once we establish a connection, we are welcomed with a service version TBFC maintd v0.2 and a message about the usage of the custom service.
┌──(user㉿kali)-[~]
└─$ nc -v 10.82.130.66 25251
10.82.130.66: inverse host lookup failed: Unknown host
(UNKNOWN) [10.82.130.66] 25251 (?) open
TBFC maintd v0.2
Type HELP for commands.
By using the custom HELP command, we get a list of the available commands. Running them one-by-one provides us with the second flag when we run the GET KEY custom command.
HELP
Commands: HELP, STATUS, GET KEY, QUIT
STATUS
status: armed_for=43s, port=25251
GET KEY
KEY2:15_th3_
QUIT
bye

┌──(user㉿kali)-[~]
└─$
With the second key in hand, let's continue scanning on the UDP side and scan the most common top 1000 UDP ports.
┌──(user㉿kali)-[~]
└─$ nmap -sU 10.82.130.66
[...SNIP...]
PORT   STATE SERVICE
53/udp open  domain
[...SNIP...]
┌──(user㉿kali)-[~]
└─$
Given the DNS service we just found, let's query it for the third key.
┌──(user㉿kali)-[~]
└─$ dig @10.82.130.66 TXT key3.tbfc.local
[...SNIP...]
;; QUESTION SECTION:
;key3.tbfc.local.               IN      TXT

;; ANSWER SECTION:
key3.tbfc.local.        0       IN      TXT     "KEY3:n3w_xm45"
[...SNIP...]
┌──(user㉿kali)-[~]
└─$
With the 3 keys collected, let's log in to the server's admin panel (Click on "Unlock)

and access the secret admin console by submitting the combined keys (3aster_15_th3_n3w_xm45), then click on "Go to Terminal". We are welcomed by a "Secret Admin Console".

After gaining console access, you can list open (listening) ports directly with ss -tunlp (or netstat on older systems) from the web app’s Secret Admin Console. The output shows services listening on all interfaces (0.0.0.0) and some bound only to localhost (127.0.0.1).
In addition to the previously discovered open TCP ports (p22/tcp,p80/tcp,p21212/tcp,p25251/tcp), there are some other (p53/tcp,p8000/tcp,p3306/tcp,p7681/tcp) previously hidden TCP ports we discover here. Some of them, p8000/tcp, p3306/tcp, p7681/tcp, are only available to the host itself and not exposed otherwise.
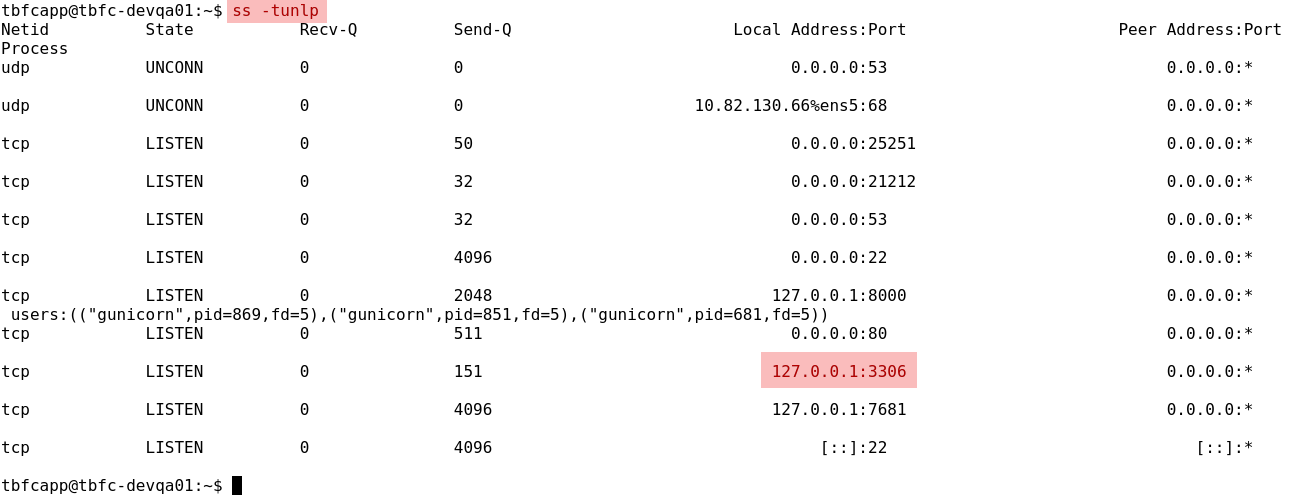
With root rights you could even see the associated processes, but the focus here is port 3306, the default MySQL port. MySQL typically requires a password for remote connections but permits unauthenticated logins from localhost, allowing you to inspect database contents using the mysql client while already on the host.
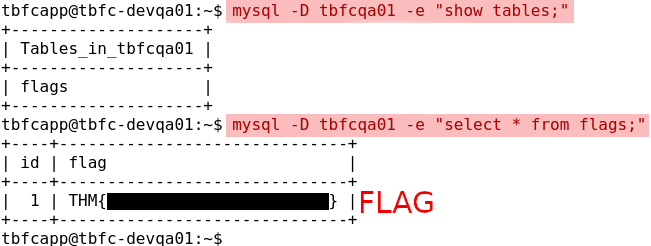
Let us try and see if we can access the database without any credentials. We first check on the tables with mysql -D tbfcqa01 -e "show tables;" and then grab the flag with mysql -D tbfcqa01 -e "select * from flags;".
Q & A
Question-1: What evil message do you see on top of the website?
Pwned by HopSec
Question-2: What is the first key part found on the FTP server?
3aster_
Question-3: What is the second key part found in the TBFC app?
15_th3_
Question-4: What is the third key part found in the DNS records?
n3w_xm45
Question-5: Which port was the MySQL database running on?
3306
Question-6: Finally, what's the flag you found in the database?
THM{<flag>}
Question-7: If you enjoyed today's room, feel free to check out the Nmap: The Basics room.
No answer needed